Wednesday, March 11, 2015
Automate Google Analytics Reporting Using Google Apps Script
Editors note: This has been cross-posted with the Google Analytics blog and the Google Developers blog -- Jan Kleinert
Many people have been asking for a simple way to put Google Analytics data into a Google Spreadsheet. Once the data is inside a Google Spreadsheet, users can easily manipulate Google Analytics data, create new visualizations, and build internal dashboards.
So today we released a new integration that dramatically reduces the work required to put Google Analytics data into any Apps Script supported product, such as Google Docs, Sites, or Spreadsheets.
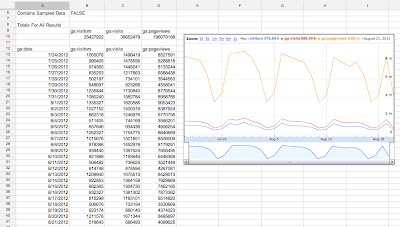
Here’s an example of Google Analytics data accessed through Apps Script and displayed in a Google Spreadsheet.
Custom API Dashboards - No Code Required
We know that a popular use case of this integration will be to create dashboards that automatically update. To make this easy to do, we’ve added a script to the Spreadsheets script gallery that handles all this work - no code required. The script is called Google Analytics Report Automation (Magic).
This script is a great template for starting your own project, and we’ve had many internal Google teams save hours of time using this tool. Here’s a video demoing how to build a dashboard using this script:
You can find this script by opening or creating a Google Spreadsheet, clicking Tools -> Script Gallery and searching for “analytics magic”.
Writing Your Own Script
Of course many developers will want to write their own code. With the new Analytics – Apps Script integration, you can request the total visitors, visits, and pageviews over time and put this data into a spreadsheet with just the following code:
// Get Data.
var results = Analytics.Data.Ga.get(
    tableId,
    startDate,
    endDate,
    ga:visitors,ga:visits,ga:pageviews,
    {‘dimensions’: ‘ga:date’});

// Output to spreadsheet.
var sheet = SpreadsheetApp.getActiveSpreadsheet().insertSheet();
sheet.getRange(2, 1, results.getRows().length, headerNames.length)
    .setValues(results.getRows());

// Make Sandwich.
To get started now, read our Automated Access to Google Analytics Data in Google Spreadsheets tutorial. Also check out the Google Analytics Apps Script reference docs.
Solving Business Problems
Are you ready to start building solutions using Google Analytics and Google Apps Script?
We’d love to hear new ways you use this integration to help manipulate, visualize and present data to solve business problems. To encourage you to try out this integration, we are giving out Google Analytics developer t-shirts to the first 15 developers to build a solution using both APIs.
To be eligible, you must publish your solution to either the Chrome Web Store or the Spreadsheets Script Gallery and include a description of a business problem the script solves. We’ll then collect these scripts and highlight the solutions in an upcoming blog post. After you publish your script, fill out this form to share what you’ve built.
We’re looking forward to seeing what you can do with this integration.
 | Nick Mihailovski profile Nick is a Senior Developer Programs Engineer working on the Google Analytics API. In his spare time he likes to travel around the world. |

Announcing Election Info Using Apps Script to Provide Voting Information
It’s time for the 2012 General Election in the United States and along with it comes the tedious process of finding your voter registration, polling sites, times, directions, etc. The previously announced Google Civic Information API provides a great service to programmatically obtain much of this information based on the your home address. Google Apps Script makes it really quick and easy to build a web application that queries this information and uses various Google services to organize and track your information.
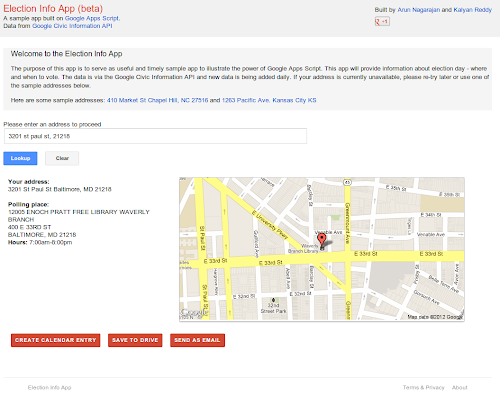
Election Info is a sample application built using Apps Script that can:
- Query the Google Civic Information API to find polling locations and hours using client side JavaScript and AJAX.
- Display polling information using
HtmlServicewith jQuery for a clean effective UI. - Generate static maps via
UrlFetchand theMapsServiceto show polling maps and directions. - Create a calendar event for election day with your polling location using the Calendar service.
- Generate a bring-along document with poll directions and hours using the Document service.
- Send you an email with a summary with your polling place information using the Gmail service.
- Store your previous searches in
UserPropertiesso it will remember your likely home address the next time you launch the app.
As you can see, this is a comprehensive sample app that is useful while also highlighting key Apps Script capabilities.
Install the app from the Chrome Web Store. Check back soon as we will be writing a blog post with details and sample code on how the sample was built.
 | Arun Nagarajan profile | twitter Arun is a Developer Advocate on Google Apps Script. Arun works closely with the community of partners, customers and developers to help them build compelling applications on top of Google Apps using Apps Script. In the past, he spent over 9 years building and designing platforms and infrastructure for enterprise mobile applications.. Arun is originally from the Boston area and enjoys basketball and snowboarding. |
Tuesday, March 10, 2015
Documents List API Best Practices Sharing Multiple Documents Using Collections
Google Docs supports sharing collections and their contents with others. This allows multiple Google Docs resources to be shared at once, and for additional resources added to the collection later to be automatically shared.
Class.io, an EDU application on the Google Apps Marketplace, uses this technique. When a professor creates a new course, the application automatically creates a Google Docs collection for that course and shares it with all the students. This gives the students and professor a single place to go in Google Docs to access and manage all of their course files.
A collection is a Google Docs resource that contains other resources, typically behaving like a folder on a file system.
A collection resource is created by making an HTTP POST to the feed link with the category element’s term set to http://schemas.google.com/docs/2007#folder, for example:
<?xml version=1.0 encoding=UTF-8?>
<entry xmlns="http://www.w3.org/2005/Atom">
  <category scheme="http://schemas.google.com/g/2005#kind"
      term="http://schemas.google.com/docs/2007#folder"/>
  <title>Example Collection</title>
</entry>
To achieve the same thing using the Python client library, use the following code:
from gdata.docs.data import Resource

collection = Resource(folder)
collection.title.text = Example Collection

# client is an Authorized client
collection = client.create_resource(entry)
The new collection returned has a content element indicating the URL to use to add new resources to the collection. Resources are added by making HTTP POST requests to this URL.
<content
  src="https://docs.google.com/feeds/default/private/full/folder%3A134acd/contents"
  type="application/atom+xml;type=feed" />
This process is simplified in the client libraries. For example, in the Python client library, resources can be added to the new collection by passing the collection into the create_resource method for creating resources, or the move_resource method for moving an existing resource into the collection, like so:
# Create a new resource of document type in the collection
new_resource = Resource(type=document, title=New Document)
       client.create_resource(new_resource, collection=collection)

# Move an existing resource
client.move_resource(existing_resource, collection=collection)
Once resources have been added to the collection, the collection can be shared using ACL entries. For example, to add the user user@example.com as a writer to the collection and every resource in the collection, the client creates and adds the ACL entry like so:
from gdata.acl.data import AclScope, AclRole
from gdata.docs.data import AclEntry

acl = AclEntry(
    scope = AclScope(value=user@example.com, type=user),
    role = AclRole(value=writer)
)

client.add_acl_entry(collection, acl)
The collection and its contents are now shared, and this can be verified in the Google Docs user interface:
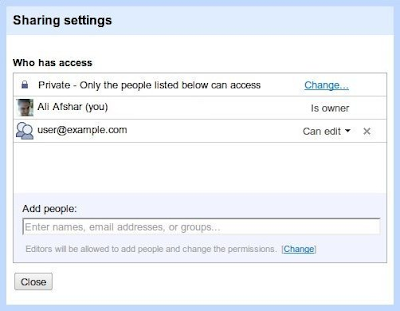
Note: if the application is adding more than one ACL entry, it is recommended to use batching to combine multiple ACL entries into a single request. For more information on this best practice, see the latest blog post on the topic.
The examples shown here are using the raw protocol or the Python client library. The Java client library also supports managing and sharing collections.
For more information on how to use collections, see the Google Documents List API documentation. You can also find assistance in the Google Documents List API forum.
 | Ali Afshar profile | twitter Ali is a Developer Programs engineer at Google, working on Google Docs and the Shopping APIs which help shopping-based applications upload and search shopping content. As an eternal open source advocate, he contributes to a number of open source applications, and is the author of the PIDA Python IDE. Once an intensive care physician, he has a special interest in all aspects of technology for healthcare. |
Wednesday, February 18, 2015
C program to produce the folowing design using s

#include<stdio.h>
#include<conio.h>
void main()
{
int i,j,n;
char ch=A;
clrscr(); //to clear the screen
printf("How many lines?");
scanf("%d",&n);
for(i=0;i<n;++i)
{
for(j=0;j<=i;++j)
printf("%c",ch+j);
printf("
");
}
getch(); //to stop the screen
}
Saturday, February 14, 2015
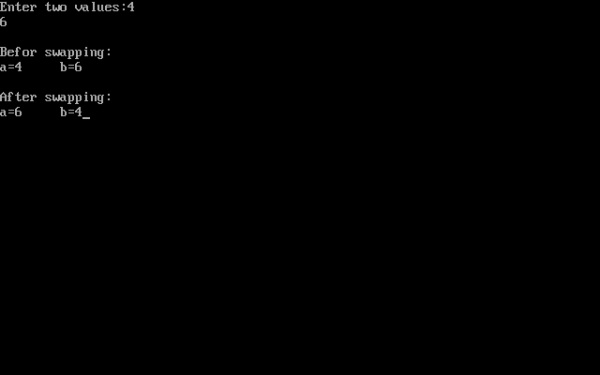
C program to swap values of two variables using pass by reference method
#include<iostream.h>
#include<conio.h>
void main()
{
clrscr();
int a,b;
void swap(int &,int &);
cout<<"Enter two values:";
cin>>a>>b;
cout<<"
Befor swapping:
a="<<a<<" b="<<b;
swap(a,b);
cout<<"
After swapping:
a="<<a<<" b="<<b;
getch();
}
void swap(int & x,int & y)
{
int temp;
temp=x;
x=y;
y=temp;
}
Wednesday, February 11, 2015
C program to produce the following design using s

#include<stdio.h>
#include<conio.h>
void main()
{
int i,j,k,n;
clrscr(); //to clear the screen
printf("How many lines:");
scanf("%d",&n);
n*=2;
printf("
");
for(i=1;i<n;i+=2)
{
for(j=n-1;j>i;j-=2)
printf(" ");
for(k=1;k<=i;++k)
{
if(i==n-1)
printf("*");
else
if(k==1||k==i)
printf("*");
else
printf(" ");
}
printf("
");
}
getch(); //to stop the screen;
}
Create your own Facebook Phishing Page Using Wapka

"Phishing Method Hack Facebook Account using WAPKA"
Phishing is a way of deceiving your victim by making him login through one of your webpages which is a copy of the original one. By doing so the fake webpage will save his E-mail ID or username and password. This is used for criminal activities for stealing Credits Cards and So on.
Now we are going to make a ~FAKE LOGIN page of Facebook.
Lets start the tutorial...
First create a new wapka account from the link below.
 |
| Create Your Own Facebook Mobile Phishing Phishing Page Using Wapka |
Step 2: Editing Wapka Texts
Login to your Wapka account. Goto Settings>Edit text> Forum/chat and change the following words,
Name: Email or Phone
Text: Password
Submit: Log In
Its shown in the screenshot below.
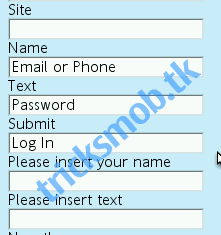 | |
|
Step 3: Create a new forum
Create a new forum to save all hacked usernames and passwords in your site.
You can do it by Edit Site>Forum
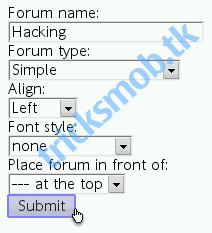 | |
|
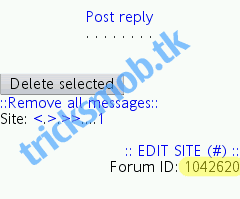
The forum we create above will be visible to everyone. Now we have to change its visiblity, so that admin can only view the hacked usernames and passwords.
You can do it by Edit site>Users>Items visibility
Mark X to make it visible only in admin mode.
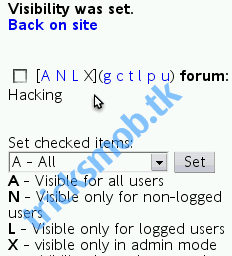
Step 5: Uploading Facebook Mobile Phisher Page Source Code
Just copy and paste the code below in your site.
For Phishing Code CLICK HERE
Step 6: You can add it by Edit site>WML/HTML code
Note: But before pasting, edit the code and replace XXXXXXX with your Forum ID( as you found it in step 4) and remove spaces in small form tag.
Now you can see your fully designed facebook phishing page.
But therell be only one filed instead of Email or Phone and Password fields.
Dont worry, wapka wont ask usernames when you are logged in.
So just logout your admin mode or open your site url in a new tab. Youll see a page like this.
 |
| Create Your Own Facebook Mobile Phishing Page Using Wapka |
Now use your social engineering skill to make the vitim to login in your site. You can send him a message with your link.
Disclaimer: DO NOT use this for fraudulent activities use this just to gain knowledge and not to cause harm to other people in any sort.
Download HTML Source Code
Wednesday, February 4, 2015
AS3 Animation Tutorial Using the AS3 EnterFrame Event to Create Animation in Flash Video Tutorial
Lecturer, Ateneo de Manila University
You can use AS3 to add some animation to your Flash project using code. Instead of adding tweens on the timeline, youll be using AS3 to animate objects. In this ActionScript video tutorial, Ill show you a few simple examples on how to create animation in Flash using the AS3 EnterFrame event.
AS3 Animation Tutorial - Using the AS3 EnterFrame Event to Create Animation in Flash
AS3 EnterFrame Event Animation Sample Code #1
Here is the code for the first example where the circle will continue to scale up as long as the movie is running.
var growthRate:Number = 2;

circle_mc.addEventListener(Event.ENTER_FRAME, grow);

function grow(e:Event):void
{
     e.target.width += growthRate;
     e.target.height += growthRate;
}
AS3 EnterFrame Event Animation Sample Code #2
In the second example, the animation will stop when the circles size reaches 150 pixels.
var growthRate:Number = 2;
var maxSize:Number = 150;

circle_mc.addEventListener(Event.ENTER_FRAME, grow);

function grow(e:Event):void
{
     e.target.width += growthRate;
     e.target.height += growthRate;
     if(e.target.width >= maxSize)
     {
          circle_mc.removeEventListener(Event.ENTER_FRAME, grow);
     }
}
AS3 EnterFrame Event Animation Sample Code #3
In the third example, the code has been modified to make the circle grow and then shrink repeatedly.
var growthRate:Number = 2;
var maxSize:Number = 150;
var minSize:Number = 100;
var scaleMode:String = "grow";

circle_mc.addEventListener(Event.ENTER_FRAME, growShrink);

function growShrink(e:Event):void
{
     if(scaleMode == "grow")
     {
          e.target.width += growthRate;
          e.target.height += growthRate;
          if(e.target.width >= maxSize)
          {
               scaleMode = "shrink";
          }
     }
     else if(scaleMode == "shrink")
     {
          e.target.width -= growthRate;
          e.target.height -= growthRate;
          if(e.target.width <= minSize)
          {
               scaleMode = "grow";
          }
     }
}Monday, February 2, 2015
Creating a Pentomino game using AS3 Part 18
For a pentomino level to be valid, it has to pass a few checks. The two conditionals Im placing for a level to be valid is the correct cell count and correct shape count. The cell count must be divideable by 5 and remain a round number, and the number of shapes must be enough to fill all the cells.
First of all go to the pentomino_editor object in your Flash library and add a new button to the tool panel, give it an id of "btn_save".
Now go to the script file and in the constructor add a mouse click listener for this button. I also added 2 lines that set canPutShapes mouseEnabled and mouseChildren properties to false.
public function pentomino_editor()
{
addEventListener(MouseEvent.MOUSE_MOVE, onMouseMove);
addEventListener(MouseEvent.MOUSE_DOWN, onMouseDown);
addEventListener(MouseEvent.MOUSE_UP, onMouseUp);
addEventListener(Event.ENTER_FRAME, onEnterFrame);

// add shape buttons
for (var i:int = 0; i < 4; i++) {
for (var u:int = 0; u < 3; u++) {
var shapeButton:MovieClip = new edit_shape();
shapeButton.x = 528 + u * 62;
shapeButton.y = 15 + i * 84;
addChild(shapeButton);
shapeButton.bg.alpha = 0.3;
shapeButton.shape.gotoAndStop(3 * i + u + 1);
shapeButtons.push(shapeButton);
shapeButton.addEventListener(MouseEvent.ROLL_OVER, buttonOver);
shapeButton.addEventListener(MouseEvent.ROLL_OUT, buttonOut);
}
}

// buttons
btn_mainmenu.addEventListener(MouseEvent.CLICK, doMainmenu);
btn_reset.addEventListener(MouseEvent.CLICK, function():void { newLevel() } );
btn_save.addEventListener(MouseEvent.CLICK, doSave);

// new level
newLevel();

addChild(gridShape);
addChild(canPutShape);
canPutShape.mouseEnabled = false;
canPutShape.mouseChildren = false;
}
The click event handler traces "Save!" if the level passed validation. We use checkSave() function that returns a boolean value for validation.
private function doSave(evt:MouseEvent):void {
if (checkSave()) {
trace("Save!");
}
}
First thing we do in that function is declare some variables and count how many cells there are using a loop:
// count total cells
var totalCells:int = 0;
var i:int;
var u:int;
var width:int = mapGrid[0].length;
var height:int = mapGrid.length;

for (i = 0; i < height; i++) {
for (u = 0; u < width; u++) {
if (mapGrid[i][u] == 1) totalCells++;
}
}
Check if the total cell count number divided by 5 is not a round number, trace an error in that case and return false:
// check if total cells can be divided by 5
if (totalCells / 5 != Math.round(totalCells / 5)) {
trace("Error! Incorrect cell count: " + totalCells);
return false;
}
Now count how many available shapes there are:
// count total available shape count
var totalShapes:int = 0;

for (i = 0; i < shapeButtons.length; i++) {
totalShapes += shapeButtons[i].count.value;
}
As you can see, we use the values of the "count" NumericStepper objects inside each edit_shape object.
Then we check if the number of cells is greater than what the available shapes can provide:
// check if there are enough shapes available
if (totalCells > totalShapes * 5) {
trace("Error! Not enough shapes available: " + totalShapes + " out of " + totalCells/5);
return false;
}
And we return true if everything is ok.
Full function:
private function checkSave():Boolean {
// count total cells
var totalCells:int = 0;
var i:int;
var u:int;
var width:int = mapGrid[0].length;
var height:int = mapGrid.length;

for (i = 0; i < height; i++) {
for (u = 0; u < width; u++) {
if (mapGrid[i][u] == 1) totalCells++;
}
}

// check if total cells can be divided by 5
if (totalCells / 5 != Math.round(totalCells / 5)) {
trace("Error! Incorrect cell count: " + totalCells);
return false;
}

// count total available shape count
var totalShapes:int = 0;

for (i = 0; i < shapeButtons.length; i++) {
totalShapes += shapeButtons[i].count.value;
}

// check if there are enough shapes available
if (totalCells > totalShapes * 5) {
trace("Error! Not enough shapes available: " + totalShapes + " out of " + totalCells/5);
return false;
}

return true;
}
Full code:
package
{
import flash.display.MovieClip;
import flash.display.Sprite;
import flash.events.Event;
import flash.events.KeyboardEvent;
import flash.events.MouseEvent;
import flash.geom.Point;
import flash.sampler.NewObjectSample;
import flash.utils.ByteArray;

/**
 * Open-source pentomino game engine
 * @author Kirill Poletaev
 */

public class pentomino_editor extends MovieClip
{
private var mapGrid:Array = [];
private var shapeButtons:Array = [];

private var gridShape:Sprite = new Sprite();
private var canPutShape:Sprite = new Sprite();
private var gridStartX:int;
private var gridStartY:int;
private var gridCellWidth:int;
private var canDraw:Boolean = false;
private var mouseDown:Boolean = false;
private var currentCell:Point = new Point(-1, -1);

public function pentomino_editor()
{
addEventListener(MouseEvent.MOUSE_MOVE, onMouseMove);
addEventListener(MouseEvent.MOUSE_DOWN, onMouseDown);
addEventListener(MouseEvent.MOUSE_UP, onMouseUp);
addEventListener(Event.ENTER_FRAME, onEnterFrame);

// add shape buttons
for (var i:int = 0; i < 4; i++) {
for (var u:int = 0; u < 3; u++) {
var shapeButton:MovieClip = new edit_shape();
shapeButton.x = 528 + u * 62;
shapeButton.y = 15 + i * 84;
addChild(shapeButton);
shapeButton.bg.alpha = 0.3;
shapeButton.shape.gotoAndStop(3 * i + u + 1);
shapeButtons.push(shapeButton);
shapeButton.addEventListener(MouseEvent.ROLL_OVER, buttonOver);
shapeButton.addEventListener(MouseEvent.ROLL_OUT, buttonOut);
}
}

// buttons
btn_mainmenu.addEventListener(MouseEvent.CLICK, doMainmenu);
btn_reset.addEventListener(MouseEvent.CLICK, function():void { newLevel() } );
btn_save.addEventListener(MouseEvent.CLICK, doSave);

// new level
newLevel();

addChild(gridShape);
addChild(canPutShape);
canPutShape.mouseEnabled = false;
canPutShape.mouseChildren = false;
}

private function onMouseMove(evt:MouseEvent):void {
if(mapGrid.length>0){
var mousePos:Point = new Point(Math.floor((mouseX - gridStartX) / gridCellWidth), Math.floor((mouseY - gridStartY) / gridCellWidth));
canPutShape.x = mousePos.x * gridCellWidth + gridStartX;
canPutShape.y = mousePos.y * gridCellWidth + gridStartY;
if (mousePos.x < mapGrid[0].length && mousePos.y < mapGrid.length && mousePos.x >= 0 && mousePos.y >= 0) {
canPutShape.alpha = 1;
}else {
canPutShape.alpha = 0;
}
}
}

private function newLevel():void {
canDraw = false;

var newScreen:MovieClip = new new_edit_screen();
addChild(newScreen);
newScreen.tWidth.restrict = "0-9";
newScreen.tHeight.restrict = "0-9";
newScreen.tWidth.text = 10;
newScreen.tHeight.text = 6;
newScreen.incorrect.alpha = 0;
newScreen.btn_continue.addEventListener(MouseEvent.CLICK, editContinue);

function editContinue(evt:MouseEvent):void {
if (newScreen.tWidth.text == "" || newScreen.tHeight.text == "" || newScreen.tWidth.text == "0" || newScreen.tHeight.text == "0") {
newScreen.incorrect.alpha = 1;
return;
}
newScreen.parent.removeChild(newScreen);
mapGrid = [];
var width:int = newScreen.tWidth.text;
var height:int = newScreen.tHeight.text;
for (var i:int = 0; i < height; i++) {
mapGrid[i] = [];
for (var u:int = 0; u < width; u++) {
mapGrid[i][u] = 1;
}
}
// grid settings
calculateGrid();
gridShape.x = gridStartX;
gridShape.y = gridStartY;

// draw tiles
drawGrid();

// canPutShape settings
canPutShape.graphics.clear();
canPutShape.graphics.lineStyle(2, 0xff0000);
canPutShape.graphics.drawRect(0, 0, gridCellWidth, gridCellWidth);
canPutShape.alpha = 0;

canDraw = true;
}
}

private function calculateGrid():void {
var columns:int = mapGrid[0].length;
var rows:int = mapGrid.length;

// free size: 520x460
// fit in: 510x450

// calculate width of a cell:
gridCellWidth = Math.round(510 / columns);

var width:int = columns * gridCellWidth;
var height:int = rows * gridCellWidth;

// calculate side margin
gridStartX = (520 - width) / 2;

if (height < 450) {
gridStartY = (450 - height) / 2;
}
if (height >= 450) {
gridCellWidth = Math.round(450 / rows);
height = rows * gridCellWidth;
width = columns * gridCellWidth;
gridStartY = (460 - height) / 2;
gridStartX = (520 - width) / 2;
}
}

private function drawGrid():void {
gridShape.graphics.clear();
var width:int = mapGrid[0].length;
var height:int = mapGrid.length;

var i:int;
var u:int;

// draw background
for (i = 0; i < height; i++) {
for (u = 0; u < width; u++) {
if (mapGrid[i][u] == 1) drawCell(u, i, 0xffffff, 1, 0x999999);
}
}
}

private function drawCell(width:int, height:int, fill:uint, thick:Number, line:uint):void {
gridShape.graphics.beginFill(fill);
gridShape.graphics.lineStyle(thick, line);
gridShape.graphics.drawRect(width * gridCellWidth, height * gridCellWidth, gridCellWidth, gridCellWidth);
}

private function buttonOver(evt:MouseEvent):void {
evt.currentTarget.bg.alpha = 1;
}

private function buttonOut(evt:MouseEvent):void {
evt.currentTarget.bg.alpha = 0.3;
}

private function doMainmenu(evt:MouseEvent):void {
(root as MovieClip).gotoAndStop(1);
}

private function onMouseDown(evt:MouseEvent):void {
mouseDown = true;
}

private function onMouseUp(evt:MouseEvent):void {
mouseDown = false;
currentCell = new Point(-1, -1)
}

private function onEnterFrame(evt:Event):void {
// if drawing is allowed and mouse is down
if (canDraw && mouseDown) {
var mousePos:Point = new Point(Math.floor((mouseX - gridStartX) / gridCellWidth), Math.floor((mouseY - gridStartY) / gridCellWidth));
// if valid coordinates
if (mousePos.x < mapGrid[0].length && mousePos.y < mapGrid.length && mousePos.x >= 0 && mousePos.y >= 0) {
// if the cell is not "current cell"
if (mousePos.x != currentCell.x || mousePos.y != currentCell.y) {
currentCell.x = mousePos.x;
currentCell.y = mousePos.y;
if (mapGrid[mousePos.y][mousePos.x] == 1) {
mapGrid[mousePos.y][mousePos.x] = 0;
}else {
mapGrid[mousePos.y][mousePos.x] = 1;
}
drawGrid();
}
}
}
}

private function doSave(evt:MouseEvent):void {
if (checkSave()) {
trace("Save!");
}
}

private function checkSave():Boolean {
// count total cells
var totalCells:int = 0;
var i:int;
var u:int;
var width:int = mapGrid[0].length;
var height:int = mapGrid.length;

for (i = 0; i < height; i++) {
for (u = 0; u < width; u++) {
if (mapGrid[i][u] == 1) totalCells++;
}
}

// check if total cells can be divided by 5
if (totalCells / 5 != Math.round(totalCells / 5)) {
trace("Error! Incorrect cell count: " + totalCells);
return false;
}

// count total available shape count
var totalShapes:int = 0;

for (i = 0; i < shapeButtons.length; i++) {
totalShapes += shapeButtons[i].count.value;
}

// check if there are enough shapes available
if (totalCells > totalShapes * 5) {
trace("Error! Not enough shapes available: " + totalShapes + " out of " + totalCells/5);
return false;
}

return true;
}

}

}
Thanks for reading!
Saturday, January 31, 2015
How to Connect XenServer and Operating VM Using Java


import com.xensource.xenapi.Connection;
import java.io.IOException;
import java.io.PrintWriter;
import javax.servlet.ServletException;
import javax.servlet.http.HttpServlet;
import javax.servlet.http.HttpSession;
import javax.servlet.http.HttpServletRequest;
import javax.servlet.http.HttpServletResponse;

/**
 *
 * @author Faruk Shaik
 */
public class connection extends HttpServlet {
    public static String IP;
    protected void processRequest(HttpServletRequest request, HttpServletResponse response)
            throws ServletException, IOException {
        response.setContentType("text/html;charset=UTF-8");
        PrintWriter out = response.getWriter();
        try {
          String ip=request.getParameter("IP");
          IP="http://"+ip;
          String uname=request.getParameter("uname");
          String pass=request.getParameter("pass");
          Connection conn = new Connection(IP,uname,pass);
          if(conn!=null)
          {
          HttpSession hs=request.getSession();
          hs.setAttribute("ip",IP);
          hs.setAttribute("uname",uname);
          hs.setAttribute("pass",pass);
                         javax.swing.JOptionPane.showMessageDialog(null,"connection established");
                 response.sendRedirect("task.jsp");
          }

        }
        catch(Exception e)
        {
             javax.swing.JOptionPane.showMessageDialog(null,"connection not established");
              response.sendRedirect("connection.jsp");
        }
            finally {
            out.close();
        }

    }
    public String s()
    {
        return IP;
    }
}
import com.xensource.xenapi.APIVersion;
import com.xensource.xenapi.Connection;
import com.xensource.xenapi.*;
import com.xensource.xenapi.VM;
import java.io.IOException;
import java.io.PrintWriter;
import java.util.Map;
import javax.servlet.ServletException;
import javax.servlet.http.HttpServlet;
import javax.servlet.http.HttpServletRequest;
import javax.servlet.http.HttpServletResponse;
import javax.servlet.http.HttpSession;
/**
*
* @author Faruk Shaik
*/
public class vmlife extends HttpServlet {
protected void processRequest(HttpServletRequest request, HttpServletResponse response)
throws ServletException, IOException {
response.setContentType("text/html;charset=UTF-8");
PrintWriter out = response.getWriter();
String name1=null;
try {
HttpSession hs=request.getSession();
String ip=(String)hs.getAttribute("ip");
String uname=(String)hs.getAttribute("uname");
String pass=(String)hs.getAttribute("pass");
Connection conn = new Connection(ip,uname,pass);
String name=request.getParameter("count");
if(name.equalsIgnoreCase("start"))
{
String vmname=request.getParameter("vmname");
Mapvms=VM.getAllRecords(conn);
for(VM.Record record: vms.values())
{
if(!record.isATemplate&&!record.isControlDomain )
{
if(vmname.equals(record.nameLabel.toString()))
{
VM.getByUuid(conn,record.uuid).start(conn, false, false);
name1="VM"+vmname+" started successfully";
}
}
}
}
else if(name.equalsIgnoreCase("shut"))
{
String vmname=request.getParameter("vmname");
Mapvms=VM.getAllRecords(conn);
for(VM.Record record: vms.values())
{
if(!record.isATemplate&&!record.isControlDomain )
{
if(vmname.equals(record.nameLabel.toString()))
{
VM.getByUuid(conn,record.uuid).hardShutdown(conn);
name1="VM"+vmname+" shutdown successfully";
}
}
}
}
else if(name.equalsIgnoreCase("reboot"))
{
String vmname=request.getParameter("vmname");
Mapvms=VM.getAllRecords(conn);
for(VM.Record record: vms.values())
{
if(!record.isATemplate&&!record.isControlDomain )
{
if(vmname.equals(record.nameLabel.toString()))
{
VM.getByUuid(conn,record.uuid).hardReboot(conn);
name1="VM" +vmname+"rebooted successfully";
}
}
}
}
}
catch(Exception e){
System.out.println(e);
javax.swing.JOptionPane.showMessageDialog(null,"xen excepton is"+e);
}finally {
out.close();
}
}
}
Monday, January 26, 2015
Using Adobe Bridge CS5 and Customizing the Photoshop CS5 Workspace Video Tutorials
The rest of the training course focuses on more advanced Photoshop CS5 tutorials on topics such as using Photoshop CS5 for print and web layouts, painting techniques, the pen tool, and creating special effects. You can access the rest of the training course by signing up for a VTC Online University membership.
About the Course
Course: Adobe Photoshop CS5 Pro User Skill Sets
Author: Geoff Blake
Release Date: 2011-02-03
Duration: 8 hrs
Course Description
Ready to take your Photoshop skills to the next level? Dive in with award-winning software trainer, artist, and designer Geoff Blake, and learn how to take your Photoshop skills to the max. First, youll see how to sort and organize your images in Bridge and how to customize Photoshop to suit your needs. Then, Geoff will show you how to use Photoshop for both print design and web design, using a step-by-step approach to creating sleek, contemporary layouts. Next, you will master Photoshops Pen tool and put your new-found skills to use when you learn how to make accurate selections and work along with InDesign. Finally, youll discover techniques for creating eye-popping special effects and how to output your work in both the print and web environments. To begin learning today, simply click on the movie links.
About the VTC Online University
The VTC Online University is one of the worlds leading software training sites. They have been providing top-quality online training since 1999. Their company offers over 900 video training courses on various topics including animation & 3D, game design & development, graphics & page layout, multimedia & video, networking & security, programming, business applications, and more.
Course Topics
Overview
Organizing Images with Adobe Bridge
A Look at Mini Bridge
Touring the Mini Bridge Interface
Previewing in Mini Bridge
Mini Bridge View Options
Navigating with Mini Bridge
Touring the Adobe Bridge Interface
Previewing Images
Image Metadata
Keywords & Keyword Searches
Filtering Your Images
Creating Folders & Moving Images
Collections & Smart Collections
Customizing Photoshop
Review: Workspaces
Customizing Keyboard Shortcuts
Customizing Photoshop Menus
If you would like to have access to the rest of the videos, sign up for a VTC Online University membership today! For $30, youll get one month access to ALL of their training courses. Thats over 900 video training courses! No long-term commitment required.
Using Photoshop for Print Layout
Getting Ready for Layout
Setting Photoshops Unit of Measurement
Creating & Managing Guides
Using the Grid & Snapping
Creating the Disc Template
A Trick for Setting Up Guides
Finishing the Template
Inserting Design Elements
Photoshop Typography Options
Typography & Layer Styles
Applying a Saved Style
Illustrator Smart Objects pt. 1
Illustrator Smart Objects pt. 2
Finishing Up the Layout
Using Photoshop for Web Layout
Setting Up a Web Layout File
Inserting the Design Elements
Building a Web Menu
Finishing Off the Layout
Photoshop Painting Techniques
Setting Up Layers for Painting
Using Photoshops Brush Tool
Paint Brush Tool Techniques
Painting with Multiple Colors
Sampling with the Eyedropper Tool
Mixing Colors in the Color Panel
Saving Color Swatches
Mixing with Photoshops Color Picker
Saving & Loading Swatches pt. 1
Saving & Loading Swatches pt. 2
Introducing Gradients
Using the Gradient Editor
Applying a Gradient to the Artwork
Using the Eraser Tool
Creating Custom Brushes
Photoshop Pen Tool Mastery
Understanding Paths & the Pen Tool
Creating Straight Path Segments
Creating Curved Path Segments pt. 1
Creating Curved Path Segments pt. 2
Creating Combination Paths pt. 1
Creating Combination Paths pt. 2
Continuing Paths & Adding Anchors
Manipulating Paths & Anchor Points
Using Paths To Create Selection pt. 1
Using Paths To Create Selection pt. 2
Clipping Paths for InDesign pt. 1
Clipping Paths for InDesign pt. 2
Creating Special Effects
Invert Posterize & Threshold
Creating Black & White Images pt. 1
Creating Black & White Images pt. 2
Creating Black & White Images pt. 3
Creating Duotone Effects pt. 1
Creating Duotone Effects pt. 2
Creating Glow Effects pt. 1
Creating Glow Effects pt. 2
Creating Glow Effects pt. 3
Creating Glow Effects pt. 4
Creating Chiseled Ice pt. 1
Creating Chiseled Ice pt. 2
Creating Chiseled Ice pt. 3
Creating Chiseled Ice pt. 4
Using Photoshop for Print Design
Photoshop Print Workflow pt. 1
Photoshop Print Workflow pt. 2
Photoshop Print Workflow pt.3
Layer Comps with InDesign pt. 1
Layer Comps with InDesign pt. 2
Using Photoshop for Web Design
Understanding Web File Formats
Using the Save For Web & Devices Dialog
Setting JPEG Optimization
Setting GIF Optimization
Setting PNG Optimization
Smart Objects with Dreamweaver pt. 1
Smart Objects with Dreamweaver pt. 2
Creating Web 2.0 Style Buttons pt. 1
Creating Web 2.0 Style Buttons pt. 2
Using Photoshop & Flash Together
Are you ready to watch the entire Adobe Photoshop CS5 Pro User Skill Sets Training Course by the VTC Online University?
Saturday, January 24, 2015
Android beginner tutorial Part 85 Embedding fonts using Assets
Assets are somewhat similar to resources, yet different. While resources are embedded into the application and can be referred to using the R class, assets are raw files that are stored in the assets directory and require us to manually read them to use them in our applications.
Today well learn how to embed and use a raw .ttf font file as an asset in our application.
First of all you need to find the ttf file. You can download fonts online, I use fontsquirrel.com - all the fonts there are free and pretty good.
Once you have the .ttf file, put it in the assets directory of your project.
Then go to activity_main.xml of your application and add a TextView there:
<LinearLayout xmlns:android="http://schemas.android.com/apk/res/android"
    xmlns:tools="http://schemas.android.com/tools"
    android:layout_width="match_parent"
    android:layout_height="match_parent"
    android:orientation="vertical"
    tools:context=".MainActivity" >

    <TextView android:layout_width="match_parent"
        android:layout_height="wrap_content"
        android:id="@+id/myText"
        android:textSize="36sp"
        android:text="Hello world!"
        />

</LinearLayout>
Now go to MainActivity.java class and load the font using Typeface.createFromAsset() static method. Once the font is extracted, apply it to the text using setTypeface() method:
TextView mytext = (TextView)findViewById(R.id.myText);
Typeface face = Typeface.createFromAsset(getAssets(), "yukarimobil.ttf");
mytext.setTypeface(face);
Heres the full code:
package com.example.codeforfoodtest_two;

import android.app.Activity;
import android.graphics.Typeface;
import android.os.Bundle;
import android.widget.TextView;

public class MainActivity extends Activity{

@Override
protected void onCreate(Bundle savedInstanceState) {
super.onCreate(savedInstanceState);
setContentView(R.layout.activity_main);

TextView mytext = (TextView)findViewById(R.id.myText);
Typeface face = Typeface.createFromAsset(getAssets(), "yukarimobil.ttf");
mytext.setTypeface(face);
}
}
It is that easy!
You can use assets to store all sorts of files and read them byte by byte or using whats provided by the Android SDK, like the Typeface.createFromAsset() method just now.
Thats all for today.
Thanks for reading!
Creating a Pentomino game using AS3 Part 14
The level editor will allow the players to create their own levels by designing the base grid and specifying, how many of each shape is allowed.
Start by going to the main_menu object and adding a new button with id "btn_editor". Then go to main_menu.as and add a click event listener for this button, add a handler that goes to the thrid frame on the main timeline if the button is pressed.
package
{
import flash.display.MovieClip;
import flash.events.MouseEvent;

/**
 * Open-source pentomino game engine
 * @author Kirill Poletaev
 */

public class main_menu extends MovieClip
{

public function main_menu()
{
(root as MovieClip).stop();
btn_play.addEventListener(MouseEvent.CLICK, doPlay);
btn_editor.addEventListener(MouseEvent.CLICK, doEditor);
}

private function doPlay(evt:MouseEvent):void {
(root as MovieClip).gotoAndStop(2);
}

private function doEditor(evt:MouseEvent):void {
(root as MovieClip).gotoAndStop(3);
}
}

}
On the third frame, create a MovieClip thats a duplicate of pentomino_game object. Its not the same movie clip, but a duplicate. Set its class path to "pentomino_editor". Now create a new class pentomino_editor.as based on pentomino_game.as code.
We need to delete a lot of code that wont be used from this script, so Im just going to explain what (and why) are we going to keep in the code.
We basically only need grid generation code and shape button code, since we are not going to actually put shapes on the grid. We dont need to rotate the shapes on roll over either, this would just confuse the users. We are going to keep both Reset and Main menu buttons, but only the Main menu button will be functional today. One of the most important things to note is that we wont create select_shape instances for each shape button, but instead well create edit_shape instances. They will also be 22 pixels higher, so the positioning code along the y axis will have to be slightly modified as well.
Overall, here is the whole code for pentomino_editor.as:
package
{
import flash.display.MovieClip;
import flash.display.Sprite;
import flash.events.Event;
import flash.events.KeyboardEvent;
import flash.events.MouseEvent;
import flash.geom.Point;
import flash.utils.ByteArray;

/**
 * Open-source pentomino game engine
 * @author Kirill Poletaev
 */

public class pentomino_editor extends MovieClip
{
private var mapGrid:Array = [];
private var shapeButtons:Array = [];

private var gridShape:Sprite = new Sprite();
private var canPutShape:Sprite = new Sprite();
private var gridStartX:int;
private var gridStartY:int;
private var gridCellWidth:int;

public function pentomino_editor()
{
// default map
mapGrid = [
[1, 1, 1, 1, 1, 1, 1, 1, 1, 1],
[1, 1, 1, 1, 1, 1, 1, 1, 1, 1],
[1, 1, 1, 1, 1, 1, 1, 1, 1, 1],
[1, 1, 1, 1, 1, 1, 1, 1, 1, 1],
[1, 1, 1, 1, 1, 1, 1, 1, 1, 1],
[1, 1, 1, 1, 1, 1, 1, 1, 1, 1]
];

// grid settings
calculateGrid();
addChild(gridShape);
gridShape.x = gridStartX;
gridShape.y = gridStartY;

// draw tiles
drawGrid();

// add shape buttons
for (var i:int = 0; i < 4; i++) {
for (var u:int = 0; u < 3; u++) {
var shapeButton:MovieClip = new edit_shape();
shapeButton.x = 528 + u * 62;
shapeButton.y = 15 + i * 84;
addChild(shapeButton);
shapeButton.bg.alpha = 0.3;
shapeButton.shape.gotoAndStop(3 * i + u + 1);
shapeButtons.push(shapeButton);
shapeButton.addEventListener(MouseEvent.ROLL_OVER, buttonOver);
shapeButton.addEventListener(MouseEvent.ROLL_OUT, buttonOut);
}
}

// buttons
btn_mainmenu.addEventListener(MouseEvent.CLICK, doMainmenu);
}

private function calculateGrid():void {
var columns:int = mapGrid[0].length;
var rows:int = mapGrid.length;

// free size: 520x460
// fit in: 510x450

// calculate width of a cell:
gridCellWidth = Math.round(510 / columns);

var width:int = columns * gridCellWidth;
var height:int = rows * gridCellWidth;

// calculate side margin
gridStartX = (520 - width) / 2;

if (height < 450) {
gridStartY = (450 - height) / 2;
}
if (height >= 450) {
gridCellWidth = Math.round(450 / rows);
height = rows * gridCellWidth;
width = columns * gridCellWidth;
gridStartY = (460 - height) / 2;
gridStartX = (520 - width) / 2;
}
}

private function drawGrid():void {
gridShape.graphics.clear();
var width:int = mapGrid[0].length;
var height:int = mapGrid.length;

var i:int;
var u:int;

// draw background
for (i = 0; i < height; i++) {
for (u = 0; u < width; u++) {
if (mapGrid[i][u] == 1) drawCell(u, i, 0xffffff, 1, 0x999999);
}
}
}

private function drawCell(width:int, height:int, fill:uint, thick:Number, line:uint):void {
gridShape.graphics.beginFill(fill);
gridShape.graphics.lineStyle(thick, line);
gridShape.graphics.drawRect(width * gridCellWidth, height * gridCellWidth, gridCellWidth, gridCellWidth);
}

private function buttonOver(evt:MouseEvent):void {
evt.currentTarget.bg.alpha = 1;
}

private function buttonOut(evt:MouseEvent):void {
evt.currentTarget.bg.alpha = 0.3;
}

private function doMainmenu(evt:MouseEvent):void {
(root as MovieClip).gotoAndStop(1);
}
}

}
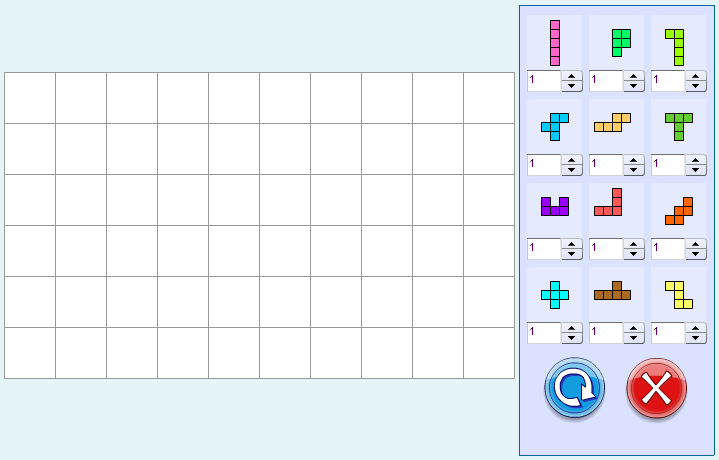
We use edit_shape MovieClip, but we dont have it yet. Go to your Flash project and create a new movie clip by duplicating select_shape. Delete the "count" text field and instead of it drag and drop a NumericStepper object from the components library (Ctrl+F7), position it so that its right under the square background, leave no gap between them.
In the end, this is what the screen looks like:
Thanks for reading!
Tuesday, January 20, 2015
Creating a Pentomino game using AS3 Part 25
Firstly go to save_screen MovieClip in Flash and add a second frame there - add an input text field with id "tName" and a button with id "btn_save_final". This will be the step that comes after the user presses "Save level locally" - he will be asked to pick a name for the level before saving it.
In save_screen.as, add a line that stops the MC at first frame in the constructor:
stop();
In the onSave() function, go to second frame and add a listener for btn_save_final button that calls onSaveFinal handler function:
private function onSave(evt:MouseEvent):void {
this.gotoAndStop(2);
btn_save_final.addEventListener(MouseEvent.CLICK, onSaveFinal);
}
The handler calls closeHandler, removes the event listener and the window, and saves the level using Pentomino.saveLevelLocal(). We pass a thrid value here - tName.text:
private function onSaveFinal(evt:MouseEvent):void {
closeHandler.call();
btn_save_final.removeEventListener(MouseEvent.CLICK, onSaveFinal);
this.parent.removeChild(this);
Pentomino.saveLevelLocal(currentGrid, currentShapes, tName.text);
}
Full save_screen.as class:
package
{
import flash.display.MovieClip;
import flash.events.MouseEvent;

/**
 * Open-source pentomino game engine
 * @author Kirill Poletaev
 */

public class save_screen extends MovieClip
{

private static var Pentomino:MovieClip;
private var currentGrid:Array;
private var currentShapes:Array;
private var closeHandler:Function;

public function save_screen(pentominoReference:MovieClip, getGrid:Array, getShapes:Array, onClose:Function)
{
stop();
Pentomino = pentominoReference;
currentGrid = getGrid;
currentShapes = getShapes;
closeHandler = onClose;
btn_play.addEventListener(MouseEvent.CLICK, onPlay);
btn_save.addEventListener(MouseEvent.CLICK, onSave);
btn_cancel.addEventListener(MouseEvent.CLICK, onCancel);
}

private function onPlay(evt:MouseEvent):void {
removeEverything();
Pentomino.playLevel(currentGrid, currentShapes);
}

private function onSave(evt:MouseEvent):void {
this.gotoAndStop(2);
btn_save_final.addEventListener(MouseEvent.CLICK, onSaveFinal);
}

private function onSaveFinal(evt:MouseEvent):void {
closeHandler.call();
btn_save_final.removeEventListener(MouseEvent.CLICK, onSaveFinal);
this.parent.removeChild(this);
Pentomino.saveLevelLocal(currentGrid, currentShapes, tName.text);
}

private function onCancel(evt:MouseEvent):void {
closeHandler.call();
removeEverything();
}

private function removeEverything():void {
btn_play.removeEventListener(MouseEvent.CLICK, onPlay);
btn_save.removeEventListener(MouseEvent.CLICK, onSave);
btn_cancel.removeEventListener(MouseEvent.CLICK, onCancel);
this.parent.removeChild(this);
}

}

}
In main.as in the saveLevelLocal() function we take this third parameter and apply its value to levelObjects "name" property:
package
{
import flash.display.MovieClip;
import flash.net.SharedObject;

/**
 * Open-source pentomino game engine
 * @author Kirill Poletaev
 */

public class main extends MovieClip
{

public function main()
{
}

public function playLevel(grid:Array, shapes:Array):void {
gotoAndStop(2);
game.playLevel(grid, shapes);
}

public function saveLevelLocal(grid:Array, shapes:Array, levelName:String):void {
var sharedObject:SharedObject = SharedObject.getLocal("myLevels");
if (sharedObject.data.levels == null) sharedObject.data.levels = [];
var levelObject:Object = new Object;
levelObject.grid = grid;
levelObject.shapes = shapes;
levelObject.name = levelName;
sharedObject.data.levels.push(levelObject);
sharedObject.flush();
}

}

}
In saved_levels.as declare 3 new variables: levels, pages and currentPage:
private var levels:Array = [];
private var pages:int;
private var currentPage:int;
The levels array takes values from SharedObjects levels array, unless its null. The pages value is calculated in the constructor. We also call a function goPage(1) in the constructor:
public function saved_levels()
{
savedLevels = SharedObject.getLocal("myLevels");
btn_back.addEventListener(MouseEvent.CLICK, doBack);
if (savedLevels.data.levels != null) levels = savedLevels.data.levels;
tInfo.text = levels.length + " levels (" + savedLevels.size + "B)";
pages = Math.floor(levels.length / 3) + 1;
goPage(1);
}
Before we move on to goPage() function, open the saved_levels MovieClip in Flash and set the ids of 3 saved level item MovieClips to item1, item2 and item3.
Now well add the goPage() function. The function receives page number and updates the tPage text field, then sets alpha of all level items to 0 and mouseEnabled and mouseChildren values to false. Then we calculate the index in the levels array for each level in the page (there are 3 levels on each page) and if that item on that specific page exists, set the respective level items alpha to 1, mouseEnabled and mouseChildren to true, and tTitles text value to the "name" property of the respective level item in the array.
private function goPage(pageNum:int):void {
currentPage = pageNum;
tPage.text = "Page " + currentPage + "/" + pages;
item1.alpha = item2.alpha = item3.alpha = 0;
item1.mouseEnabled = item2.mouseEnabled = item3.mouseEnabled = false;
item1.mouseChildren = item2.mouseChildren = item3.mouseChildren = false;

if (levels[3 * (currentPage-1)] != null) {
item1.alpha = 1;
item1.mouseEnabled = true;
item1.mouseChildren = true;
item1.tTitle.text = levels[3 * (currentPage-1)].name;
}

if (levels[3 * (currentPage-1)+1] != null) {
item2.alpha = 1;
item2.mouseEnabled = true;
item2.mouseChildren = true;
item2.tTitle.text = levels[3 * (currentPage-1)+1].name;
}

if (levels[3 * (currentPage-1)+2] != null) {
item3.alpha = 1;
item3.mouseEnabled = true;
item3.mouseChildren = true;
item3.tTitle.text = levels[3 * (currentPage-1)+2].name;
}
}
Thats all for now.
Full saved_level.as code so far:
package
{
import flash.display.MovieClip;
import flash.events.MouseEvent;
import flash.net.SharedObject;

/**
 * Open-source pentomino game engine
 * @author Kirill Poletaev
 */

public class saved_levels extends MovieClip
{
private var savedLevels:SharedObject;
private var levels:Array = [];
private var pages:int;
private var currentPage:int;

public function saved_levels()
{
savedLevels = SharedObject.getLocal("myLevels");
btn_back.addEventListener(MouseEvent.CLICK, doBack);
if (savedLevels.data.levels != null) levels = savedLevels.data.levels;
tInfo.text = levels.length + " levels (" + savedLevels.size + "B)";
pages = Math.floor(levels.length / 3) + 1;
goPage(1);
}

private function goPage(pageNum:int):void {
currentPage = pageNum;
tPage.text = "Page " + currentPage + "/" + pages;
item1.alpha = item2.alpha = item3.alpha = 0;
item1.mouseEnabled = item2.mouseEnabled = item3.mouseEnabled = false;
item1.mouseChildren = item2.mouseChildren = item3.mouseChildren = false;

if (levels[3 * (currentPage-1)] != null) {
item1.alpha = 1;
item1.mouseEnabled = true;
item1.mouseChildren = true;
item1.tTitle.text = levels[3 * (currentPage-1)].name;
}

if (levels[3 * (currentPage-1)+1] != null) {
item2.alpha = 1;
item2.mouseEnabled = true;
item2.mouseChildren = true;
item2.tTitle.text = levels[3 * (currentPage-1)+1].name;
}

if (levels[3 * (currentPage-1)+2] != null) {
item3.alpha = 1;
item3.mouseEnabled = true;
item3.mouseChildren = true;
item3.tTitle.text = levels[3 * (currentPage-1)+2].name;
}
}

private function doBack(evt:MouseEvent):void {
(root as MovieClip).gotoAndStop(1);
}
}

}
Thanks for reading!
Saturday, January 17, 2015
Html5 Example showing some graphics example using css3
Hi , i am going to explain you how to create a graphics or animations with out java script page background for your website using html5 and css3. First create a file named index.html and paste the following code shown below:
Now create a file named style.css and replace with the following code:
	CSS3 animation


	Developed By: Vivek Kumar
body {
	background-color: #F6F4F2;
	font-family: "Helvetica Neue", Helvetica, Arial, sans-serif;
	font-size: .9em;
	line-height: 1.1em;
	margin: 0px;
}
h1,ul,li {
	margin: 0px;
	padding: 0px;
}
#header {
	background-color: #515151;
	background: #515151
		-webkit-gradient(linear, left top, left bottom, color-stop(0.2, #515151),
		color-stop(0.8, #302F2D) );
	border-top: 1px solid #919192;
	height: 32px;
	left: 0px;
	position: fixed;
	top: 0px;
	width: 100%;
	z-index: 1;
}
#subheader { display: none; }
#footer {
	display: none;
	background-color: #515151;
	background: #515151
		-webkit-gradient(linear, left bottom, left top, color-stop(0.2, #515151),
		color-stop(0.8, #302F2D) );
	border-top: 1px solid #919192;
	height: 32px;
 	position: fixed;
	bottom: 0px;
	width: 100%;
	z-index: 1;
}
#sidebar {
	background-color: #ECEAE7;
	overflow: auto;
	padding: 30px 2% 20px 0px;
	text-align: right;
    /* position: fixed; */
	float: left;
	width: 22%;
	top: 33px;
	bottom: 0px;
	z-index: 1;
	border-right: 1px solid #999;
}
#sidebar ul,#sidebar li {
	margin: 0px;
	padding: 0px;
}
#sidebar li, #sidebar li a {
	color: #767573;
	font-size: 1.06em;
	list-style: none;
	margin: 1.05em 0px;
}
#scrollable {
	/* position: fixed; */
	padding: 20px 2% 0px 1%;
	float: right;
	width: 72%;
	overflow: auto;
	top: 33px;
}
#content {
	margin: 20px 2% 0px;
	color: #313131;
	/*  position:absolute;*/
	/*  overflow:auto;*/
	z-index: 0;
}
#header h1, #footer h1 {
	color: #F6F4F2;
	font-size: 1.2em;
	font-weight: normal;
	line-height: 32px;
	margin: 0px;
	text-align: center;
	text-shadow: 0px -1px 1px #222222;
}
#footer h1 {
	font-size: .9em;
	text-align: left;
	padding-left: 16px;
}
#content h2 {
	border-bottom: 1px solid #ccc;
	padding-bottom: 0.25em;
	color: #e87a12;
	font-size: 1.4em;
	font-weight: bold;
	margin: 1.3em 0px 0.8em 0px;
	text-shadow: #FFFFFF 0px 1px 1px;
}
code {
	font-weight: bold;
	font-size: 1.0em;
	color: #bc6108;
}
blockquote {
	color: #767573;
	font-style: normal;
	margin-left: 30px;
	margin-right: 10px;
	padding-left: 6px;
	position: relative;
	text-shadow: #FFFFFF 0px 1px 0px;
}
blockquote p {
	padding: 5px 0px;
	font-size: 0.8em;
}
blockquote::before {
	font-style: normal;
	content: 201C;
	font-size: 400%;
	font-family: Georgia, Palatino, Times New Roman, Times;;
	position: absolute;
	left: -25px;
	top: 0.2em;
	color: #E0E0E0;
}
ul {
	margin-left: 40px;
}
ul>li {
	list-style: disc;
	list-style-position: outside;
}
ul ul {
	margin-bottom: 0.5em;
	margin-top: 0.5em;
}
a.btn {
  	border: 1px solid #555;
  	-webkit-border-radius: 5px;
  	border-radius: 5px;
  	text-align:center;
  	display:block;
/*   	float:left; */
  	clear: both;
  	background:#eceae7;
  	width:90%;
  	color:#e87a12;
  	font-size:1.1em;
  	font-weight: bold;
  	text-decoration:none;
  	padding:0.7em 0.1em;
 	margin: 5px auto;
}
a.btn.deux {
	clear: none;
	float:left;
  	width: 45%;
  	margin:6px 3px 3px;
}
a.btn.trois {
	clear: none;
	float:left;
	width: 30%;
  	margin:6px 2px 3px;
}
#deviceinfo {
	border-collapse:collapse;
	width:75%;
	margin: 20px auto;
}
#deviceinfo tr th.alt, #deviceinfo tr td.alt {
	text-align:left;
}
#deviceinfo, th, td {
	border: 1px solid #ccc;
}
#deviceinfo th {
	font-size:1.15em;
	padding-top:4px;
	padding-bottom:4px;
	background-color:#e89442;
	color:#f0f0f0;
	height: 1.3em;
}
#deviceinfo td, #deviceinfo th {
	padding:3px 7px 2px 7px;
	vertical-align:bottom;
	text-align:right;
}
.result-block {
	clear: both;
	margin-top: 0.3em;
}
#accel-data {
	margin-bottom: 15px;
	width: 95%;
}
dl{
  	clear:both;
  	list-style-type:none;
  	padding-left:2px;
  	overflow:auto;
}
dl > dt{
  	float:left;
  	margin-top: 15px;
  	margin-left:5px;
}
dl > dd{
  	float:left;
  	font-weight:bold;
  	margin-top: 15px;
  	margin-left: 10px;
  	margin-right: 25px;
  }
.api-div {
 	display: none;
	margin-bottom: 0.6em;
}
.api-div h4 {
 	display: block;
 	font-size: 0.8em;
 	font-weight: normal;
 	background: #eceae7;
 	border-left: 6px solid #de2c2c;
 	padding: 5px 8px;
}
.api-div .help {
 	border-left: 6px solid #188f8f;
}
#cameraImage {
	border: 2px solid #666;
	display: none;
	margin: 1.7em auto;
	width:200px;
	height:150px;
}
#eventOutput {
	height:1.5em;
	display: block;
}
#map {
	width: 180px;
	height: 140px;
	border: 2px solid #666;
 	display: none;
	margin: 1.0em auto;
}

@media screen and (max-width: 320px) and (orientation:portrait) {
	/* #header h1 { color: #f00; }  For TESTING */
	#sidebar { display: none; }
	#scrollable {
		padding: 0px;
		margin: 64px 1% 0px 1%;
		float: left;
		width: 97%;
		overflow: auto;
	}
	#subheader {
		display: block;
		background-color: #CBCBCB;
		background: -webkit-gradient(linear, left top, left bottom, color-stop(0.0, #F9F9F9),color-stop(1.0, #CBCBCB) );
		border-top: 1px solid #383A3C;
		border-bottom: 1px solid #919395;
		height: 42px;
		left: 0px;
		position: fixed;
		top: 33px;
		width: 100%;
		z-index: 1;
		text-align:center;
		}
	select {
		font-size: 1.65em;
		font-weight: bold;
		padding: 5px 16px 5px 20px;
		color: #444;
		background-color: #e8a35f;
		margin: 3px auto;
	}
	#deviceinfo {
		width:90%;
	}
}
@media all and (min-width: 800px){
	 /* #header h1 { color: #0f0; } FOR TESTING */
	#content {
		font-size: 1.0em;
		line-height: 1.2em;
	}
	#content h2 {
		padding-bottom: 0.4em;
		font-size: 2em;
 		margin-top: 2em;
	}
	blockquote {
		margin-top: 20px;
		margin-bottom: 30px;
	}
	blockquote p {
		/* padding: 5px 0px; 10px 0px; */
		font-size: 0.95em;
	}
	blockquote code {
	  	font-size: 1.2em;
	}
	#cameraImage {
		width: 400px;
		height: 300px;
    }
    #map {
		width: 360px;
		height: 280px;
		margin: 1.5em auto;
	}
	#content {
		margin: 30px 3% 0px;
	}
	#sidebar {
		padding-top: 15px;
    	position: fixed;
	}
	#sidebar li,#sidebar li a {
		font-size: 1.2em;
		margin: 1.8em 0px;
	}
	.api-div h4 {
 		font-size: 0.9em;
	}
	#footer {
		display: block;
	}
}

@media all and (min-width: 1200px){
	/*#header h1 { color: #ff0; }   FOR TESTING */
	blockquote p {
		/* padding: 5px 0px; 10px 0px; */
		font-size: 1.0em;
	}
	blockquote code {
	  	font-size: 1.3em;
	}
	#deviceinfo {
		width:50%;
	}
	#deviceinfo th {
		font-size:1.35em;
		height: 1.4em;
	}
	#deviceinfo td, #deviceinfo th {
		font-size: 1.1em;
	}
	#footer {
		display: none;
	}
}
Friday, January 16, 2015
Simple Login and Sign Up using Facebook Javascript SDK
This is the simplest working example for facebook based sign up.

This tutorial uses Facebook Javascript SDK v2.2
Demo| Download
Needables
- Facebook SDK
- Facebook Application ID

 <script src="https://ajax.googleapis.com/ajax/libs/jquery/1.11.1/jquery.min.js"></script>
 <script src="http://getbootstrap.com/dist/js/bootstrap.min.js"></script>
Signup Html Form
      <form class="form-signin" role="form">
            <div id="status"></div>
        <h2 class="form-signin-heading">User Registration</h2>

        <label for="inputFname" class="sr-only">First Name</label>
            <input type="text" id="inputFname" class="form-control" placeholder="First Name" required autofocus>

        <label for="inputLname" class="sr-only">First Name</label>
            <input type="text" id="inputLname" class="form-control" placeholder="Last Name" required >

        <label for="inputEmail" class="sr-only">Email address</label>
        <input type="email" id="inputEmail" class="form-control" placeholder="Email address" required >

        <label for="inputPassword" class="sr-only">Password</label>
        <input type="password" id="inputPassword" class="form-control" placeholder="Password" required>
        <div class="checkbox">
          <label>
            <input type="checkbox" value="remember-me"> Remember me
          </label>
        </div>

        <button class="btn btn-sm btn-primary btn-block" type="submit">Sign Up</button> <button class="btn btn-sm btn-primary btn-block" onclick="_login();" type="submit">Sign Up using Facebook</button>
      </form>
Javascript
    <script>
  // Load the SDK asynchronously
  (function(thisdocument, scriptelement, id) {
    var js, fjs = thisdocument.getElementsByTagName(scriptelement)[0];
    if (thisdocument.getElementById(id)) return;

    js = thisdocument.createElement(scriptelement); js.id = id;
    js.src = "//connect.facebook.net/en_US/sdk.js"; //you can use
    fjs.parentNode.insertBefore(js, fjs);
  }(document, script, facebook-jssdk));

  window.fbAsyncInit = function() {
  FB.init({
    appId      : 1449392918617564, //Your APP ID
    cookie     : true,  // enable cookies to allow the server to access
                        // the session
    xfbml      : true,  // parse social plugins on this page
    version    : v2.1 // use version 2.1
  });

  // These three cases are handled in the callback function.
  FB.getLoginStatus(function(response) {
    statusChangeCallback(response);
  });

  };

  // This is called with the results from from FB.getLoginStatus().
  function statusChangeCallback(response) {
    if (response.status === connected) {
      // Logged into your app and Facebook.
      _i();
    } else if (response.status === not_authorized) {
      // The person is logged into Facebook, but not your app.
      document.getElementById(status).innerHTML = Please log  +
        into this app.;
    }
  }

  function _login() {
    FB.login(function(response) {
       // handle the response
       if(response.status===connected) {
        _i();
       }
     }, {scope: public_profile,email});
 }

 function _i(){
     FB.api(/me, function(response) {
        document.getElementById("inputFname").value = response.first_name;
        document.getElementById("inputLname").value = response.last_name;
        document.getElementById("inputEmail").value = response.email;
    });
 }

</script>