Saturday, January 24, 2015
Creating a Pentomino game using AS3 Part 14
The level editor will allow the players to create their own levels by designing the base grid and specifying, how many of each shape is allowed.
Start by going to the main_menu object and adding a new button with id "btn_editor". Then go to main_menu.as and add a click event listener for this button, add a handler that goes to the thrid frame on the main timeline if the button is pressed.
package
{
import flash.display.MovieClip;
import flash.events.MouseEvent;

/**
 * Open-source pentomino game engine
 * @author Kirill Poletaev
 */

public class main_menu extends MovieClip
{

public function main_menu()
{
(root as MovieClip).stop();
btn_play.addEventListener(MouseEvent.CLICK, doPlay);
btn_editor.addEventListener(MouseEvent.CLICK, doEditor);
}

private function doPlay(evt:MouseEvent):void {
(root as MovieClip).gotoAndStop(2);
}

private function doEditor(evt:MouseEvent):void {
(root as MovieClip).gotoAndStop(3);
}
}

}
On the third frame, create a MovieClip thats a duplicate of pentomino_game object. Its not the same movie clip, but a duplicate. Set its class path to "pentomino_editor". Now create a new class pentomino_editor.as based on pentomino_game.as code.
We need to delete a lot of code that wont be used from this script, so Im just going to explain what (and why) are we going to keep in the code.
We basically only need grid generation code and shape button code, since we are not going to actually put shapes on the grid. We dont need to rotate the shapes on roll over either, this would just confuse the users. We are going to keep both Reset and Main menu buttons, but only the Main menu button will be functional today. One of the most important things to note is that we wont create select_shape instances for each shape button, but instead well create edit_shape instances. They will also be 22 pixels higher, so the positioning code along the y axis will have to be slightly modified as well.
Overall, here is the whole code for pentomino_editor.as:
package
{
import flash.display.MovieClip;
import flash.display.Sprite;
import flash.events.Event;
import flash.events.KeyboardEvent;
import flash.events.MouseEvent;
import flash.geom.Point;
import flash.utils.ByteArray;

/**
 * Open-source pentomino game engine
 * @author Kirill Poletaev
 */

public class pentomino_editor extends MovieClip
{
private var mapGrid:Array = [];
private var shapeButtons:Array = [];

private var gridShape:Sprite = new Sprite();
private var canPutShape:Sprite = new Sprite();
private var gridStartX:int;
private var gridStartY:int;
private var gridCellWidth:int;

public function pentomino_editor()
{
// default map
mapGrid = [
[1, 1, 1, 1, 1, 1, 1, 1, 1, 1],
[1, 1, 1, 1, 1, 1, 1, 1, 1, 1],
[1, 1, 1, 1, 1, 1, 1, 1, 1, 1],
[1, 1, 1, 1, 1, 1, 1, 1, 1, 1],
[1, 1, 1, 1, 1, 1, 1, 1, 1, 1],
[1, 1, 1, 1, 1, 1, 1, 1, 1, 1]
];

// grid settings
calculateGrid();
addChild(gridShape);
gridShape.x = gridStartX;
gridShape.y = gridStartY;

// draw tiles
drawGrid();

// add shape buttons
for (var i:int = 0; i < 4; i++) {
for (var u:int = 0; u < 3; u++) {
var shapeButton:MovieClip = new edit_shape();
shapeButton.x = 528 + u * 62;
shapeButton.y = 15 + i * 84;
addChild(shapeButton);
shapeButton.bg.alpha = 0.3;
shapeButton.shape.gotoAndStop(3 * i + u + 1);
shapeButtons.push(shapeButton);
shapeButton.addEventListener(MouseEvent.ROLL_OVER, buttonOver);
shapeButton.addEventListener(MouseEvent.ROLL_OUT, buttonOut);
}
}

// buttons
btn_mainmenu.addEventListener(MouseEvent.CLICK, doMainmenu);
}

private function calculateGrid():void {
var columns:int = mapGrid[0].length;
var rows:int = mapGrid.length;

// free size: 520x460
// fit in: 510x450

// calculate width of a cell:
gridCellWidth = Math.round(510 / columns);

var width:int = columns * gridCellWidth;
var height:int = rows * gridCellWidth;

// calculate side margin
gridStartX = (520 - width) / 2;

if (height < 450) {
gridStartY = (450 - height) / 2;
}
if (height >= 450) {
gridCellWidth = Math.round(450 / rows);
height = rows * gridCellWidth;
width = columns * gridCellWidth;
gridStartY = (460 - height) / 2;
gridStartX = (520 - width) / 2;
}
}

private function drawGrid():void {
gridShape.graphics.clear();
var width:int = mapGrid[0].length;
var height:int = mapGrid.length;

var i:int;
var u:int;

// draw background
for (i = 0; i < height; i++) {
for (u = 0; u < width; u++) {
if (mapGrid[i][u] == 1) drawCell(u, i, 0xffffff, 1, 0x999999);
}
}
}

private function drawCell(width:int, height:int, fill:uint, thick:Number, line:uint):void {
gridShape.graphics.beginFill(fill);
gridShape.graphics.lineStyle(thick, line);
gridShape.graphics.drawRect(width * gridCellWidth, height * gridCellWidth, gridCellWidth, gridCellWidth);
}

private function buttonOver(evt:MouseEvent):void {
evt.currentTarget.bg.alpha = 1;
}

private function buttonOut(evt:MouseEvent):void {
evt.currentTarget.bg.alpha = 0.3;
}

private function doMainmenu(evt:MouseEvent):void {
(root as MovieClip).gotoAndStop(1);
}
}

}
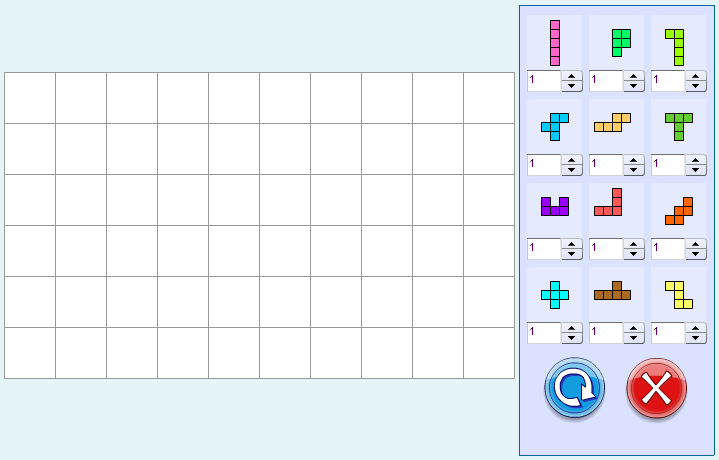
We use edit_shape MovieClip, but we dont have it yet. Go to your Flash project and create a new movie clip by duplicating select_shape. Delete the "count" text field and instead of it drag and drop a NumericStepper object from the components library (Ctrl+F7), position it so that its right under the square background, leave no gap between them.
In the end, this is what the screen looks like:
Thanks for reading!
Subscribe to:
Post Comments (Atom)
No comments:
Post a Comment
Note: Only a member of this blog may post a comment.