Showing posts with label how. Show all posts
Showing posts with label how. Show all posts
Monday, March 9, 2015
How about inline slideshow with a nice pop up gallery
A simple thing was kinda blowing my mind lately. Theres a lot of fancy galleries out there. Jquery and others, where Highslide happens to remain one of the best. But as I went through all of them and being more or less impressed, on none of "XY most best wow galleries" have I noticed 1 to satisfy my ... kind of a simple need.
What I (my client) wanted was a gallery that is inline as slideshow (with custom effects) and then as you click on the image, it enlarges into more-or-less full-screen or something like it.
Now amazingly I havent found any to be complete like that. Either theyre inline excellent slideshows without "popup-zoomin", or theyre amazing galleries that work from thumbnails (meaning static photos in the page). No fancy-wow-ough-yeah gallery covers the thing as:
1. inline slideshow (not thumbnails)
AND 2. pop-up (zoom-in or whatever) gallery (that has the controls of forward, backward,... and effects,...).
So after a month (or three months?), a combination of 2 scripts seems to somehow provide the best option:
1. Jquery cycle
2. prettyPhoto
With 1st, you put in images in 1 div and cycle through them with several effects. Nice, simple to plug in.
< div id="PhotosScrolling" >
< img1... />
< img2... />
< img3... />
< /div >
With 2nd, you just need to put some links over those imgs, so the final html looks like this:
Read more »
What I (my client) wanted was a gallery that is inline as slideshow (with custom effects) and then as you click on the image, it enlarges into more-or-less full-screen or something like it.
Now amazingly I havent found any to be complete like that. Either theyre inline excellent slideshows without "popup-zoomin", or theyre amazing galleries that work from thumbnails (meaning static photos in the page). No fancy-wow-ough-yeah gallery covers the thing as:
1. inline slideshow (not thumbnails)
AND 2. pop-up (zoom-in or whatever) gallery (that has the controls of forward, backward,... and effects,...).
So after a month (or three months?), a combination of 2 scripts seems to somehow provide the best option:
1. Jquery cycle
2. prettyPhoto
With 1st, you put in images in 1 div and cycle through them with several effects. Nice, simple to plug in.
< div id="PhotosScrolling" >
< img1... />
< img2... />
< img3... />
< /div >
With 2nd, you just need to put some links over those imgs, so the final html looks like this:
< div id="PhotosScrolling" >
< a href="BigImage1" rel="ImageGalleryName" > < img1... /> < /a>
< a href="BigImage2" rel="ImageGalleryName" > < img2... /> < /a>
< a href="BigImage3" rel="ImageGalleryName" > < img3... /> < /a>
< /div>
Add the script calls with options. Example is as great as the great touristic destination itself :-).
What I love about these 2 scripts is their simplicity and css dependency. You can easily implement it on any database logic and need not think about much else.
Still wondering though, did I miss any script that does both jobs and can be implemented even easier?

Sunday, March 1, 2015
How to Copy HTML Embed Code to Your Blog!
This week was a three way tie on the poll... I was beyond shocked!!! I was especially surprised since this is the first time there was a tie! Since there was a tie, I blogged about the item that had been on the poll the longest, which was how to add html/embed code to your blog post!

Heres the poll:

Itll be interesting to see which wins the poll next week. In the meantime, here is a short and sweet tutorial that shows how to copy that embed code to your blog post!


Read more »
Heres the poll:
Itll be interesting to see which wins the poll next week. In the meantime, here is a short and sweet tutorial that shows how to copy that embed code to your blog post!
You can download this tutorial as a PDF by clicking this picture!
Note: This tutorial is hosted on Google Docs. To save it from there, just open the file and click File > Download to save onto your computer!
As for next weeks poll, Ill be adding something that a lot of you have been asking for... how to add a texture/pattern to text! Be sure to vote!
How to Embed a Video in Smart Notebook!
Its Tuesday again, and I am shockingly writing this post before the stroke of midnight! :) The winner of this weeks poll was how to embed a video in Smart Notebook!

Heres the poll for anyone interested!


Dont you just love when theyre short and sweet?
Note: This tutorial is hosted on Google Docs. To save it from there, just open the file and click File > Download to save onto your computer!
I do plan on adding some other Smart Notebook Tutorials in the future, but in the meantime I want to add a Microsoft Word/PowerPoint option... how to make any font into an outline!

Read more »
Heres the poll for anyone interested!
Now, onto the tutorial! If your video is not .flv, check out yesterdays tutorial to learn how to convert it!
Dont you just love when theyre short and sweet?
You can download this tutorial as a PDF by clicking this picture!
I do plan on adding some other Smart Notebook Tutorials in the future, but in the meantime I want to add a Microsoft Word/PowerPoint option... how to make any font into an outline!
Friday, February 27, 2015
How to Print Anything at a Smaller Size!
I absolutely love this little trick! Im not even joking when I say I use it at least three times a week! Every time I make/buy a new center game, I use this trick to print the cover page smaller so that it will fit in a quart size ziploc bag. And... I use it to make visuals slightly smaller so that they fit better on my walls! It is definitely one of my favorite tricks!
So... time to show you how to print anything at a smaller size!

Before I go into the poll and the tutorial, do you see the ADORABLE product in my preview? Well... its fabulous and its free from The Primary Gal! Shes relatively new to blogging and TPT so head over there and give her some love!

Now, for the poll! This was clearly the winner but the other options were definitely contenders!

And of course, heres the tutorial! Step 1 mentions that its easiest to do this with a PDF, so if youre not sure how to make a PDF, be sure to check out my previous tutorial below!

The steps are slightly different on Mac and PC so I did two separate write ups!


As for next weeks poll, Im going to add how to make a customized search so that it only searches specific websites... this is perfect for research projects!
Read more »
So... time to show you how to print anything at a smaller size!
Before I go into the poll and the tutorial, do you see the ADORABLE product in my preview? Well... its fabulous and its free from The Primary Gal! Shes relatively new to blogging and TPT so head over there and give her some love!
Now, for the poll! This was clearly the winner but the other options were definitely contenders!
And of course, heres the tutorial! Step 1 mentions that its easiest to do this with a PDF, so if youre not sure how to make a PDF, be sure to check out my previous tutorial below!
The steps are slightly different on Mac and PC so I did two separate write ups!
You can download this tutorial as a PDF by clicking this picture!
Note: This tutorial is hosted on Google Drive. To save it from there, just open the file and click File > Download to save onto your computer!
As for next weeks poll, Im going to add how to make a customized search so that it only searches specific websites... this is perfect for research projects!
Thursday, February 26, 2015
How to Make a Bunting Banner in PowerPoint!
I just knew that this option would be popular on the poll! And it was perfect timing since I was planning on making a bunting banner this week for my classroom!

More than half of you voted for this in the polls!

Now, onto the tutorial!


I am printing that bunting banner first thing tomorrow morning! I love how it looks!!!
For next weeks poll, Ill add how to use/open QR codes. I figured this would be a good prerequisite for how to make your own QR codes!
Read more »
More than half of you voted for this in the polls!
Now, onto the tutorial!
I am printing that bunting banner first thing tomorrow morning! I love how it looks!!!
You can download this tutorial as a PDF by clicking this picture!
Note: This tutorial is hosted on Google Drive. To save it from there, just open the file and click File > Download to save onto your computer!
For next weeks poll, Ill add how to use/open QR codes. I figured this would be a good prerequisite for how to make your own QR codes!
Wednesday, February 25, 2015
How to Load the Full Version of a Website on your iPad Smartphone!
I remember the days when my iPad automatically loaded the full version of a website... then I upgraded to IOS6 and all of a sudden the whole internet thought my iPad was a mobile device... yikes!!!
Unfortunately, theres no magic setting to switch the iPad back to the way it was before the update, but there are lots of ways you can load the full version of a website on your iPad!

Heres the poll for those of you keeping track! And, for those of you who havent been able to vote from your iPad/smartphone, do this tutorial now to load the poll so you can vote for next week! :)

There are three different options that you can use to load the full version of the site... and here they are!


Read more »
Unfortunately, theres no magic setting to switch the iPad back to the way it was before the update, but there are lots of ways you can load the full version of a website on your iPad!
Heres the poll for those of you keeping track! And, for those of you who havent been able to vote from your iPad/smartphone, do this tutorial now to load the poll so you can vote for next week! :)
There are three different options that you can use to load the full version of the site... and here they are!
You can download this tutorial as a PDF by clicking this picture!
Note: This tutorial is hosted on Google Docs. To save it from there, just open the file and click File > Download to save onto your computer!
For next weeks poll, Im going to add another iPad tutorial: how to take a screenshot on your iPad/iPhone... something that was necessary for me to write this weeks tutorial!
Thursday, February 12, 2015
How to Format an Unformattable Pendrive

Sometimes when you format your pendrive an error message is shown. This error is shown because your pendrive is affected by viruses. You try hard to format your pendrive but you fail in doing so. In this post i am telling you a trick by which you can format an unformatable pendrive easily. I use this method most of the time on my computer.
Also Read: How to install Hindi font in windows xp
Instructions to format a Pendrive
1. Insert you pendrive in the usb port.2. Now open run from the start menu and type cmd and hit enter.
3. A black screen will open. Now Write format and your drive letter (example: format h:) and press enter, as shown in above image.
4. Your device is ready to format now press enter.
5. Now pendrive is formated, label your pendrive by a name that you like and press enter.
Saturday, January 31, 2015
How to Connect XenServer and Operating VM Using Java
At the time of final year project in MCA we have done a challenging project on citrix xenserver. Initially we did research and learn about virtualization, xenserver and xen java API concepts later we decided to do a web based project and named as xenserver management on cloud computing. We developed a web console to interact with xenserve and performing various operations on it. In our project we did different modules like establishing connection with xenserver, getting the xenserver version, vm creation, VM destroy and virtual machine life cycle. Life cycle is nothing but VM start, stop and reboot.
It is difficult to explain all modules so I will cover most useful functionality how to connect xenserver using java and VM life cycle using java. Don’t be confuse VM is called as virtual machine and it a guest operating system. In below video demo we can watch complete practical part like how to create web project, adding xen API jars in project, configuring apache tomcat server etc.
Screenshots


Code to connect xenserver using java
import com.xensource.xenapi.Connection;
import java.io.IOException;
import java.io.PrintWriter;
import javax.servlet.ServletException;
import javax.servlet.http.HttpServlet;
import javax.servlet.http.HttpSession;
import javax.servlet.http.HttpServletRequest;
import javax.servlet.http.HttpServletResponse;

/**
 *
 * @author Faruk Shaik
 */
public class connection extends HttpServlet {
    public static String IP;
    protected void processRequest(HttpServletRequest request, HttpServletResponse response)
            throws ServletException, IOException {
        response.setContentType("text/html;charset=UTF-8");
        PrintWriter out = response.getWriter();
        try {
          String ip=request.getParameter("IP");
          IP="http://"+ip;
          String uname=request.getParameter("uname");
          String pass=request.getParameter("pass");
          Connection conn = new Connection(IP,uname,pass);
          if(conn!=null)
          {
          HttpSession hs=request.getSession();
          hs.setAttribute("ip",IP);
          hs.setAttribute("uname",uname);
          hs.setAttribute("pass",pass);
                         javax.swing.JOptionPane.showMessageDialog(null,"connection established");
                 response.sendRedirect("task.jsp");
          }

        }
        catch(Exception e)
        {
             javax.swing.JOptionPane.showMessageDialog(null,"connection not established");
              response.sendRedirect("connection.jsp");
        }
            finally {
            out.close();
        }

    }
    public String s()
    {
        return IP;
    }
}
Code to Start, stop and reboot the VM using java
import com.xensource.xenapi.APIVersion;
import com.xensource.xenapi.Connection;
import com.xensource.xenapi.*;
import com.xensource.xenapi.VM;
import java.io.IOException;
import java.io.PrintWriter;
import java.util.Map;
import javax.servlet.ServletException;
import javax.servlet.http.HttpServlet;
import javax.servlet.http.HttpServletRequest;
import javax.servlet.http.HttpServletResponse;
import javax.servlet.http.HttpSession;
/**
*
* @author Faruk Shaik
*/
public class vmlife extends HttpServlet {
protected void processRequest(HttpServletRequest request, HttpServletResponse response)
throws ServletException, IOException {
response.setContentType("text/html;charset=UTF-8");
PrintWriter out = response.getWriter();
String name1=null;
try {
HttpSession hs=request.getSession();
String ip=(String)hs.getAttribute("ip");
String uname=(String)hs.getAttribute("uname");
String pass=(String)hs.getAttribute("pass");
Connection conn = new Connection(ip,uname,pass);
String name=request.getParameter("count");
if(name.equalsIgnoreCase("start"))
{
String vmname=request.getParameter("vmname");
Mapvms=VM.getAllRecords(conn);
for(VM.Record record: vms.values())
{
if(!record.isATemplate&&!record.isControlDomain )
{
if(vmname.equals(record.nameLabel.toString()))
{
VM.getByUuid(conn,record.uuid).start(conn, false, false);
name1="VM"+vmname+" started successfully";
}
}
}
}
else if(name.equalsIgnoreCase("shut"))
{
String vmname=request.getParameter("vmname");
Mapvms=VM.getAllRecords(conn);
for(VM.Record record: vms.values())
{
if(!record.isATemplate&&!record.isControlDomain )
{
if(vmname.equals(record.nameLabel.toString()))
{
VM.getByUuid(conn,record.uuid).hardShutdown(conn);
name1="VM"+vmname+" shutdown successfully";
}
}
}
}
else if(name.equalsIgnoreCase("reboot"))
{
String vmname=request.getParameter("vmname");
Mapvms=VM.getAllRecords(conn);
for(VM.Record record: vms.values())
{
if(!record.isATemplate&&!record.isControlDomain )
{
if(vmname.equals(record.nameLabel.toString()))
{
VM.getByUuid(conn,record.uuid).hardReboot(conn);
name1="VM" +vmname+"rebooted successfully";
}
}
}
}
}
catch(Exception e){
System.out.println(e);
javax.swing.JOptionPane.showMessageDialog(null,"xen excepton is"+e);
}finally {
out.close();
}
}
}
Monday, January 26, 2015
How To Make Secure Your Facebook Account
1. Make sure only your Friends can see your Profile:
You wouldnt just go up to a stranger in the street and start telling them about your life, so why would you want them to see your Facebook profile?
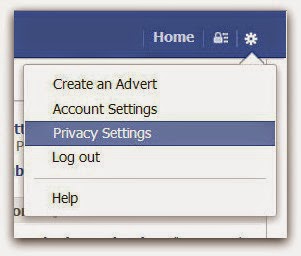
Click on the cog icon that you see in the top right hand corner of the screen. Then click Privacy Settings.
Click Privacy - the third option down in the left hand pane.
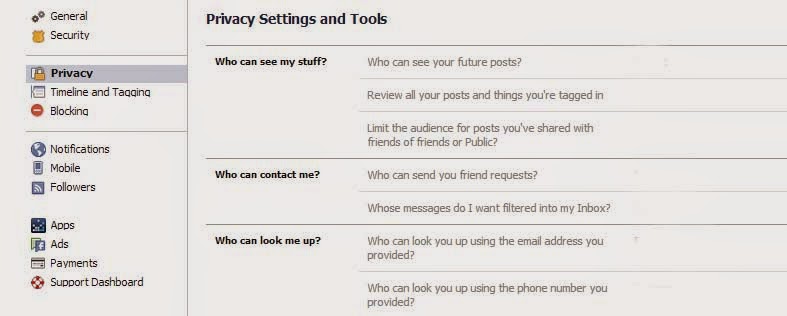
You are now in the Privacy Settings and Tools area of Facebook. From here you can control Who can see my stuff?
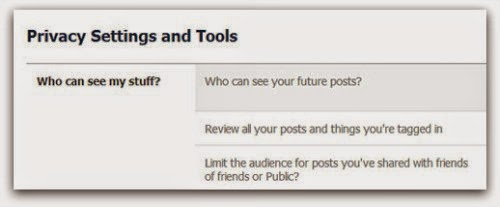
By editing Who can see your future posts? you will be able to choose exactly who gets to see your future updates.
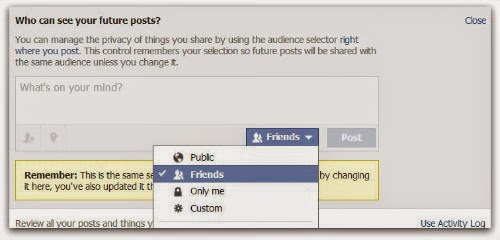
Choose from:
- Public (which obviously means everyone)
- Friends
- Only you
- Custom (which allows you to limit some of your friends from seeing your posts)
Pick whats best for you, but make sure Public isnt selected. Whatever you choose will then become the default every time you post an update (though you still have the option of selectively changing this for each individual update you post in the future).
If you want to limit old posts that you may have made available to everyone or friends of friends then you can do this individually in the Activity Log, or you can choose to Limit the audience for old posts on your timeline. This will change everything youve ever posted to only be seen by your friends...
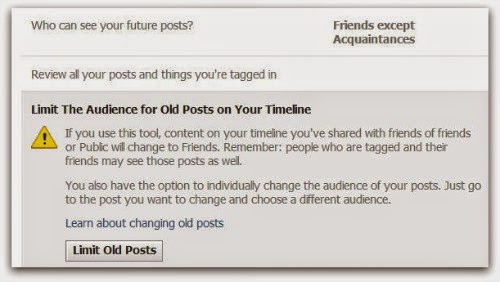
2. Control who can contact you on Facebook:
The second part of the Privacy Settings and Tools section allows you to select who can contact you.
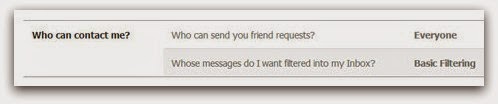
By default this is set up to allow friends and people you may know the opportunity to send you a message to your inbox.
If you want only friends to be able to contact you, you can increase the filtering on your inbox. Other messages will then be diverted to your other folder which you can access from your Messages screen.
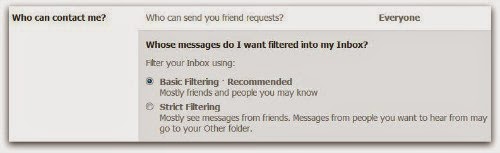
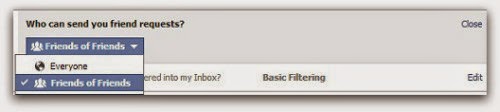
Additionally you can limit who can send you a friend request. By default, anyone can try to befriend you on Facebook, but if youd rather limit that a bit you can change it so only friends of your friends can add you as a friend:
3. Limit who can discover your profile based on your email address and/or telephone Number:
The final option from the Privacy Settings and Tools screen allows you to control who can find you using your email address or telephone number.
Under Who can look me up?, click Edit next to the line that says Who can look you up using the email address or telephone number you provided?
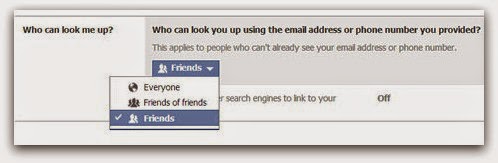
Change the setting to Friends of friends or Friends only.
4. Set up login Notifications:
Facebook can send you an alert every time someone accesses your account from an unknown computer or other device, enabling you to receive a warning that someone has gained unauthorised access to your account.
Still under Privacy Settings, click the second option in the left hand pane.
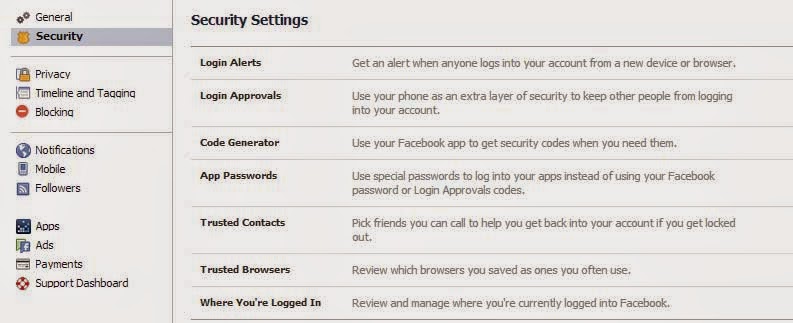
Click Edit next to login notifications and choose whether you want to receive an email or a text message/push alert. Click on Save Changes. Login notifications are now active.
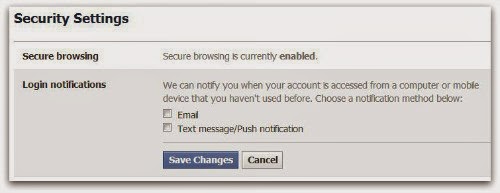
5. Turn on login Approvals:
Every time you access your account from an unknown browser you can get Facebook to send a code to your phone which you will then need to use to login.
Next to Login approvals, click Edit. Then tick the box to require a security code to access my account from unknown browsers. Click Save Changes

Click Get Started. Facebook will then take you through the process of setting up login approvals.
Note, youll only need to use a code whenever you login from somewhere new so if you always use the same browser and phone you will not need to verify your identity every time. It does makes it much more difficult for a hacker to get into your account from elsewhere, so its a great thing to enable.
These are just a few tips that can help you safeguard your Facebook profile.
If you have any tips you wish to share, please leave them in the comments below.
Tuesday, January 13, 2015
How to Create Shortcuts for Symbols in Microsoft Word

Though graphical user interface has almost smashed away the command line, still keyboard shortcut is very popular among professionals. Still it is the best way to get out the best from any software. Because graphical user interface may let you easily use the software but keyboard shortcuts can give you the productivity.
Earlier Ive provided keyboard shortcuts for different programs. You can also read these:
- Keyboard Shortcuts for MS Excel
- Shortcuts for Internet Browsers
- Ctrl + A to Ctrl + Z Shortcuts for MS Word
- Keyboard Shortcuts for MS Word
Today you will learn how to create shortcuts for symbols or special characters in MS Word. For example: Alt + 1 for ×, Ctrl + Num 0 = ≠, Ctrl + Num 1 = ÷ etc. Okay lets begin:
- At first open MS Word.
- Then go to Symbol (Word XP and 2003 users will find it under Insert Menu. And Word 2007 and 2010 should go to the Insert Tab then at the right side there will be Symbol option. Then choose More Symbols from down arrow).
- Now you will see the Symbol Window with many symbols arranged under different fonts.
- Select the Symbol or Character you want to make a shortcut for.
- Click the Shortcut Key.
- In the Press New Shortcut Key box press the key combination you wanna use for the selected symbol. For example: Ctrl + desired letter. Desired letter maybe 1 or num 1, or A, B, C etc. But make sure that this combination doesnt conflict with any existing shortcuts. (Never assign any shortcuts from Ctrl + A to Ctrl + Z. Use Alt key while combining with A to Z)
- Finally hit on the Assign button. Or if you wanna remove the previous one then hit on the remove button. Thats it.
Note: Some characters may already have shortcut key combination. You will see the combination when you are in the symbol window. It will be right to the Shortcut Key button.
Stay with Marks PC Solution to get more interesting IT topics!
Subscribe to:
Posts (Atom)