Monday, March 9, 2015
How about inline slideshow with a nice pop up gallery
What I (my client) wanted was a gallery that is inline as slideshow (with custom effects) and then as you click on the image, it enlarges into more-or-less full-screen or something like it.
Now amazingly I havent found any to be complete like that. Either theyre inline excellent slideshows without "popup-zoomin", or theyre amazing galleries that work from thumbnails (meaning static photos in the page). No fancy-wow-ough-yeah gallery covers the thing as:
1. inline slideshow (not thumbnails)
AND 2. pop-up (zoom-in or whatever) gallery (that has the controls of forward, backward,... and effects,...).
So after a month (or three months?), a combination of 2 scripts seems to somehow provide the best option:
1. Jquery cycle
2. prettyPhoto
With 1st, you put in images in 1 div and cycle through them with several effects. Nice, simple to plug in.
< div id="PhotosScrolling" >
< img1... />
< img2... />
< img3... />
< /div >
With 2nd, you just need to put some links over those imgs, so the final html looks like this:

Automatically Generate Maps and Directions with Google Apps Script
Following up on our recent post about the new Doc List capability in Google Apps Script, we thought we’d take a moment to look a little more closely at another new feature in Apps Script - integration with Google Maps. Google Maps has had an API for quite some time, but now we’ve made it very easy to generate customized maps and driving directions straight from a script.
A mail merge is often used to automate some of the drudgery involved in sending invitations to a large number of people. With the new Apps Script Maps Service you can easily add a map image to the email, and even add a marker showing the event location.
While that’s nice, it’s hardly a time saver - why write code to generate the same image repeatedly? A much more useful feature is generating a custom map for each guest, along with personalized driving directions. We’ve made a spreadsheet template that includes just such a script - it’s available here.
Let’s look at a short code snippet that illustrates the calls required to generate a map image and add a marker at the start and end addresses:
function getMap (start, end) {
// Generate personalized static map.
var directions = Maps.newDirectionFinder()
.setOrigin(start)
.setDestination(end)
.getDirections();
var map = Maps.newStaticMap().setSize(500, 350);
map.setMarkerStyle(Maps.StaticMap.MarkerSize.MID,
"red", null);
map.addMarker(start);
map.addMarker(end);
return map.getMapUrl()
}
Running the function with start and end set to Google, San Francisco and Google, Mountain View, we get a link to the following image:

Along with generating maps images, the Maps feature can also find directions, retrieve elevation data and even perform some geocoding operations. Please note that any data returns by these APIs should not be used without displaying an associated map image - see the Google Maps API Terms of Service for more details.
Posted by Evin Levey, Google Apps Script Product Manager
Thursday, February 26, 2015
A Giveaway with a 100 Chance to Win!
Do you want to enter a giveaway where there is a 100% chance that you would win? Then, this post is for you! I just posted a new Uno game in my TPT store: An Alphabet Recognition Uno Game!

This game coordinates with the other Uno games Ive created. By entering this giveaway, you can win the ABC Uno game and ANY OTHER UNO GAME I CREATED!!!
Heres what you have to do to win the Alphabet Uno Game:
1. Follow my blog.
2. Follow my TPT store.
3. Leave me a comment telling me that you did both!
I know that the alphabet game is a bit simple for the older grades, but this second part of the giveaway is perfect for any grade! Heres what you can do to get one of my other Uno Games for free:
1. Blog about this giveaway, linking back to this post.
2. Leave me a comment with the link to your blog post and telling me which Uno game you want me to email you!
You can check out the other Uno games in my TPT store! There are currently games for the Dolch Pre-Primer (Freebie), Primer, 1st Grade, 2nd Grade, and 3rd Grade Words!
Anyone who does either of the above before Saturday, April 14 at noon EST will win!
Tuesday, February 17, 2015
Got Lollipop 10 cool things to try with Android 5 0
 |
| Googles Android 5.0 release is more than just a pretty makeover. Here are 10 fun features youll definitely want to explore once you have Lollipop in front of you |
Theres plenty of new stuff to see, of course -- but once youve finished exploring all the fresh and fancy visuals, here are 10 cool things to try with Lollipop on your Android phone or tablet:
1. Set up a trusted Bluetooth device.
If you have a Moto phone, you may have done this before -- but for the rest of the world, its uncharted terrain: the ability to have your Android device stay unlocked anytime a specific Bluetooth device is present and paired.To set it up, head into your phone or tablets system settings and tap "Security." Make sure you have "Screen lock" set to something other than "Swipe"; youll need to have a pattern, password, or PIN established so your phone can automatically secure itself whenever your trusted Bluetooth device isnt around.
Once youve done that, tap "Smart Lock" on that same menu and then tap "Trusted devices." Tap the red plus sign and follow the prompts to pair your smartwatch, car stereo, portable speaker, or practically anything else -- then sit back and enjoy having easy access to your Android gadget whenever the Bluetooth device is nearby.
(You probably dont have access to it yet, by the way, but youll soon be able to set a trusted place as well. An incoming update to Google Play Services should add that option to all Lollipop devices within the coming days.)
2. Check out the revamped Face Lock feature.
While youre in that same "Security" menu, go back into "Smart Lock" and tap "Trusted face." Follow the prompts to train the system to recognize your face, then press the power button and give it a whirl.
3. Take Lollipops always-listening voice command system out for a spin.
Provided your phone or tablet supports it, you can now give voice commands anytime -- even when your devices display is off.The option to activate the feature is a bit buried: Head into your system settings, tap "Language & input" and then "Voice input," then tap the gear icon next to "Enhanced Google services" and look for a line labeled "Ok Google Detection."
Tap it, then tap the line labeled "Always on" and follow the prompts to train the system to recognize your voice. While youre in that menu, think about whether you want voice commands to work even when your phone is locked with a pattern, PIN, or password; if you do, tap the line labeled "When locked" before you exit out.
Once youre all done, just say "Okay, Google" and your phone will start listening. You can then ask it a question or give it all sorts of commands and have it work for you whether its in your hands or not.
4. Interact with a notification on the lock screen.
Lollipop brings a whole new look to the Android lock screen, and your personal notifications are the main attraction. Next time you press your devices power button and see a notification waiting, try swiping it horizontally in either direction to dismiss it. You can also tap on it twice to open it or swipe downwards on it to expand it and gain access to any quick commands available (like archiving or replying to an email).5. Set up and try priority notification mode.
One of Lollipops more complex but also potentially useful features is the systems new priority notification mode -- essentially a customizable "do not disturb"-style setting for your tablet or phone. Whenever the priority mode is active, only notifications that are considered "high priority" will make a sound and alert you; any other notifications will show up but remain silent.To get started, press your devices volume up or volume down key while the display is on and then tap "Priority" in the panel that appears at the top of the screen. Select either to leave that mode on indefinitely (the default) or to specify a finite amount of time -- an hour, two hours, whatever -- for which itll remain active.

While you have that panel open, take a minute to visit the priority notification settings to make sure its set up the way you want: After pressing a volume key and tapping "Priority," tap the gear icon next to the words "Priority interruptions only." Now think about what types of notifications you want to alert you when you have the priority mode active. You can opt to allow any combination of events and reminders, calls, and messages -- and with the latter two, you can either allow any calls and messages to come through or allow only calls and messages from approved contacts.
6. Schedule a recurring priority notification mode.
Lollipops priority notification mode can automatically activate itself at certain recurring times -- if, say, you want your phone to remain silent except for emergency calls and messages during the night.Go back into that same menu we were just in (you can also get to it by going into the main system settings and tapping "Sound & notification," then "Interruptions"). Scroll down to the bottom of the screen and select what days and times you want the priority mode to activate.
Once youve done that, your device will automatically go into priority notification mode during those windows -- and youll be bothered only by the notifications you absolutely need.
7. Customize how app notifications behave.
Want to take things a step further? Lollipop lets you customize notifications on an app-by-app basis so that any apps alerts can be considered "high priority" all the time.If you set an app to be high priority, youre effectively whitelisting it: Any notifications generated by that app will always alert you, even if your device is in priority-only mode. The apps notifications will also always appear at the top of your notification panel, above any others.

All you have to do is head into your system settings, select "Sound & notifications" and then select "App notifications." Tap any app you want to customize, then toggle the switch for "Priority" to whitelist it.
8. Prepare your phone for guest access.
If you ever pass your phone or tablet off to a friend, Lollipops new guest mode is well worth exploring.To see how it works, open up your devices Quick Settings panel by swiping down from the top of the screen and then swiping down a second time. Tap the circular avatar at the far right corner, then tap "Guest."
When youre ready to switch back to your own account, do that same thing but tap your name instead of "Guest." If you have a security pattern, PIN, or password set, youll be prompted to enter it before proceeding.
9. Pin something to your devices screen.
Weve all been there: Someone you know needs to borrow your phone "for a quick sec" to make a call or look something up online. Or maybe you want to hand your device over to the little one so she can play a game while the grown-ups talk. A new Lollipop feature called Screen Pinning is designed to let you do those types of things without any hassle -- and without having to worry about the person getting into something they shouldnt.Take a moment now to enable it: Go into the main system settings, select "Security," scroll down to "Screen Pinning," and set it to "On."
Then take it for a test run: Tap the Recent Apps key (the square to the right of the Home key) and scroll upward. Youll see a pushpin icon on the most recent app or process youve had open. Tap it and then confirm that you want to pin that process.

To exit the pinned mode, press the Back and Recent Apps (apparently also now known as "Overview") buttons at the same time. If you have a PIN, pattern, or password set -- which you should if you want this feature to have much meaning -- youll need to enter it in order to return the device to its normal state.
10. Beam something to another device.
Android Beam has been around for a while, but its always been hard to know exactly when and how it can work. With Lollipop, Beam is integrated into the system sharing function and is consequently easier to use and more versatile than ever.See for yourself: Open up the Photos app on your device and tap any image you like. Then tap the share icon at the bottom of the screen and select "Android Beam" from the list of choices that appears.
Your phone or tablet will instruct you to bring another Android device against its back. Just make sure the other device is unlocked, then bring them back to back -- and shazam: The photo you selected will transfer wirelessly from one device to the other, even if the other device isnt on Lollipop. No wires, no special apps, no third-party services required.
(Both devices will need to support NFC in order for this to work, but pretty much every reasonable Android device released in the past few years does.)
You can do the same thing anywhere the share command is available -- a social media app, a file manager, you name it. Images, links, contacts, and any other type of shareable content should work.
Bonus: Try your hand at Lollipops hidden Flappy Bird game.
Google loves including fun little Easter eggs in its products, and Lollipop is no exception. Go into your system settings, select "About phone" (or tablet) and then tap the line labeled "Android version" a bunch of times in a row.When you see a large Lollipop graphic appear on your screen, tap the circle part of the image about five times and then press and hold your finger to it. Youll then be taken into an Android-themed Flappy Bird-like game, with lots o lollipop obstacles to jump through and avoid.
Flap, flap, flap. One final tip: If you find yourself playing for more than 10 minutes, put down your device and smack yourself in the head with the nearest rubber mallet. Youll thank me later.
Sunday, February 15, 2015
Need for Speed Most Wanted 2005 full version for PC with highly compressed

Review:
The games career mode starts out with a hilarious bang. You take on the role of a nameless, faceless new racer attempting to hit the scene in the city of Rockport. An underground ranking known as the Blacklist governs who can race who, and when. You almost immediately run into a punk named Razor, whos definitely the sort of dude that lives his life a quarter-mile at a time. Hes at the bottom of the list, but a few races later, hes sabotaged your ride and has won it from you in a race. Meanwhile, youre carted off to jail. Left with nothing but some mysterious help from a stranger named Mia, your task is to get back in the race game to work your way to the top of the Blacklist, which is now topped by Razor, whos using your old car to wipe out the competition.
The game actually has a great story hook at the beginning that makes you want to see the career mode through to completion. The early story segments are told through some sort of unholy mixture of computer-generated cars and full-motion video actors. The acting in these early segments is awful...awful good, that is. Youll scratch your head and wonder if these segments are intentionally bad and meant to be played for laughs or if theyre just unintentionally funny. Either way, theyre great. Unfortunately, after a brief prologue, you stop seeing video sequences, and the story is conveyed via voicemails from various characters. Are you a cop? Will you get to utter the magic street racing words, "Mia, I am a cop"? Or is the plot twist even more painfully obvious than that? Youll have to see the story through to find out where everyones allegiances lie.
Working your way up the Blacklist is a multistep progress. Before you can challenge the next Blacklist racer, you have to satisfy a list of requirements. Youll have to win a set number of race events. And youll have to reach a set number of pursuit milestones and earn enough bounty by riling up the police. The cops hate street racers and will give chase when they see you rolling around the open city. You can also just jump right into a pursuit from a menu, too.
Running from the cops is the best action the game has to offer. Chases usually start with just one car on your tail. But as you resist, you might find 20 cars giving chase, in addition to a chopper flying overhead. Losing the cops gets tougher as your heat level rises. Level one heat results in the appearance of just your standard squad cars. But by the time you get up to level five, youll be dealing with roadblocks, spike strips, helicopters, and federal-driven Corvettes. A meter at the bottom of the screen indicates how close you are to losing the cops or getting busted. Stopping your car--or having it stopped for you by spike strips or getting completely boxed in by cops--is how youll get busted. To actually get away, youll need to get out of visual range...and stay there. The initial evasion changes the meter over to a cooldown meter. Youll have to lie low and wait for that meter to fill up to end the chase. This is probably the tensest part of the entire chase, since you never know when two cops might blow around the corner and spot you, starting the whole process over again. It all sort of works like some sort of strange, wonderful cross between Grand Theft Autos open city and Metal Gear Solids stealth mechanic. All the while, youll be acquiring heat on your car. This means that youll have to keep a couple of cars around, because acquiring heat on one car lowers the heat on your other ones. Also, getting busted too many times can result in your car getting impounded, though you can avoid that by resetting the system whenever you get caught (if thats more your speed).
Theres also a lot of racing in Most Wanteds career mode--almost too much, in fact. Youll engage in multilap circuit races, point-A-to-point-B sprint races, drag racing, checkpoint-driven tollbooth races, and speed trap, where the winner is the player that accumulates the most speed while passing by a handful of radar cameras spread throughout the track. The races are solid but not spectacular. The artificial intelligence doesnt really help things along, because most of the game is rubber-banded like crazy. We actually set our controller down for 20 seconds--then picked it back up and caught our opponents on the final lap. And though the AI will occasionally crash and come to a complete halt, itll catch up very, very quickly. Later on in the game, you get a voicemail message informing you that things are going to get tougher. At this point, the computer drivers magically start taking every single shortcut, and the rubber banding only seems to work against you. As a result, catching up after a mistake is much tougher. If this difficulty had gradually sloped up, it wouldnt be a big deal. But flipping the switch from "drive like crap" to "drive like a genius" is really annoying. Fortunately, the racing action itself is entertaining enough to keep you going, and of course, youll be dying to find out what happens next in the story. Read more
System requirements:
Windows 2000/XP
1.4GHz Processor
256MB RAM
8X CD-ROM Drive
3GB Hard Disk Space
32MB ATi Radeon 7500 or nVidia GeForce2 MX Class Video Card
DirectX compatible Sound Card
DirectX 9.0c
Keyboard
Mouse
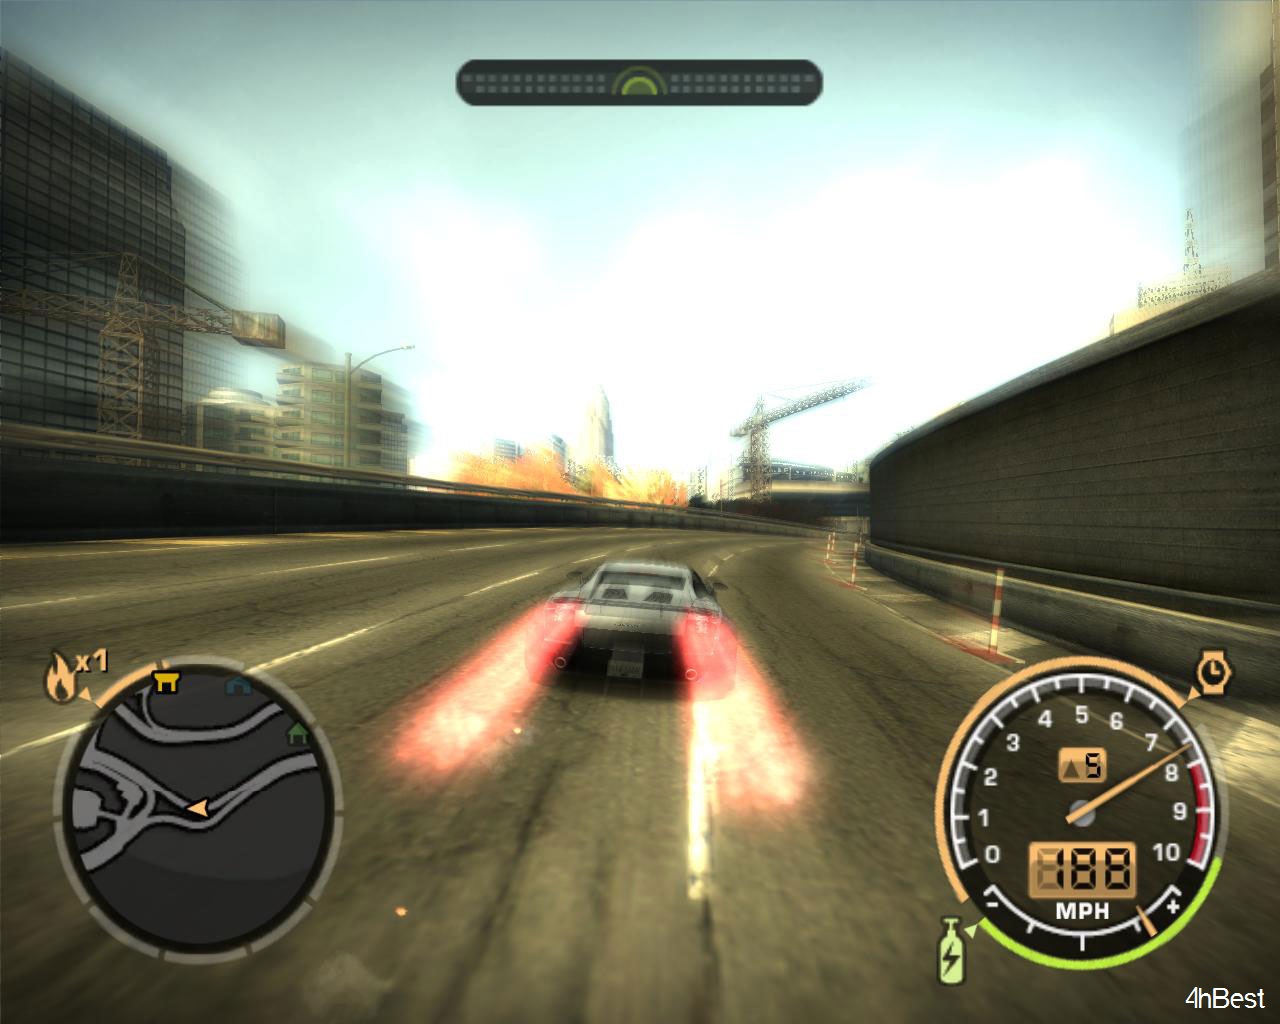
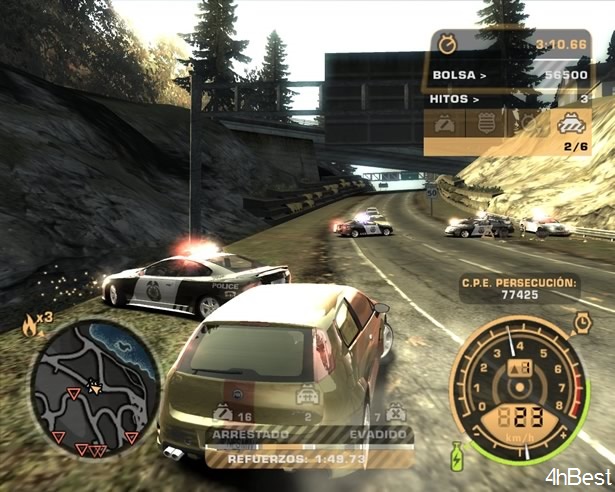
Screen Shots: Click on the image to view large screen
 |  |  |

Part 1
Part 2
Friday, February 13, 2015
Stream Lookup Step explained with a Sample Transformation in Pentaho Kettle Pentaho Data Integration
This simple transformation explains the "Stream Look Up" step example in Pentaho Kettle as part of my learning & documenting here for community developers.
In next articles Ill be sharing more interesting topics with End to End examples.
Example developed on :
5.1.0 Kettle
Reference :
D:pdi-ce-5.1.0.0-752data-integrationsamples ransformationsStream lookup - basics.ktr
Scenario :
There are 2 tables lets say Employee and Department and the data is as follows in both of the tables.
There is a common field lets say DeptID_Emp and DeptID_Dept in both the tables.
Lookup the DeptID_Emp field with DeptID_Dept and get the records of all employees with department names.
Employee Table:
EmpID Name DeptID_Emp
110 Sadakar 10
111 Hasini 10
112 Dolly 20
113 Kutti 20
114 Jikky 30
Department Table:
DeptID_Dept DeptName
10 Mathematics
20 Computers
1. Drag and drop Data Grid step (Input->Data Grid) and Meta(Column names) and Data(Insert the employee data shown above) name it as "Employee".
2. Drag and drop Data Grid step (Input->Data Grid) and double click the step to open its properties.
Give meta data (i.e., column names with length) Insert the data shown in Department table.
3. Drag and drop Stream Lookup step (Look Up -> Stream Lookup).
Connect Employee -> Stream Lookup and Department -> Stream Lookup
and open the properties of Stream Value Lookup.
As shown in below figure set the configuration.
Lookup Step : Department
Filed : DeptID_Emp ( Lookup field from the source stream).
LookupFiled : DeptID_Dept (lookup the DeptID_Emp field with DeptID_Dept).
i.e., matching the values of the fields ( Internally itll compared with = operator).
Get Fields : If you click on it, it will fetch all the fields from source stream (here it is Employee table) on.
Get Lookup fields: Itll fetch all the rows from lookup file(here it is Departmet table).
We can also provide default values to the fields that are coming from lookup file/table.

4. Connect "Stream lookup" to a dummy step (Flow->Dummy) and have a preview.(right click on the dummy step and see the preview).
What the Stream Lookup do here in the transformation is : Itll look for a match from the source stream. If the values matches from the lookup file then associated department name is added to the dummy step else itll take NULL value.
If we add select values step we can get the desired fields with new names.
Output is shown below image.
The sample transformation shown in below image :

Download the .ktr file here : Click me
:-)
Saturday, January 31, 2015
Working with Adobe Premiere Pros Basic 3D Video Effect PART 1
Software: Adobe Premiere Pro
Version: 1.5
In this tutorial we will learn how to use Adobe Premiere Pros Basic 3D video effect. Heres a sample video file that shows what we hope to achieve by the end of this exercise:
Lets begin by creating a folder named Basic_3D_Effect. You may place this folder anywhere on your hard drive.
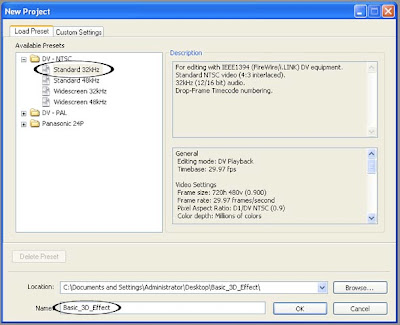
Next, create a new Adobe Premiere Pro 1.5 project. Select the DV-NTSC Standard 32kHz Preset. Name your project Basic_3D_Effect and save it inside the Basic_3D_Effect folder you just created. Click on OK.
Next, create a new Title by choosing File > New > Title...
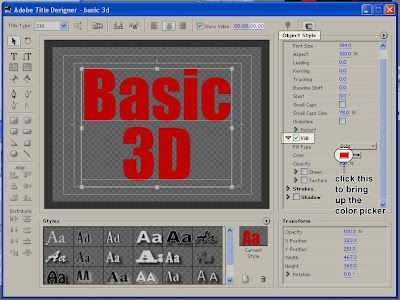
Using the Title designers Type Tool, type in the words "Basic 3D". Type the word "Basic" on one line and type "3D" on the next line similar to the image below.
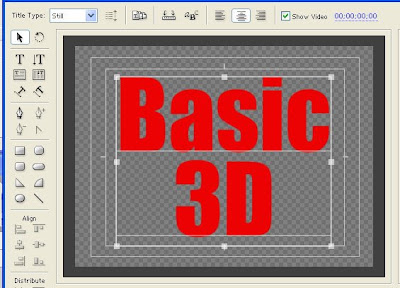
Use a big bold font and choose a color that isnt too bright. To change the color of your text, select it first, then go to the Object Style section of the Adobe Title Designer. Under the Fill properties, click on the color box to the right of the word Color. This will bring up the Color Picker window where you will be able to choose your desired color.
Save your Title file as basic_3D.prtl (make sure you save it in the Basic_3D_Effect folder as well) and close the Title Designer window.
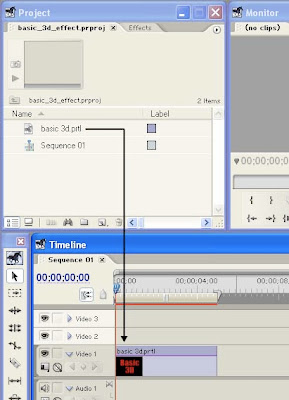
From the Project window, drag the basic_3D title down to the video 1 track of your Timeline. You can zoom in on your Timeline in order to see the clip better. Make sure that the clip is about 5 seconds in duration.
continue to Working with Adobe Premiere Pros Basic 3D Video Effect PART 2
Sunday, January 25, 2015
ATM 702X Action Chip Tablet Flashing Tutorial with Latest Flasher
ATM 702X Action Chip Tablet Flashing Tutorial with Latest Flasher.
ATM7021 , ATM7021A,ATM7029
Flashing Tool for Action CPU based ATM 702X Tablets.
Step by Step Tutorial .


for boot mode Action CPU Tablet turn off tablet . Hold Volume UP(+) button and connect Action ATM702X tablet and insert cable .While holding Volume Up button press power button simultaneously 4 to 5 times. Computer found new hardware and driver will be installed . To make sure either your android tablet is connected go to properties of my computer and find out in USB portion"Action USB 2.0" .

 |
| 1.4 Action Tablet Flashing Tool |
 |
| 1.5 Action Tablet Flashing Tool |
 |
| 2. Action Tablet Flashing Tool |
 |
| 2.1 Action Tablet Flashing Tool |
 |
| 2.2 ATM7021,ATM7021A,ATM7029 Flashing Tool |
 |
| 2.3 ATM7021,ATM7021A,ATM7029 Flashing Tool |
 |
| 2.4 ATM7021,ATM7021A,ATM7029 Flashing Tool |
 |
| 2.5 ATM7021,ATM7021A,ATM7029 firmware loader |
 |
| 3. ATM7021,ATM7021A,ATM7029 Flashing Tool |
 |
| 3.1 ATM7021,ATM7021A,ATM7029 firmware loader |
 |
| 3.2 Action tablet firmware loader |
Do not disconnect your tablet during flashing process. Charge your tablet more then 60% before flashing. Power failure during flashing may result dead tablet.
Make sure your tablet is Action CPU based .
Find out board id and download exact firmware.Choosing wrong firmware may result soft brick or dead tablet.
Wednesday, January 14, 2015
Playing with Filename Extensions!

Common File Types with Extensions
- Asmt.exe : It will show your file as executable file
- Asmt.img: It will show your file as burnable image file.
- Asmt.wmv: It will show your file as video file
- Asmt.mp3: It will show your file as audio file