Showing posts with label tutorial. Show all posts
Showing posts with label tutorial. Show all posts
Wednesday, February 4, 2015
AS3 Animation Tutorial Using the AS3 EnterFrame Event to Create Animation in Flash Video Tutorial
by Alberto Medalla
Lecturer, Ateneo de Manila University
You can use AS3 to add some animation to your Flash project using code. Instead of adding tweens on the timeline, youll be using AS3 to animate objects. In this ActionScript video tutorial, Ill show you a few simple examples on how to create animation in Flash using the AS3 EnterFrame event.
AS3 EnterFrame Event Animation Sample Code #1
Here is the code for the first example where the circle will continue to scale up as long as the movie is running.
AS3 EnterFrame Event Animation Sample Code #2
In the second example, the animation will stop when the circles size reaches 150 pixels.
AS3 EnterFrame Event Animation Sample Code #3
In the third example, the code has been modified to make the circle grow and then shrink repeatedly.
Read more »
Lecturer, Ateneo de Manila University
You can use AS3 to add some animation to your Flash project using code. Instead of adding tweens on the timeline, youll be using AS3 to animate objects. In this ActionScript video tutorial, Ill show you a few simple examples on how to create animation in Flash using the AS3 EnterFrame event.
AS3 Animation Tutorial - Using the AS3 EnterFrame Event to Create Animation in Flash
AS3 EnterFrame Event Animation Sample Code #1
Here is the code for the first example where the circle will continue to scale up as long as the movie is running.
var growthRate:Number = 2;

circle_mc.addEventListener(Event.ENTER_FRAME, grow);

function grow(e:Event):void
{
     e.target.width += growthRate;
     e.target.height += growthRate;
}
AS3 EnterFrame Event Animation Sample Code #2
In the second example, the animation will stop when the circles size reaches 150 pixels.
var growthRate:Number = 2;
var maxSize:Number = 150;

circle_mc.addEventListener(Event.ENTER_FRAME, grow);

function grow(e:Event):void
{
     e.target.width += growthRate;
     e.target.height += growthRate;
     if(e.target.width >= maxSize)
     {
          circle_mc.removeEventListener(Event.ENTER_FRAME, grow);
     }
}
AS3 EnterFrame Event Animation Sample Code #3
In the third example, the code has been modified to make the circle grow and then shrink repeatedly.
var growthRate:Number = 2;
var maxSize:Number = 150;
var minSize:Number = 100;
var scaleMode:String = "grow";

circle_mc.addEventListener(Event.ENTER_FRAME, growShrink);

function growShrink(e:Event):void
{
     if(scaleMode == "grow")
     {
          e.target.width += growthRate;
          e.target.height += growthRate;
          if(e.target.width >= maxSize)
          {
               scaleMode = "shrink";
          }
     }
     else if(scaleMode == "shrink")
     {
          e.target.width -= growthRate;
          e.target.height -= growthRate;
          if(e.target.width <= minSize)
          {
               scaleMode = "grow";
          }
     }
}
[VIEW MORE SAMPLES]
Click on the link to view more AS3 enterframe animation samples

Sunday, February 1, 2015
Android beginner tutorial Part 60 Introduction to Services
In this tutorial we will find out what Services are and what they are used for.
A Service in Android is a component similar to Activity. The difference between the two is that a Service runs in the background, it has no user interface whatsoever. Because of that, they are used to perform actions that dont need user interaction. A Service keeps running until it is stopped by something else or if it stops itself.
Using Intents, applications can connect and interact with Services. There can be more than one application connected to a single Service.
Just like the Activity class, Service has lifecycle methods. The 3 main ones are onCreate(), onStartCommant() and onDestroy().
A Service can be started by an application using Context.startService() method. It can be stopped using Context.stopService().
A Service can stop itself using Service.stopSelf() or Service.stopSelfResult() methods.
It is possible to connect to a running Service and use that connection to interact with the Service. The connection is established using Context.bindService() method and stopped using Context.unbindService().
If a Service has been stopped, it can be resumed using the bindService() method.
The onStartCommand() function is called by the system every time the service is explicitly called using the startService() method. It provides the arguments that are passed to the method, as well as a unique token of the start request. The onCreate() and onDestroy() methods are called in all Services regardless of whether they were added using startService() or bindService() methods.
Any Service can potentially interact with the user, because any Service can receive client requests. If a Service allows other applications to connect to it, its binding is done using these methods: onBind(), onUnbind() and onRebind(). They all receive Intent objects as parameters.
The Intent thats sent to the onBind() function is the one that was used in the bindService() function. The Intent thats sent to the onUnbind() function is the one that was used in unbindService().
The onBind() method returns the connection channel, which the clients can use to interact with the Service. The onRebind() function can be called after onUnbind(), if a new client connects to the Service.
Thats all for today. We will begin creating Services in the next part.
Thanks for reading!
Read more »
A Service in Android is a component similar to Activity. The difference between the two is that a Service runs in the background, it has no user interface whatsoever. Because of that, they are used to perform actions that dont need user interaction. A Service keeps running until it is stopped by something else or if it stops itself.
Using Intents, applications can connect and interact with Services. There can be more than one application connected to a single Service.
Just like the Activity class, Service has lifecycle methods. The 3 main ones are onCreate(), onStartCommant() and onDestroy().
A Service can be started by an application using Context.startService() method. It can be stopped using Context.stopService().
A Service can stop itself using Service.stopSelf() or Service.stopSelfResult() methods.
It is possible to connect to a running Service and use that connection to interact with the Service. The connection is established using Context.bindService() method and stopped using Context.unbindService().
If a Service has been stopped, it can be resumed using the bindService() method.
The onStartCommand() function is called by the system every time the service is explicitly called using the startService() method. It provides the arguments that are passed to the method, as well as a unique token of the start request. The onCreate() and onDestroy() methods are called in all Services regardless of whether they were added using startService() or bindService() methods.
Any Service can potentially interact with the user, because any Service can receive client requests. If a Service allows other applications to connect to it, its binding is done using these methods: onBind(), onUnbind() and onRebind(). They all receive Intent objects as parameters.
The Intent thats sent to the onBind() function is the one that was used in the bindService() function. The Intent thats sent to the onUnbind() function is the one that was used in unbindService().
The onBind() method returns the connection channel, which the clients can use to interact with the Service. The onRebind() function can be called after onUnbind(), if a new client connects to the Service.
Thats all for today. We will begin creating Services in the next part.
Thanks for reading!
Saturday, January 31, 2015
Android beginner tutorial Part 37 Graphics in GridView
In this tutorial we will learn how to display graphical data in GridViews.
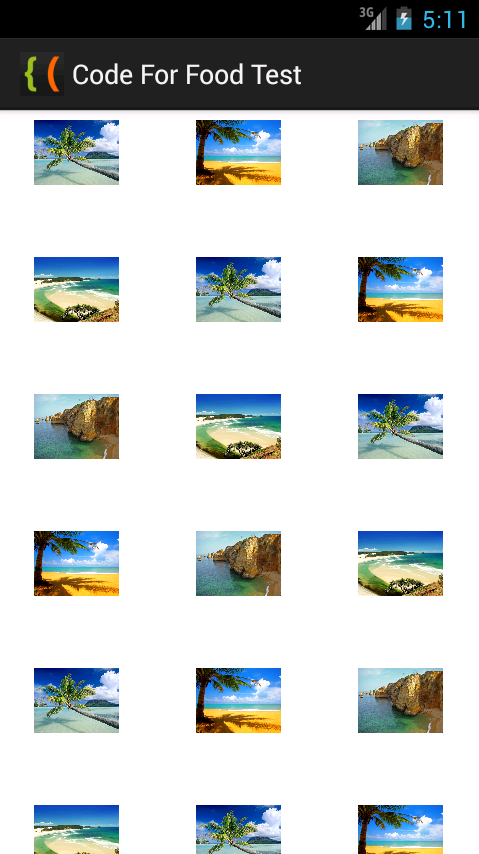
First of all, well need to prepare some sample images. I put 4 images called sample1.jpg, sample2.jpg, sample3.jpg and sample4.jpg in the drawable-hdpi folder of my android project.
Once thats done, we can use them in our application.
Start by creating an Activity with a GridView:
To display images in a GridView, well need to create a custom adapter class. We will extend the BaseAdapter class and call our new custom class ImageAdapter.
If youre using Eclipse IDE, go to File > New > Class. Create the new java class, and use this code:
The logic behind the code is simple, the important part is to include everything the class needs to function properly. Note that we declare the array of pictures in the class itself, and then use an ImageView to display each item. If the ImageView object already exists, we reuse it.
The code of MainActivity.java class is simple too - just apply the adapter to the grid. The only unusual thing here is the passing of getApplicationContext() value to the ImageAdapter constructor.
The results look like this:
Thanks for reading!
Read more »
First of all, well need to prepare some sample images. I put 4 images called sample1.jpg, sample2.jpg, sample3.jpg and sample4.jpg in the drawable-hdpi folder of my android project.
Once thats done, we can use them in our application.
Start by creating an Activity with a GridView:
<LinearLayout xmlns:android="http://schemas.android.com/apk/res/android"
    xmlns:tools="http://schemas.android.com/tools"
    android:layout_width="match_parent"
    android:layout_height="match_parent"
    android:orientation="vertical"
    tools:context=".MainActivity" >

<GridView
    android:id="@+id/grid"
    android:layout_width="fill_parent"
    android:layout_height="fill_parent"
    android:verticalSpacing="35dp"
    android:horizontalSpacing="5dp"
    android:numColumns="auto_fit"
    android:columnWidth="100dp"
    android:stretchMode="columnWidth"
    android:gravity="center"
    />

</LinearLayout>
To display images in a GridView, well need to create a custom adapter class. We will extend the BaseAdapter class and call our new custom class ImageAdapter.
If youre using Eclipse IDE, go to File > New > Class. Create the new java class, and use this code:
package com.kircode.codeforfood_test;

import android.content.Context;
import android.view.View;
import android.view.ViewGroup;
import android.widget.BaseAdapter;
import android.widget.GridView;
import android.widget.ImageView;

public class ImageAdapter extends BaseAdapter {


    private Integer[] mPictures = {
    R.drawable.sample1, R.drawable.sample2,
    R.drawable.sample3, R.drawable.sample4,
    R.drawable.sample1, R.drawable.sample2,
    R.drawable.sample3, R.drawable.sample4,
    R.drawable.sample1, R.drawable.sample2,
    R.drawable.sample3, R.drawable.sample4,
    R.drawable.sample1, R.drawable.sample2,
    R.drawable.sample3, R.drawable.sample4,
    R.drawable.sample1, R.drawable.sample2,
    R.drawable.sample3, R.drawable.sample4,
    R.drawable.sample1, R.drawable.sample2,
    R.drawable.sample3, R.drawable.sample4
    };
    private Context mContext;

    public ImageAdapter(Context c) {
        mContext = c;
    }

    public int getCount() {
        return mPictures.length;
    }

    public Object getItem(int position) {
        return mPictures[position];
    }

    public long getItemId(int position) {
        return mPictures[position];
    }

    // create a new ImageView for each item referenced by the Adapter
    public View getView(int position, View convertView, ViewGroup parent) {
        ImageView imageView;
        if (convertView == null) {  // if its not recycled, initialize some attributes
            imageView = new ImageView(mContext);
            imageView.setLayoutParams(new GridView.LayoutParams(85, 85));
            imageView.setScaleType(ImageView.ScaleType.CENTER_CROP);
            imageView.setPadding(10, 10, 10, 10);
        } else {
            imageView = (ImageView) convertView;
        }

        imageView.setImageResource(mPictures[position]);
        return imageView;
    }
}
The logic behind the code is simple, the important part is to include everything the class needs to function properly. Note that we declare the array of pictures in the class itself, and then use an ImageView to display each item. If the ImageView object already exists, we reuse it.
The code of MainActivity.java class is simple too - just apply the adapter to the grid. The only unusual thing here is the passing of getApplicationContext() value to the ImageAdapter constructor.
package com.kircode.codeforfood_test;

import android.app.Activity;
import android.os.Bundle;
import android.view.Menu;
import android.widget.GridView;

public class MainActivity extends Activity{

private GridView grid;

@Override
protected void onCreate(Bundle savedInstanceState) {
super.onCreate(savedInstanceState);
setContentView(R.layout.activity_main);

grid = (GridView)findViewById(R.id.grid);

ImageAdapter arrayAdapter = new ImageAdapter(getApplicationContext());
grid.setAdapter(arrayAdapter);
}

@Override
public boolean onCreateOptionsMenu(Menu menu) {
// Inflate the menu; this adds items to the action bar if it is present.
getMenuInflater().inflate(R.menu.activity_main, menu);
return true;
}

}
The results look like this:
Thanks for reading!
Android MySQL PHP JSON tutorial
In this post Im going to describe how we can read data from MySQL database and show them in a Android list view. You can download the complete Android project from here. To fetch data here I used a PHP script which encodes data into json format.
This project has three main parts.
1. MySQL database
2. PHP web service
3.Android web service client
1. MySQL database.
My database has only one table named "emp_info" and it has two columns. "employee name" and "employee no". "employee no" is the primary key.

2.PHP web service
Use following PHP script to fetch data from the database and to encode data in to json format.
http://cpriyankara.coolpage.biz/employee_details.php
3.Android web service client.
This part is bit complected. Android activity is a combination of Async Task json and list view. If you are not familiar with those stuff look following tutorials.
Android Async Task and web service access
http://codeoncloud.blogspot.com/2013/07/android-web-service-access-using-async.html
Android list view
http://codeoncloud.blogspot.com/2013/07/how-to-populate-android-list-view-from.html
Here is the code for main Android activity.
Add Internet permission to AndroidManifest.xml
Code for main activity layout.

Was above information helpful?
Your comments always encourage me to write more...
Read more »
This project has three main parts.
1. MySQL database
2. PHP web service
3.Android web service client
1. MySQL database.
My database has only one table named "emp_info" and it has two columns. "employee name" and "employee no". "employee no" is the primary key.
Use following PHP script to fetch data from the database and to encode data in to json format.
<?phpYou can see the output of php by clicking below url:
$host="XXXXX"; //replace with database hostname
$username="XXXXX"; //replace with database username
$password="XXXXX"; //replace with database password
$db_name="XXXXXX"; //replace with database name
$con=mysql_connect("$host", "$username", "$password")or die("cannot connect");
mysql_select_db("$db_name")or die("cannot select DB");
$sql = "select * from emp_info";
$result = mysql_query($sql);
$json = array();
if(mysql_num_rows($result)){
while($row=mysql_fetch_assoc($result)){
$json[emp_info][]=$row;
}
}
mysql_close($con);
echo json_encode($json);
?>
http://cpriyankara.coolpage.biz/employee_details.php
3.Android web service client.
This part is bit complected. Android activity is a combination of Async Task json and list view. If you are not familiar with those stuff look following tutorials.
Android Async Task and web service access
http://codeoncloud.blogspot.com/2013/07/android-web-service-access-using-async.html
Android list view
http://codeoncloud.blogspot.com/2013/07/how-to-populate-android-list-view-from.html
Here is the code for main Android activity.
package com.axel.mysqlphpjson;

import java.io.BufferedReader;
import java.io.IOException;
import java.io.InputStream;
import java.io.InputStreamReader;
import java.util.ArrayList;
import java.util.HashMap;
import java.util.List;
import java.util.Map;

import org.apache.http.HttpResponse;
import org.apache.http.client.ClientProtocolException;
import org.apache.http.client.HttpClient;
import org.apache.http.client.methods.HttpPost;
import org.apache.http.impl.client.DefaultHttpClient;
import org.json.JSONArray;
import org.json.JSONException;
import org.json.JSONObject;

import android.os.AsyncTask;
import android.os.Bundle;
import android.app.Activity;
import android.view.Menu;
import android.widget.ListView;
import android.widget.SimpleAdapter;
import android.widget.Toast;

public class MainActivity extends Activity {
 private String jsonResult;
 private String url = "http://cpriyankara.coolpage.biz/employee_details.php";
 private ListView listView;

 @Override
 protected void onCreate(Bundle savedInstanceState) {
  super.onCreate(savedInstanceState);
  setContentView(R.layout.activity_main);
  listView = (ListView) findViewById(R.id.listView1);
  accessWebService();
 }

 @Override
 public boolean onCreateOptionsMenu(Menu menu) {
  // Inflate the menu; this adds items to the action bar if it is present.
  getMenuInflater().inflate(R.menu.main, menu);
  return true;
 }

 // Async Task to access the web
 private class JsonReadTask extends AsyncTask<String, Void, String> {
  @Override
  protected String doInBackground(String... params) {
   HttpClient httpclient = new DefaultHttpClient();
   HttpPost httppost = new HttpPost(params[0]);
   try {
    HttpResponse response = httpclient.execute(httppost);
    jsonResult = inputStreamToString(
      response.getEntity().getContent()).toString();
   }

   catch (ClientProtocolException e) {
    e.printStackTrace();
   } catch (IOException e) {
    e.printStackTrace();
   }
   return null;
  }

  private StringBuilder inputStreamToString(InputStream is) {
   String rLine = "";
   StringBuilder answer = new StringBuilder();
   BufferedReader rd = new BufferedReader(new InputStreamReader(is));

   try {
    while ((rLine = rd.readLine()) != null) {
     answer.append(rLine);
    }
   }

   catch (IOException e) {
    // e.printStackTrace();
    Toast.makeText(getApplicationContext(),
      "Error..." + e.toString(), Toast.LENGTH_LONG).show();
   }
   return answer;
  }

  @Override
  protected void onPostExecute(String result) {
   ListDrwaer();
  }
 }// end async task

 public void accessWebService() {
  JsonReadTask task = new JsonReadTask();
  // passes values for the urls string array
  task.execute(new String[] { url });
 }

 // build hash set for list view
 public void ListDrwaer() {
  List<Map<String, String>> employeeList = new ArrayList<Map<String, String>>();

  try {
   JSONObject jsonResponse = new JSONObject(jsonResult);
   JSONArray jsonMainNode = jsonResponse.optJSONArray("emp_info");

   for (int i = 0; i < jsonMainNode.length(); i++) {
    JSONObject jsonChildNode = jsonMainNode.getJSONObject(i);
    String name = jsonChildNode.optString("employee name");
    String number = jsonChildNode.optString("employee no");
    String outPut = name + "-" + number;
    employeeList.add(createEmployee("employees", outPut));
   }
  } catch (JSONException e) {
   Toast.makeText(getApplicationContext(), "Error" + e.toString(),
     Toast.LENGTH_SHORT).show();
  }

  SimpleAdapter simpleAdapter = new SimpleAdapter(this, employeeList,
    android.R.layout.simple_list_item_1,
    new String[] { "employees" }, new int[] { android.R.id.text1 });
  listView.setAdapter(simpleAdapter);
 }

 private HashMap<String, String> createEmployee(String name, String number) {
  HashMap<String, String> employeeNameNo = new HashMap<String, String>();
  employeeNameNo.put(name, number);
  return employeeNameNo;
 }
}
Add Internet permission to AndroidManifest.xml
<?xml version="1.0" encoding="utf-8"?>
<manifest xmlns:android="http://schemas.android.com/apk/res/android"
    package="com.axel.mysqlphpjson"
    android:versionCode="1"
    android:versionName="1.0" >

    <uses-sdk
        android:minSdkVersion="8"
        android:targetSdkVersion="17" />

    <uses-permission android:name="android.permission.INTERNET" />

    <application
        android:allowBackup="true"
        android:icon="@drawable/ic_launcher"
        android:label="@string/app_name"
        android:theme="@style/AppTheme" >
        <activity
            android:name="com.axel.mysqlphpjson.MainActivity"
            android:label="@string/app_name" >
            <intent-filter>
                <action android:name="android.intent.action.MAIN" />

                <category android:name="android.intent.category.LAUNCHER" />
            </intent-filter>
        </activity>
    </application>

</manifest>
Code for main activity layout.
<RelativeLayout xmlns:android="http://schemas.android.com/apk/res/android"Quick demo of the application:
xmlns:tools="http://schemas.android.com/tools"
android:layout_width="match_parent"
android:layout_height="match_parent"
android:paddingBottom="@dimen/activity_vertical_margin"
android:paddingLeft="@dimen/activity_horizontal_margin"
android:paddingRight="@dimen/activity_horizontal_margin"
android:paddingTop="@dimen/activity_vertical_margin"
tools:context=".MainActivity" >
<ListView
android:id="@+id/listView1"
android:layout_width="match_parent"
android:layout_height="wrap_content"
android:layout_alignParentTop="true"
android:layout_centerHorizontal="true"
android:layout_marginTop="14dp" >
</ListView>
</RelativeLayout>
Was above information helpful?
Your comments always encourage me to write more...
Thursday, January 29, 2015
Android beginner tutorial Part 56 Activity stacks and tasks
Today we will learn about Activity stacks and tasks.
In Android all Activity objects are saved in a stack. Whenever an Activity launches another Activity, the new one is moved to the stack and becomes the active Activity. The previous one also remains in the stack, but it is moved lower. Activity objects in a stack are never repositioned, they can only be added or removed.
When the user presses the Back button on their device, the current Activity is pushed out of the stack and is replaced with the previous one, which becomes visible again.
If there are multiple Activities of the same class in a stack, they are treated as separate instances.
A stack with Activities in it is called a task, which can be put in the foreground, when one of its Activities is currently active, or in the background, where its completely out of user focus.
If the user doesnt interact with a task for a long period of time, the system clears all of that tasks Activities, except for the main one. To save the state of an Activity before it is destroyed, which is done after the onDestroy() method is called, you can use the onSaveInstanceState() method. Android calls it before creating an Activity, before calling onPause().
The system sends a Bundle object this way, which can be used to store some data to later be able to recreate the same Activity state. When the Activity is once again called, the system kindly sends the Bundle with all the parameters youve written as a parameter of the onCreate() method, as well as the onRestoreInstanceState() method, which is called after onStart(), so that one of them (or both) could return the Activity to what it looked like before.
The onSaveInstanceState() and onRestoreInstanceState() methods are not a part of the lifecycle of an Activity. They wont always be called by the system. For example, the onSaveInstanceState() method is called when the Activity become vulnerable to being destroyed by the system, but it isnt called if the user willingly closes it. Thats good, because it is an intuitive and expected behaviour.
Because onSaveInstanceState() is not always called, if youre saving data you should do that when the application gets paused - in the onPause() function.
That way it will be possible to later restart the destroyed Activity (if the system decides to destroy it) with the saved previous state.
That is all for today.
Thanks for reading!
Read more »
In Android all Activity objects are saved in a stack. Whenever an Activity launches another Activity, the new one is moved to the stack and becomes the active Activity. The previous one also remains in the stack, but it is moved lower. Activity objects in a stack are never repositioned, they can only be added or removed.
When the user presses the Back button on their device, the current Activity is pushed out of the stack and is replaced with the previous one, which becomes visible again.
If there are multiple Activities of the same class in a stack, they are treated as separate instances.
A stack with Activities in it is called a task, which can be put in the foreground, when one of its Activities is currently active, or in the background, where its completely out of user focus.
If the user doesnt interact with a task for a long period of time, the system clears all of that tasks Activities, except for the main one. To save the state of an Activity before it is destroyed, which is done after the onDestroy() method is called, you can use the onSaveInstanceState() method. Android calls it before creating an Activity, before calling onPause().
The system sends a Bundle object this way, which can be used to store some data to later be able to recreate the same Activity state. When the Activity is once again called, the system kindly sends the Bundle with all the parameters youve written as a parameter of the onCreate() method, as well as the onRestoreInstanceState() method, which is called after onStart(), so that one of them (or both) could return the Activity to what it looked like before.
The onSaveInstanceState() and onRestoreInstanceState() methods are not a part of the lifecycle of an Activity. They wont always be called by the system. For example, the onSaveInstanceState() method is called when the Activity become vulnerable to being destroyed by the system, but it isnt called if the user willingly closes it. Thats good, because it is an intuitive and expected behaviour.
Because onSaveInstanceState() is not always called, if youre saving data you should do that when the application gets paused - in the onPause() function.
That way it will be possible to later restart the destroyed Activity (if the system decides to destroy it) with the saved previous state.
That is all for today.
Thanks for reading!
Android beginner tutorial Part 90 Path and ArcShape
In this tutorial we will learn about drawing primitive shapes in Android using Path and ArcShape classes.
The Path class is similar in usage to the way shapes are drawn using AS3. It has the moveTo() and lineTo() methods that youve probably worked with before if you ever tried drawing graphics using Actionscript3.
Using this class it is possible to draw unordinary primitive shapes, like, for example, a star.
First we set up the path for the lines to follow:
You can then apply the drawing to a ShapeDrawable object.

Next class is ArcShape. This one lets us draw arcs, basically. There are two values you need to pass to the ArcShape constructor - float startAngle and float sweepAngle.
Example:

Now weve covered all the primitive shape drawing classes.
Thanks for reading!
Read more »
The Path class is similar in usage to the way shapes are drawn using AS3. It has the moveTo() and lineTo() methods that youve probably worked with before if you ever tried drawing graphics using Actionscript3.
Using this class it is possible to draw unordinary primitive shapes, like, for example, a star.
First we set up the path for the lines to follow:
Path p = new Path();
p.moveTo(50, 0);
p.lineTo(25, 100);
p.lineTo(100, 50);
p.lineTo(0, 50);
p.lineTo(75, 100);
p.lineTo(50, 0);
You can then apply the drawing to a ShapeDrawable object.
ShapeDrawable shape = new ShapeDrawable(new PathShape(p, 100, 100));
shape.setIntrinsicHeight(100);
shape.setIntrinsicWidth(100);
shape.getPaint().setColor(Color.RED);
shape.getPaint().setStyle(Paint.Style.STROKE);
Next class is ArcShape. This one lets us draw arcs, basically. There are two values you need to pass to the ArcShape constructor - float startAngle and float sweepAngle.
Example:
ShapeDrawable shape = new ShapeDrawable(new ArcShape(0, 250));
shape.setIntrinsicHeight(100);
shape.setIntrinsicWidth(100);
shape.getPaint().setColor(Color.RED);
Now weve covered all the primitive shape drawing classes.
Thanks for reading!
Sunday, January 25, 2015
ATM 702X Action Chip Tablet Flashing Tutorial with Latest Flasher
ATM 702X Action Chip Tablet Flashing Tutorial with Latest Flasher.
ATM7021 , ATM7021A,ATM7029
Actions Product PAD Tool
Flashing Tool for Action CPU based ATM 702X Tablets.
Step by Step Tutorial .
Flashing Tool for Action CPU based ATM 702X Tablets.
Step by Step Tutorial .
How to Flash Action Tablets (ATM7021 , ATM7021A , ATM7029) ?

Download Actions PAD Product Tool
Install Setup.exe


Successful 100 %.
Things to Remember .
Do not disconnect your tablet during flashing process. Charge your tablet more then 60% before flashing. Power failure during flashing may result dead tablet.
Make sure your tablet is Action CPU based .
Find out board id and download exact firmware.Choosing wrong firmware may result soft brick or dead tablet.
for boot mode Action CPU Tablet turn off tablet . Hold Volume UP(+) button and connect Action ATM702X tablet and insert cable .While holding Volume Up button press power button simultaneously 4 to 5 times. Computer found new hardware and driver will be installed . To make sure either your android tablet is connected go to properties of my computer and find out in USB portion"Action USB 2.0" .
Open Action Pad Product Tool . Pad Product tool will automatically open a dialogue box for the firmware file. Select the appropriate firmware with extension .fw . for reference see image 1.4
 |
| 1.4 Action Tablet Flashing Tool |
Action PAD Product Tool will load firmware and "Replace Firmware " dialog box will appear. Current firmware and New firmware detail will be shown . Click on Replace firmware .
 |
| 1.5 Action Tablet Flashing Tool |
You will notice a button in right corner of Action Pad Product Tool will be green. (Green button indicate, that you are ready to flash Action Tablet. You do not need to click on any other option like Advance Config or AUTOMATION. You can view detail of loaded ATM 702X Tablet firmware (as shown in image 2 and 2.1). On top left corner you will also see the USB Detection notification " 1 Usb Device Detected ".
 |
| 2. Action Tablet Flashing Tool |
 |
| 2.1 Action Tablet Flashing Tool |
Click on DOWN button to start flashing.
it will start with downloading VMLINUX .
 |
| 2.2 ATM7021,ATM7021A,ATM7029 Flashing Tool |
Writing MISC Partitions.
 |
| 2.3 ATM7021,ATM7021A,ATM7029 Flashing Tool |
Then Writing System Partitions.
 |
| 2.4 ATM7021,ATM7021A,ATM7029 Flashing Tool |
Writing Data Partitions.
 |
| 2.5 ATM7021,ATM7021A,ATM7029 firmware loader |
Writing Data_BAK_ Partitions .
 |
| 3. ATM7021,ATM7021A,ATM7029 Flashing Tool |
 |
| 3.1 ATM7021,ATM7021A,ATM7029 firmware loader |
Congratulations : You have done Flashing Action ATIM 702X Tablet. Successful notifications will also be display on down left corner. Accumulative 1, Successful 1. Failed 0.
 |
| 3.2 Action tablet firmware loader |
Do not disconnect your tablet during flashing process. Charge your tablet more then 60% before flashing. Power failure during flashing may result dead tablet.
Make sure your tablet is Action CPU based .
Find out board id and download exact firmware.Choosing wrong firmware may result soft brick or dead tablet.
Note :- The above mention method was tested and find 100% working with ATM7021A CPU based tablet. However I did not find any trouble or difficulty during the flashing process but I do not take any responsibility.
Acknowledgement :
All the logos are property of their respective owners. Action Chip is property of Actions Semi Conductors .
Saturday, January 24, 2015
Android beginner tutorial Part 85 Embedding fonts using Assets
In this tutorial we will learn how to load and use a font from an asset.
Assets are somewhat similar to resources, yet different. While resources are embedded into the application and can be referred to using the R class, assets are raw files that are stored in the assets directory and require us to manually read them to use them in our applications.
Today well learn how to embed and use a raw .ttf font file as an asset in our application.
First of all you need to find the ttf file. You can download fonts online, I use fontsquirrel.com - all the fonts there are free and pretty good.
Once you have the .ttf file, put it in the assets directory of your project.
Then go to activity_main.xml of your application and add a TextView there:
Now go to MainActivity.java class and load the font using Typeface.createFromAsset() static method. Once the font is extracted, apply it to the text using setTypeface() method:
Heres the full code:
It is that easy!
You can use assets to store all sorts of files and read them byte by byte or using whats provided by the Android SDK, like the Typeface.createFromAsset() method just now.
Thats all for today.
Thanks for reading!
Read more »
Assets are somewhat similar to resources, yet different. While resources are embedded into the application and can be referred to using the R class, assets are raw files that are stored in the assets directory and require us to manually read them to use them in our applications.
Today well learn how to embed and use a raw .ttf font file as an asset in our application.
First of all you need to find the ttf file. You can download fonts online, I use fontsquirrel.com - all the fonts there are free and pretty good.
Once you have the .ttf file, put it in the assets directory of your project.
Then go to activity_main.xml of your application and add a TextView there:
<LinearLayout xmlns:android="http://schemas.android.com/apk/res/android"
    xmlns:tools="http://schemas.android.com/tools"
    android:layout_width="match_parent"
    android:layout_height="match_parent"
    android:orientation="vertical"
    tools:context=".MainActivity" >

    <TextView android:layout_width="match_parent"
        android:layout_height="wrap_content"
        android:id="@+id/myText"
        android:textSize="36sp"
        android:text="Hello world!"
        />

</LinearLayout>
Now go to MainActivity.java class and load the font using Typeface.createFromAsset() static method. Once the font is extracted, apply it to the text using setTypeface() method:
TextView mytext = (TextView)findViewById(R.id.myText);
Typeface face = Typeface.createFromAsset(getAssets(), "yukarimobil.ttf");
mytext.setTypeface(face);
Heres the full code:
package com.example.codeforfoodtest_two;

import android.app.Activity;
import android.graphics.Typeface;
import android.os.Bundle;
import android.widget.TextView;

public class MainActivity extends Activity{

@Override
protected void onCreate(Bundle savedInstanceState) {
super.onCreate(savedInstanceState);
setContentView(R.layout.activity_main);

TextView mytext = (TextView)findViewById(R.id.myText);
Typeface face = Typeface.createFromAsset(getAssets(), "yukarimobil.ttf");
mytext.setTypeface(face);
}
}
It is that easy!
You can use assets to store all sorts of files and read them byte by byte or using whats provided by the Android SDK, like the Typeface.createFromAsset() method just now.
Thats all for today.
Thanks for reading!
Sunday, January 18, 2015
Android beginner tutorial Part 94 Applying XML animations
In this tutorial well make a demo application that applies scale, rotate and translate animations to a shape on the screen.
First of all we need to create the animation XML files.
Go to the res/anim/ directory of your project. The first file well add is rotate.xml:
Then goes scale.xml:
Then we add translate.xml animation, which is a set containing two translate animations that are executed in order:
Now go to activity_main.xml file. Add an ImageView there, set its layout_width and layout_height values to wrap_content. Set the gravity of the parent to center.
Now go to MainActivity.java class. First we declare the image and draw a red square onto it:
Add an onCreateOptionsMenu() function, which adds 3 buttons to the menu. Set the IDs of the menu items to the IDs of the animations:
In the onOptionsItemSelected() function, we get the animation out of the selected item using the id. Then we apply it to the image using startAnimation() method:
Simple as that. Full code:
Thats all for today.
Thanks for reading!
Read more »
First of all we need to create the animation XML files.
Go to the res/anim/ directory of your project. The first file well add is rotate.xml:
<?xml version="1.0" encoding="utf-8"?>
<set xmlns:android="http://schemas.android.com/apk/res/android"
    android:shareInterpolator="false">
    <rotate android:fromDegrees="0"
        android:toDegrees="360"
        android:pivotX="50%"
        android:pivotY="50%"
        android:startOffset="0"
        android:duration="3000"/>
</set>
Then goes scale.xml:
<?xml version="1.0" encoding="utf-8"?>
<set xmlns:android="http://schemas.android.com/apk/res/android"
    android:shareInterpolator="false">
    <scale android:fromXScale="1"
        android:fromYScale="1"
        android:toXScale="0.5"
        android:toYScale="0.5"
        android:pivotX="50%"
        android:pivotY="50%"
        android:startOffset="0"
        android:duration="1500"/>
</set>
Then we add translate.xml animation, which is a set containing two translate animations that are executed in order:
<?xml version="1.0" encoding="utf-8"?>
<set xmlns:android="http://schemas.android.com/apk/res/android"
    android:shareInterpolator="false">
    <translate android:toYDelta="-100"
        android:startOffset="0"
        android:duration="1500"/>
    <translate android:toYDelta="100"
        android:startOffset="1500"
        android:duration="1500"/>
</set>
Now go to activity_main.xml file. Add an ImageView there, set its layout_width and layout_height values to wrap_content. Set the gravity of the parent to center.
<LinearLayout xmlns:android="http://schemas.android.com/apk/res/android"
    xmlns:tools="http://schemas.android.com/tools"
    android:layout_width="match_parent"
    android:layout_height="match_parent"
    android:orientation="vertical"
    tools:context=".MainActivity"
    android:gravity="center">

    <ImageView
        android:id="@+id/image"
        android:layout_width="wrap_content"
        android:layout_height="wrap_content"
        />

</LinearLayout>
Now go to MainActivity.java class. First we declare the image and draw a red square onto it:
private ImageView image;

@Override
protected void onCreate(Bundle savedInstanceState) {
super.onCreate(savedInstanceState);
setContentView(R.layout.activity_main);

image = (ImageView)findViewById(R.id.image);
ShapeDrawable shape = new ShapeDrawable(new RectShape());
shape.setIntrinsicHeight(100);
shape.setIntrinsicWidth(100);
shape.getPaint().setColor(Color.RED);
image.setImageDrawable(shape);
}
Add an onCreateOptionsMenu() function, which adds 3 buttons to the menu. Set the IDs of the menu items to the IDs of the animations:
@Override
public boolean onCreateOptionsMenu(Menu menu){
menu.add(Menu.NONE, R.anim.rotate, Menu.NONE, "Rotate");
menu.add(Menu.NONE, R.anim.scale, Menu.NONE, "Scale");
menu.add(Menu.NONE, R.anim.translate, Menu.NONE, "Translate");
return(super.onCreateOptionsMenu(menu));
}
In the onOptionsItemSelected() function, we get the animation out of the selected item using the id. Then we apply it to the image using startAnimation() method:
@Override
public boolean onOptionsItemSelected(MenuItem item){
Animation animation = AnimationUtils.loadAnimation(this, item.getItemId());
image.startAnimation(animation);
return true;
}
Simple as that. Full code:
package com.example.codeforfoodtest_two;

import android.app.Activity;
import android.graphics.Color;
import android.graphics.drawable.ShapeDrawable;
import android.graphics.drawable.shapes.RectShape;
import android.os.Bundle;
import android.view.Menu;
import android.view.MenuItem;
import android.view.animation.Animation;
import android.view.animation.AnimationUtils;
import android.widget.ImageView;

public class MainActivity extends Activity{

private ImageView image;

@Override
protected void onCreate(Bundle savedInstanceState) {
super.onCreate(savedInstanceState);
setContentView(R.layout.activity_main);

image = (ImageView)findViewById(R.id.image);
ShapeDrawable shape = new ShapeDrawable(new RectShape());
shape.setIntrinsicHeight(100);
shape.setIntrinsicWidth(100);
shape.getPaint().setColor(Color.RED);
image.setImageDrawable(shape);
}

@Override
public boolean onCreateOptionsMenu(Menu menu){
menu.add(Menu.NONE, R.anim.rotate, Menu.NONE, "Rotate");
menu.add(Menu.NONE, R.anim.scale, Menu.NONE, "Scale");
menu.add(Menu.NONE, R.anim.translate, Menu.NONE, "Translate");
return(super.onCreateOptionsMenu(menu));
}

@Override
public boolean onOptionsItemSelected(MenuItem item){
Animation animation = AnimationUtils.loadAnimation(this, item.getItemId());
image.startAnimation(animation);
return true;
}
}
Thats all for today.
Thanks for reading!
Saturday, January 17, 2015
Android Web Service Access Tutorial
Updated tutorial for new versions >> http://codeoncloud.blogspot.com/2013/06/android-java-soap-web-service-access.html
In this tutorial Im going to demonstrate how we can access a java web service in Android application using ksoap2 library. This Android application also passes parameters to the web service.
First we have to create a web service & deploy it on Tomcat server.
Here is the sample code of java web service Im going to access.
Android application will pass parameters for fname & lname variables.
To create web service refer my these tutorials.
1. Create java web service in Eclipse using Axis2 (Part 01)
2. Create java web service in Eclipse using Axis2 (Part 02)
Following is the code for the Android application which invoke the web service. You have to use ksoap2 (You can download ksoap2 from here:::http://code.google.com/p/ksoap2-android/wiki/HowToUse?tm=2) library for this implementation. Read my comments carefully
You can find complete information about the implementation of Android application from these two posts.
1. Create java web service in Eclipse using Axis2 (Part 01)
2. Create java web service in Eclipse using Axis2 (Part 02)
NAMESPACE in line 15 is targetNamespace in the WSDL.
URL in line 16 The URL of WSDL file. In my case it is " http://175.157.143.117:8085/TestProperties/services/TestPropts?wsdl"
blue colored is the ip of the server replace it with your ip & red colored is the port number.
Make appropriate changes according to your WSDL. Open your WSDL using Firefox or Chrome. Then you can easily find those values from the WSDL.
We have to add internet permission to the Android Manifest. After adding permission your Manifest should like follows.
Here is the final result

You can download sample projects:
Click here to download web service project
Click here to download Android project
If you find this post helpful dont forget to leave a comment. your comments encourage me to write!
Read more »
In this tutorial Im going to demonstrate how we can access a java web service in Android application using ksoap2 library. This Android application also passes parameters to the web service.
First we have to create a web service & deploy it on Tomcat server.
Here is the sample code of java web service Im going to access.
package com.testprops.ws;

public class TestPropts {
 public String testMyProps(String fname,String lname){
  return "First Name : "+fname+" Last Name : "+lname;
 }
}
Android application will pass parameters for fname & lname variables.
To create web service refer my these tutorials.
1. Create java web service in Eclipse using Axis2 (Part 01)
2. Create java web service in Eclipse using Axis2 (Part 02)
Following is the code for the Android application which invoke the web service. You have to use ksoap2 (You can download ksoap2 from here:::http://code.google.com/p/ksoap2-android/wiki/HowToUse?tm=2) library for this implementation. Read my comments carefully
package com.sendproperties.ws;

import org.ksoap2.SoapEnvelope;
import org.ksoap2.serialization.PropertyInfo;
import org.ksoap2.serialization.SoapObject;
import org.ksoap2.serialization.SoapPrimitive;
import org.ksoap2.serialization.SoapSerializationEnvelope;
import org.ksoap2.transport.HttpTransportSE;
import android.app.Activity;
import android.os.Bundle;

import android.widget.TextView;

public class SendValuesActivity extends Activity {
    private final String NAMESPACE = "http://ws.testprops.com";
    private final String URL = "http://175.157.143.117:8085/TestProperties/services/TestPropts?wsdl";
    private final String SOAP_ACTION = "http://ws.testprops.com/testMyProps";
    private final String METHOD_NAME = "testMyProps";
    /** Called when the activity is first created. */
    @Override
    public void onCreate(Bundle savedInstanceState) {
        super.onCreate(savedInstanceState);
        setContentView(R.layout.main);

        SoapObject request = new SoapObject(NAMESPACE, METHOD_NAME);

        String firstName = "Android";
        String lastName = "Program";

      //Pass value for fname variable of the web service
        PropertyInfo fnameProp =new PropertyInfo();
        fnameProp.setName("fname");//Define the variable name in the web service method
        fnameProp.setValue(firstName);//Define value for fname variable
        fnameProp.setType(String.class);//Define the type of the variable
        request.addProperty(fnameProp);//Pass properties to the variable

      //Pass value for lname variable of the web service
        PropertyInfo lnameProp =new PropertyInfo();
        lnameProp.setName("lname");
        lnameProp.setValue(lastName);
        lnameProp.setType(String.class);
        request.addProperty(lnameProp);

        SoapSerializationEnvelope envelope = new SoapSerializationEnvelope(SoapEnvelope.VER11);
        envelope.setOutputSoapObject(request);
        HttpTransportSE androidHttpTransport = new HttpTransportSE(URL);

        try {
            androidHttpTransport.call(SOAP_ACTION, envelope);
            SoapPrimitive response = (SoapPrimitive)envelope.getResponse();


            TextView tv = new TextView(this);
            tv.setText(response.toString());
            setContentView(tv);

        } catch (Exception e) {
            e.printStackTrace();
        }
    }
 }
You can find complete information about the implementation of Android application from these two posts.
1. Create java web service in Eclipse using Axis2 (Part 01)
2. Create java web service in Eclipse using Axis2 (Part 02)
Change these things in your Android program according to your web service
NAMESPACE in line 15 is targetNamespace in the WSDL.
blue colored is the ip of the server replace it with your ip & red colored is the port number.
SOAP_ACTION in line 17 is "NAMESPACE/METHOD_NAME"
METHOD_NAME in line 18 is WSDL operation. You can find something like <wsdl:operation name="............."> in your WSDL.
METHOD_NAME in line 18 is WSDL operation. You can find something like <wsdl:operation name="............."> in your WSDL.
Make appropriate changes according to your WSDL. Open your WSDL using Firefox or Chrome. Then you can easily find those values from the WSDL.
We have to add internet permission to the Android Manifest. After adding permission your Manifest should like follows.
Here is the final result
You can download sample projects:
Click here to download web service project
Click here to download Android project
If you find this post helpful dont forget to leave a comment. your comments encourage me to write!
Sunday, January 11, 2015
HTML Tutorial 7 Creating HTML List

Hello Guys! This is my tutorial number 7 on HTML. If you would like to read the previous 6 tutorials then please use the search box above, type HTML and get the HTML tutorials list.
Today I will discuss about a simple topic of HTML. Really this is as simple as I say! :) Okay lets start.
Practice Rules
Practice rules are as usual. Use notepad and a web browser. Save the file with .htm or .html extension.
HTML List: Ordered and Unordered
There are mainly two types of lists can be created by HTML code. The first one is ordered list and the other is unordered list.
Ordered List:
In an ordered list, the list items are marked by numbers. This exactly looks like a numbered list created by Microsoft Word or other text editing programs.
An ordered list starts with <ol> tag and ends with </ol> tag. Each item of the list starts with <li> tag and ends with </li> tag. Look at the code below:
<ol><li>Apple</li><li>Google</li><li>Microsoft</li></ol>
Remember, o indicates unordered (o) and l indicates list. Thus it is written as <ol>.
After enter this code, you will get the following output in your browser:
After enter this code, you will get the following output in your browser:
- Apple
- Microsoft
Unordered List:
In an unordered list, the list items are marked with bullets. Normally small black circles (·)
Code for unordered list is very similar. Instead of typing <ol>, you need to use <ul>. u for unordered and l for list. Follow the code below:
Your browser will display:
In an unordered list, the list items are marked with bullets. Normally small black circles (·)
Code for unordered list is very similar. Instead of typing <ol>, you need to use <ul>. u for unordered and l for list. Follow the code below:
<ul><li>Apple</li><li>Google</li><li>Microsoft</li></ul>
- Apple
- Microsoft
Description List:
There is another list in HTML which is known as description list. A description list contains a brief description of the list item.
But I think you can describe the list item simply typing some texts. This is not very important to create a different type of list to describe list items. Thats why Im not showing the code of description list.
Tip: You can use line breaks, text, links or images inside a list item.
Tags used in HTML List:
By this time youre familiar with the tags used in creating HTML list. Lets check them at once:
There is another list in HTML which is known as description list. A description list contains a brief description of the list item.
But I think you can describe the list item simply typing some texts. This is not very important to create a different type of list to describe list items. Thats why Im not showing the code of description list.
Tip: You can use line breaks, text, links or images inside a list item.
Tags used in HTML List:
By this time youre familiar with the tags used in creating HTML list. Lets check them at once:
- <ol> - Defines an ordered list
- <ul> - Defines an unordered list
- <li> - Defines a list item
- <dl> - Defines a description list
- <dt> - Defines a term/ name in description list
- <dd> - Defines a description of a term/ name in description list.
Stay with Marks PC Solution to get more interesting IT topics!
Subscribe to:
Posts (Atom)