Monday, March 2, 2015
Wetpaint 1 2 3 My Free Wiki Is Up!
- Link to Wetpaint
- Wetpaint Videos

WIKI?
A wiki is a type of website that anyone can easily edit and help grow through collaboration.
 WETPAINT?
Is a 100% Free wiki (collaborative) authoring tool (it claims to be! Visit Professional Services and explore.), which enables anyone easily to start a free wiki that they can share with students, colleagues, friends, family, etc.
FEATURES?
Wetpaint is a reasonably easy-to-learn/use wiki tool, which has an amazingly attractive look-and-feel (subject to subjectivity!). Yeah, I can tell you also that this tool has an amazing list of features, and they are adding new features all the time (according to them), so theres always something new to try. Here are some of the juicy features:
- 1-2-3 Simple Site Creation
- Public or Private Sites
- Pre-Populated Templates (Classrooms, Group Projects, Gaming Clans, etc)
- Easy Photo/Video Integration
- Page Level Discussion Threads
- Customizable Page Templates
- Spell Check
- Menu of Popular Widgets
- Private Onsite Messaging
- Address Book Upload
- Site Statistics (Google Analytics and SiteMeter)
- RSS updates
- Email Notifications
- Etc.
Except for the annoying Google Ads (which is probably the main source of income for Wetpaint), floating toolbars, and the clipboard bug (minor fix needed!), this tool I believe is going to be a global Wiki smash hit soon. Dont ask me why! Just try it out for yourself :)

Wednesday, February 11, 2015
C program to find the sum of the series x x 2 2 x 3 3 x n n
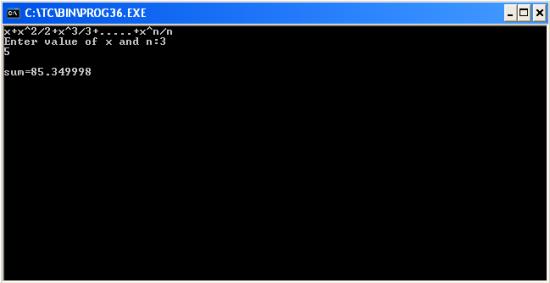
#include<stdio.h>
#include<conio.h>
#include<math.h>
void main()
{
int i,n;
float x,sum=0;
clrscr(); //to clear the screen
printf("x+x^2/2+x^3/3+.....+x^n/n");
printf("
Enter value of x and n:");
scanf("%f%d",&x,&n);
for(i=1;i<=n;++i)
sum+=pow(x,i)/i;
printf("
sum=%f",sum);
getch(); //to stop the screen
}
Tuesday, January 27, 2015
KirSizer Flex AIR Image Sizer app Part 3
Go to the first NavigatorContent container and ste the first labels id to labelSelected. Set the TileLists widht to 282, columnWidth and columnHeight to 60, columnCount to 4 and itemRenderer to a custom class called TileRenderer.
Set the "Add files" buttons click event handler to addFiles() function:
<s:NavigatorContent width="100%" height="100%" hideEffect="fadeOut" showEffect="fadeIn">
<s:VGroup width="100%" height="100%" paddingLeft="10" paddingTop="10" paddingRight="10" paddingBottom="10">
<s:Label id="labelSelected">0 files selected</s:Label>
<mx:TileList id="tileList" width="282" height="100%" dataProvider="{selectedFiles}" itemRenderer="TileRenderer" columnWidth="60" rowHeight="60" columnCount="4" />
<s:Button label="Add folder" width="100%" />
<s:Button label="Add files" width="100%" click="addFiles();" />
<s:Button label="Continue" width="100%" click="contentStack.selectedIndex = 1;" />
</s:VGroup>
</s:NavigatorContent>
In the script tags declare a new ArrayCollection called slectedFiles, make it bindable:
[Bindable]
private var selectedFiles:ArrayCollection = new ArrayCollection([]);
Now create this addFiles() function and inside of it create a new File object. Call its browseForOpenMultiple() method and add a filter for jpg, jpeg and png pictures. Add a SELECT_MULTIPLE event listener for the File.
private function addFiles():void {
var file:File = new File();
file.browseForOpenMultiple("Select JPG or PNG files", [new FileFilter("Pictures", "*.jpg;*.jpeg;*.png")]);
file.addEventListener(FileListEvent.SELECT_MULTIPLE, filesSelected);
}
The fileSelected function, which is a handler to the SELECT_MULTIPLE event, loops through the receives files and adds their native paths to the selectedFiles array. However, we must keep in mind that the user might accidently import the same file twice, so we need to check if the file already exists in the array before adding it. We use another loop for that. After the loop, we set labelSelecteds text to display how many files are selected:
private function filesSelected(evt:FileListEvent):void {
for (var i:int = 0; i < evt.files.length; i++) {
var alreadySelected:Boolean = false;
for (var u:int = 0; u < selectedFiles.length; u++) {
if (selectedFiles[u] == evt.files[i].nativePath) {
alreadySelected = true;
}
}
if (!alreadySelected) selectedFiles.addItem(evt.files[i].nativePath);
}
labelSelected.text = selectedFiles.length + " files selected";
}
Now create a new mxml file called TileRenderer.mxml. This is our custom item renderer for the TileList. Set the root tags to a VBox, and inside of it create an Image object with source bound to {data}, which is the received image url. Set maxWidth to 60, maxHeight to 60 and scaleContent to true:
<?xml version="1.0" encoding="utf-8"?>
<mx:VBox xmlns:fx="http://ns.adobe.com/mxml/2009"
xmlns:s="library://ns.adobe.com/flex/spark"
xmlns:mx="library://ns.adobe.com/flex/mx"
horizontalAlign="center"
verticalAlign="middle" horizontalScrollPolicy="off"
verticalScrollPolicy="off">
<mx:Image source="{data}" maxWidth="60" maxHeight="60" scaleContent="true"/>
</mx:VBox>
And full Main.mxml code looks like this:
<?xml version="1.0" encoding="utf-8"?>
<s:WindowedApplication xmlns:fx="http://ns.adobe.com/mxml/2009"
xmlns:s="library://ns.adobe.com/flex/spark"
xmlns:mx="library://ns.adobe.com/flex/mx"
width="300" height="460"
showStatusBar="false" title="KirSizer">

<fx:Declarations>
<mx:ArrayCollection id="measures">
<fx:String>%</fx:String>
<fx:String>px</fx:String>
</mx:ArrayCollection>
<mx:ArrayCollection id="actions">
<fx:String>Fixed width, fixed height</fx:String>
<fx:String>Fixed width, proportional height</fx:String>
<fx:String>Proportional width, fixed height</fx:String>
<fx:String>Proportional sizes to fit specified sizes</fx:String>
</mx:ArrayCollection>
<mx:ArrayCollection id="formats">
<fx:String>Same format as initial file</fx:String>
<fx:String>Convert all to JPG</fx:String>
<fx:String>Convert all to PNG</fx:String>
</mx:ArrayCollection>
<mx:Fade id="fadeIn" alphaFrom="0" alphaTo="1" duration="300"/>
<mx:Fade id="fadeOut" alphaFrom="1" alphaTo="0" duration="300"/>
</fx:Declarations>

<fx:Style>
@namespace s "library://ns.adobe.com/flex/spark";
@namespace mx "library://ns.adobe.com/flex/mx";

#contentStack{
backgroundColor: #313131;
}

s|Label{
color: #fcfcfc;
}

s|Button{
chromeColor: #636363;
}

mx|ComboBox{
chromeColor: #636363;
color: #fcfcfc;
contentBackgroundColor: #000000;
rollOverColor: #aaaaaa;
selectionColor: #ffffff;
}
</fx:Style>

<fx:Script>
<![CDATA[
import flash.events.FileListEvent;
import flash.filesystem.File;
import flash.net.FileFilter;
import mx.collections.ArrayCollection;
import mx.effects.easing.Linear;
import mx.controls.Alert;

[Bindable]
private var selectedFiles:ArrayCollection = new ArrayCollection([]);

private function actionChange():void{
switch (actionCombo.selectedIndex) {
case 0: case 3:
newWidth.enabled = true;
widthMeasure.enabled = true;
newHeight.enabled = true;
heightMeasure.enabled = true;
break;
case 1:
newWidth.enabled = true;
widthMeasure.enabled = true;
newHeight.enabled = false;
heightMeasure.enabled = false;
break;
case 2:
newWidth.enabled = false;
widthMeasure.enabled = false;
newHeight.enabled = true;
heightMeasure.enabled = true;
break;
}
}

private function addFiles():void {
var file:File = new File();
file.browseForOpenMultiple("Select JPG or PNG files", [new FileFilter("Pictures", "*.jpg;*.jpeg;*.png")]);
file.addEventListener(FileListEvent.SELECT_MULTIPLE, filesSelected);
}

private function filesSelected(evt:FileListEvent):void {
for (var i:int = 0; i < evt.files.length; i++) {
var alreadySelected:Boolean = false;
for (var u:int = 0; u < selectedFiles.length; u++) {
if (selectedFiles[u] == evt.files[i].nativePath) {
alreadySelected = true;
}
}
if (!alreadySelected) selectedFiles.addItem(evt.files[i].nativePath);
}
labelSelected.text = selectedFiles.length + " files selected";
}
]]>
</fx:Script>

<mx:ViewStack id="contentStack" width="100%" height="100%">
<s:NavigatorContent width="100%" height="100%" hideEffect="fadeOut" showEffect="fadeIn">
<s:VGroup width="100%" height="100%" paddingLeft="10" paddingTop="10" paddingRight="10" paddingBottom="10">
<s:Label id="labelSelected">0 files selected</s:Label>
<mx:TileList id="tileList" width="282" height="100%" dataProvider="{selectedFiles}" itemRenderer="TileRenderer" columnWidth="60" rowHeight="60" columnCount="4" />
<s:Button label="Add folder" width="100%" />
<s:Button label="Add files" width="100%" click="addFiles();" />
<s:Button label="Continue" width="100%" click="contentStack.selectedIndex = 1;" />
</s:VGroup>
</s:NavigatorContent>
<s:NavigatorContent width="100%" height="100%" hideEffect="fadeOut" showEffect="fadeIn">
<s:VGroup width="100%" height="100%" paddingLeft="10" paddingTop="10" paddingRight="10" paddingBottom="10">
<s:Button label="Return to file selection" width="100%" click="contentStack.selectedIndex = 0;" />

<s:Label>Resize options:</s:Label>

<mx:ComboBox width="100%" id="actionCombo" height="22" dataProvider="{actions}" selectedIndex="0" editable="false" change="actionChange();"
openEasingFunction="Linear.easeOut" closeEasingFunction="Linear.easeIn" openDuration="300" closeDuration="300"/>
<s:HGroup verticalAlign="middle">
<s:Label width="50">Width:</s:Label>
<s:NumericStepper id="newWidth" height="22" width="150" minimum="1" value="100" maximum="{(widthMeasure.selectedIndex==0)?(100):(4000)}" />
<mx:ComboBox id="widthMeasure" height="22" width="50" dataProvider="{measures}" selectedIndex="0" editable="false"
openEasingFunction="Linear.easeOut" closeEasingFunction="Linear.easeIn" openDuration="300" closeDuration="300"/>
</s:HGroup>

<s:HGroup verticalAlign="middle">
<s:Label width="50">Height:</s:Label>
<s:NumericStepper id="newHeight" height="22" width="150" minimum="1" value="100" maximum="{(heightMeasure.selectedIndex==0)?(100):(4000)}"/>
<mx:ComboBox id="heightMeasure" height="22" width="50" dataProvider="{measures}" selectedIndex="0" editable="false"
openEasingFunction="Linear.easeOut" closeEasingFunction="Linear.easeIn" openDuration="300" closeDuration="300"/>
</s:HGroup>

<s:Label/>

<s:Label>Output file names:</s:Label>
<s:HGroup verticalAlign="middle">
<s:TextInput width="240" text="%initialName%" />
<s:Button width="35" label="?"/>
</s:HGroup>

<s:Label/>

<s:Label>Output destination:</s:Label>
<s:HGroup verticalAlign="middle">
<s:RadioButton id="oldDestination" label="Same directory" groupName="destinationGroup" selected="true" />
<s:RadioButton id="newDestination" label="Specified directory" groupName="destinationGroup" />
</s:HGroup>
<s:HGroup verticalAlign="middle" width="100%">
<s:TextInput width="100%" enabled="{newDestination.selected}" text="Select destination..." editable="false" />
<s:Button width="80" label="Browse" enabled="{newDestination.selected}"/>
</s:HGroup>

<s:Label/>

<s:Label>Output format:</s:Label>
<mx:ComboBox width="100%" height="22" id="formatCombo" dataProvider="{formats}" selectedIndex="0" editable="false"
openEasingFunction="Linear.easeOut" closeEasingFunction="Linear.easeIn" openDuration="300" closeDuration="300"/>

<s:Label/>

<s:Label>Output JPG quality:</s:Label>
<s:HSlider width="100%" minimum="1" maximum="100" value="100" />

<s:Label/>

<s:Button label="Resize" width="100%" />
</s:VGroup>
</s:NavigatorContent>
</mx:ViewStack>
</s:WindowedApplication>
Thanks for reading!
Saturday, January 24, 2015
ActionScript 3 Number to String Conversion
If you youd like to do ActionScript 3 Number to String conversions, then you can use the toString() method of the Number class.
Here is an example:
var myNumber:Number = 7;
var myString:String = myNumber.toString();Why would I want to convert numbers to strings?
One example of how this can be useful is if youd like to calculate some number value and then display it inside a text field.
For example:
var value1:Number = 7;
var value2:Number = 2;
var total:Number = value1 + value2;

myTextField.text =  total.toString();
// Assume that myTextField is an instance of the TextField class
// and that it has already been created and added to the stageIf the number is a decimal (e.g. .5), Flash will add a leading 0 when it performs the number to string conversion (i.e. .5 will become "0.5").
Also, the toString() method of the Number class accepts one parameter for the radix. The radix lets you specify which numeric base (from 2 to 36) to use when the number is converted into a string. For example, if youd like the number to be interpreted as an octal (base 8), then you pass a value of 8 to the radix parameter:
var myNumber:Number = 14;
trace( myNumber.toString(8) );So that is how you do ActionScript 3 number to string conversions.
Wednesday, January 21, 2015
Zenithink C71A 7 8GB Android4 1 2013 06 15 V1 3 FIRMWARE
Tuesday, January 13, 2015
HOW TO DRAW A GIANT PANDA IN MS WORD PART 3

