Tuesday, March 10, 2015
Introducing the Google Drive Android API
 By Magnus Hyttsten, Developer Advocate, Google Drive
With todays developer preview of the Google Drive Android API in Google Play Services 4.1, you can add the convenience of Google Drive cloud storage to your apps without breaking a sweat.
While Drive integration on Android was possible in the past, the new API creates a faster, seamless experience that enables your apps to integrate with the Drive backend within minutes.
The new API offers a number of benefits:
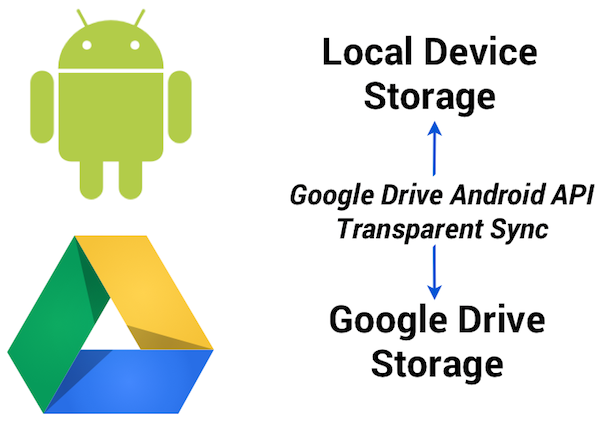
1. Transparent use and syncing of local storage
The Google Drive Android API temporarily uses a local data store in case the device is not connected to a network. So, no need to worry about failed API calls in your app because the user is offline or experiencing a network connectivity problem. Data stored locally in this fashion will automatically and transparently be stored in the Google Drive cloud by Android’s sync scheduler when connectivity is available to minimize impact on battery life, bandwidth, and other resources.
2. Designed for Android and available everywhere
The API was developed for Android and conforms to the latest Android design paradigms, such as using the new uniform client API GoogleAPIClient. And being part of the latest release of Google Play Services provides additional benefits:
- There’s minimal impact on the weight of your apps. As the client library is a stub to Google Play Services, incorporating the API has minimal impact on the size of your .apk binaries, resulting in faster downloads, fewer updates, and smaller execution footprint.
- User files are automatically synced between different devices (provided the app has the same namespace and is signed with the same key).
- Any device running the Gingerbread or later releases of Android and Google Play Services will automatically have support for the Google Drive Android API.
3. User interface components
File picker and creator user interface components are provided with this initial release of the Google Drive Android API, enabling users to select files and folders in Google Drive.
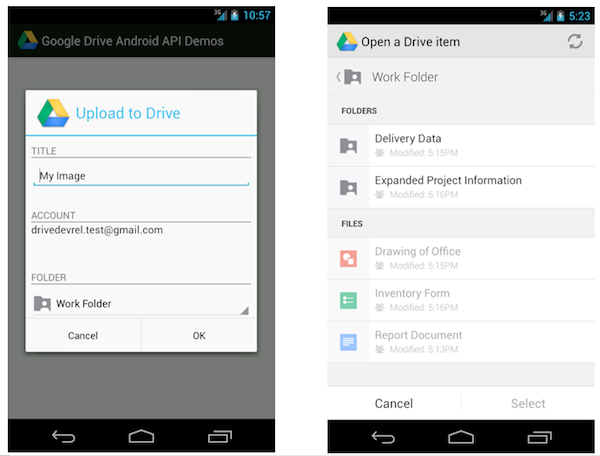
For example, the file picker is implemented as an Intent and allows you develop a native Android user experience with just a couple lines of code. This following code snippet launches the picker and allows the user to select a text file:
// Launch user interface and allow user to select file
    IntentSender i = Drive.DriveApi
        .newOpenFileActivityBuilder()
        .setMimeType(new String[] { “text/plain” })
        .build(mGoogleApiClient);
    startIntentSenderForResult(i, REQ_CODE_OPEN, null, 0, 0, 0);
The result is provided in the onActivityResult callback as usual.
4. Direct access to Drive functionality
You may be wondering how the Google Drive Android API relates to the Storage Access Framework released as part of Android 4.4 KitKat.
The Storage Access Framework is a generic client API that works with multiple storage providers, including cloud-based and local file systems. While apps can use files stored on Google Drive using this generic framework, the Google Drive API offers specialized functionality for interacting with files stored on Google Drive — including access to metadata and sharing features.
Additionally, as part of Google Play services the Google Drive APIs are supported on devices running Android 2.3 Gingerbread and above.
How to get started
As you incorporate the Google Drive Android API into your apps, we hope it makes your life a little bit easier, and enables you to create fun, powerful apps that take advantage of all that Android and Google Drive can do together.
For more information visit our documentation or explore our API demo and other sample applications on the official Google Drive GitHub repository.
Also check out the official launch video:
Let’s keep the discussions going on +GoogleDrive, and Stack Overflow (google-drive-sdk).
Magnus Hyttsten is a Developer Advocate on the Google Drive team. Beyond work, he enjoys trying out new technologies, thinking about product strategies, and exploring California.
Posted by Scott Knaster, Editor
Cross posted on the Google Developers Blog.
Introducing JavaScript Support for the Drive API
Did you know you can write a complete Google Drive App with JavaScript that runs completely in the web browser? You can! Your browser-based application, including Chrome extensions, can take advantage of our client library, or just use CORS requests to the API.
Your app can support all the functionality of the Drive API, including uploading files, downloading files, tracking changes, listing files and managing revisions. Also you can take advantage of our user interface components that make opening and sharing files easy.
We are really keen to offer first-class support to browser-based applications, so we have added JavaScript snippets to all our API reference documentation. Please let us know how we are doing by posting to Stack Overflow.
Want to try it out? Check out our Javascript Quickstart Guide, which helps you get your application up and running in five minutes or so.
 | Ali Afshar profile | twitter Tech Lead, Google Drive Developer Relations. As an eternal open source advocate, he contributes to a number of open source applications, and is the author of the PIDA Python IDE. Once an intensive care physician, he has a special interest in all aspects of technology for healthcare |
Monday, January 12, 2015
Creating and booting a UNetboootin live USB drive
- Connect a USB drive to a USB port on your PC. It should display UDISK in an AutoPlay window.

- Go to unetbootin.scourceforge.net, and then click Download (for Windows).

- Open your Downloads folder, double-click unetbootin-windows-578.exe, and then click Yes (in the User Account Control window) to display the UNetbootin window.

- Select Distribution, select a Linux distribution, such as Puppy Linux, and then click OK to download and install UNetbootin and create a live USB drive. Be patient, this takes time.


- After the installation completes, remove your live USB drive, and then click Reboot Now.

- Connect a USB drive to a USB port on your PC.
- Go to unetbootin.scourceforge.net, and then click Download (for Linux).
- Open your Downloads folder, right-click unetbootin-linux-578, click Properties, click Permissions, click the Allow executing file as a program checkbox, and then close the Properties window.

- Double-click unetbootin-linux-578, type your password, and then click OKto display the UNetbootin window.
- Select Diskimage, and then click the Select disk image filebox ( ... ) at the right.

- Click Computer, double-click the unlabeled folder, double-click Home, double-click your home-folder name (such as Dave), double-click Downloads, select an ISO file to install onto your live USB drive, and then click Open.
- On the UNetbootin window, click OK to install UNetbootin and create a live USB drive. Be patient, this takes time.


- After the installation completes, remove your live USB drive, and then click Reboot Now.
- Connect your live USB drive to a USB port on your PC.
- Boot according to the boot sequence on your particular PC. (Here are two possible examples: While your PC starts to boot, press F11 to display a Please select boot device window, and then select USB: UDB DISK. While your PC starts to boot, press F9to display a Boot Menu window, select Hard Disk, and then select USB-HDDO: UDB DISK 2.0 1.0.) Note: Write down the step-2 boot-sequence for your particular PC; you will need it each time you boot your live USB drive.
- Continue according to the Linux distribution that you have booted through your live USB drive.
Sunday, January 11, 2015
HOW TO DRAW A PANDA IMAGE FLASH DRIVE DESIGN IN MS WORD
TITLE: A PANDA IMAGE FLASH DRIVE DESIGN
TYPE: GRAPHIC DESIGN
